Package java.util.concurrent Description
Utility classes commonly useful in concurrent programming. This package includes a few small standardized extensible frameworks, as well as some classes that provide useful functionality and are otherwise tedious or difficult to implement. Here are brief descriptions of the main components. See also the java.util.concurrent.locks and java.util.concurrent.atomic packages.
Executors
Interfaces.
Executoris a simple standardized interface for defining custom thread-like subsystems, including thread pools, asynchronous I/O, and lightweight task frameworks. Depending on which concrete Executor class is being used, tasks may execute in a newly created thread, an existing task-execution thread, or the thread calling execute, and may execute sequentially or concurrently.
ExecutorService provides a more complete asynchronous task execution framework. An ExecutorService manages queuing and scheduling of tasks, and allows controlled shutdown.
The ScheduledExecutorService subinterface and associated interfaces add support for delayed and periodic task execution. ExecutorServices provide methods arranging asynchronous execution of any function expressed as Callable, the result-bearing analog of Runnable.
A Future returns the results of a function, allows determination of whether execution has completed, and provides a means to cancel execution.
A RunnableFuture is a Future that possesses a run method that upon execution, sets its results.
Implementations.
Classes ThreadPoolExecutorand ScheduledThreadPoolExecutorprovide tunable, flexible thread pools.
The Executors class provides factory methods for the most common kinds and configurations of Executors, as well as a few utility methods for using them. Other utilities based on Executors include the concrete class FutureTask providing a common extensible implementation of Futures, andExecutorCompletionService, that assists in coordinating the processing of groups of asynchronous tasks.
Class ForkJoinPool provides an Executor primarily designed for processing instances of ForkJoinTask and its subclasses. These classes employ a work-stealing scheduler that attains high throughput for tasks conforming to restrictions that often hold in computation-intensive parallel processing.
Queues
The ConcurrentLinkedQueue class supplies an efficient scalable thread-safe non-blocking FIFO queue. The ConcurrentLinkedDeque class is similar, but additionally supports the Deque interface.
Five implementations in java.util.concurrent support the extended BlockingQueue interface, that defines blocking versions of put and take:LinkedBlockingQueue, ArrayBlockingQueue, SynchronousQueue, PriorityBlockingQueue, and DelayQueue. The different classes cover the most common usage contexts for producer-consumer, messaging, parallel tasking, and related concurrent designs.
Extended interface TransferQueue, and implementation LinkedTransferQueueintroduce a synchronous transfer method (along with related features) in which a producer may optionally block awaiting its consumer.
The BlockingDeque interface extends BlockingQueue to support both FIFO and LIFO (stack-based) operations. Class LinkedBlockingDeque provides an implementation.
Timing
The TimeUnit class provides multiple granularities (including nanoseconds) for specifying and controlling time-out based operations. Most classes in the package contain operations based on time-outs in addition to indefinite waits. In all cases that time-outs are used, the time-out specifies the minimum time that the method should wait before indicating that it timed-out. Implementations make a “best effort” to detect time-outs as soon as possible after they occur. However, an indefinite amount of time may elapse between a time-out being detected and a thread actually executing again after that time-out. All methods that accept timeout parameters treat values less than or equal to zero to mean not to wait at all. To wait “forever”, you can use a value of Long.MAX_VALUE.
Synchronizers
Five classes aid common special-purpose synchronization idioms.
Semaphore is a classic concurrency tool.CountDownLatch is a very simple yet very common utility for blocking until a given number of signals, events, or conditions hold.- A
CyclicBarrier is a resettable multiway synchronization point useful in some styles of parallel programming.
- A
Phaser provides a more flexible form of barrier that may be used to control phased computation among multiple threads.
- An
Exchanger allows two threads to exchange objects at a rendezvous point, and is useful in several pipeline designs.
Concurrent Collections
Besides Queues, this package supplies Collection implementations designed for use in multithreaded contexts: ConcurrentHashMap,ConcurrentSkipListMap, ConcurrentSkipListSet, CopyOnWriteArrayList and CopyOnWriteArraySet. When many threads are expected to access a given collection, a ConcurrentHashMap is normally preferable to a synchronized HashMap, and a ConcurrentSkipListMap is normally preferable to a synchronized TreeMap. A CopyOnWriteArrayList is preferable to a synchronized ArrayList when the expected number of reads and traversals greatly outnumber the number of updates to a list.
The “Concurrent” prefix used with some classes in this package is a shorthand indicating several differences from similar “synchronized” classes. For example java.util.Hashtable and Collections.synchronizedMap(new HashMap()) are synchronized. But ConcurrentHashMapis “concurrent”. A concurrent collection is thread-safe, but not governed by a single exclusion lock. In the particular case of ConcurrentHashMap, it safely permits any number of concurrent reads as well as a tunable number of concurrent writes. “Synchronized” classes can be useful when you need to prevent all access to a collection via a single lock, at the expense of poorer scalability. In other cases in which multiple threads are expected to access a common collection, “concurrent” versions are normally preferable. And unsynchronized collections are preferable when either collections are unshared, or are accessible only when holding other locks.
Most concurrent Collection implementations (including most Queues) also differ from the usual java.util conventions in that their Iterators and Spliterators provide weakly consistent rather than fast-fail traversal:
- they may proceed concurrently with other operations
- they will never throw
ConcurrentModificationException
- they are guaranteed to traverse elements as they existed upon construction exactly once, and may (but are not guaranteed to) reflect any modifications subsequent to construction.
Memory Consistency Properties
Chapter 17 of the Java Language Specification defines the happens-before relation on memory operations such as reads and writes of shared variables. The results of a write by one thread are guaranteed to be visible to a read by another thread only if the write operation happens-before the read operation. The synchronized and volatile constructs, as well as the Thread.start() and Thread.join() methods, can form happens-before relationships. In particular:
- Each action in a thread happens-before every action in that thread that comes later in the program’s order.
- An unlock (
synchronized block or method exit) of a monitor happens-before every subsequent lock (synchronized block or method entry) of that same monitor. And because the happens-before relation is transitive, all actions of a thread prior to unlocking happen-before all actions subsequent to any thread locking that monitor.
- A write to a
volatile field happens-before every subsequent read of that same field. Writes and reads of volatile fields have similar memory consistency effects as entering and exiting monitors, but do not entail mutual exclusion locking.
- A call to
start on a thread happens-before any action in the started thread.
- All actions in a thread happen-before any other thread successfully returns from a
join on that thread.
The methods of all classes in java.util.concurrent and its subpackages extend these guarantees to higher-level synchronization. In particular:
-
Actions in a thread prior to placing an object into any concurrent collection happen-before actions subsequent to the access or removal of that element from the collection in another thread.
-
Actions in a thread prior to the submission of a Runnable to an Executor happen-before its execution begins. Similarly for Callables submitted to an ExecutorService.
-
Actions taken by the asynchronous computation represented by a Future happen-before actions subsequent to the retrieval of the result via Future.get() in another thread.
-
Actions prior to “releasing” synchronizer methods such as Lock.unlock, Semaphore.release, and CountDownLatch.countDown happen-before actions subsequent to a successful “acquiring” method such as Lock.lock, Semaphore.acquire, Condition.await, and CountDownLatch.awaiton the same synchronizer object in another thread.
-
For each pair of threads that successfully exchange objects via an Exchanger, actions prior to the exchange() in each thread happen-before those subsequent to the corresponding exchange() in another thread.
-
Actions prior to calling CyclicBarrier.await and Phaser.awaitAdvance (as well as its variants) happen-before actions performed by the barrier action, and actions performed by the barrier action happen-before actions subsequent to a successful return from the corresponding await in other threads.
-
Since:
1.5
Unsafe
JDK的rt.jar包中的Unsafe类提供了硬件级别的原子性操作,Unsafe类中的方法都是native方法,它们使用JNI的方式访问本地C++实现库。
 1
 2
 3
 4
 5
 6
 7
 8
 9
10
11
12
13
14
15
16
17
18
19
20
|
public class TestUnsafe {
    static final Unsafe unsafe = Unsafe.getUnsafe();
    static final long stateOffset;
    private volatile long state = 0;

    static {
        try {
            stateOffset = unsafe.objectFieldOffset(TestUnsafe.class.getDeclaredField("state"));
        } catch (Exception e) {
            System.out.println(e.getLocalizedMessage());
            throw new Error(e);
        }
    }

    public static void main(String[] args) {
        TestUnsafe test = new TestUnsafe();
        boolean success = unsafe.compareAndSwapInt(test, stateOffset, 0, 1);
        System.out.println(success);
    }
}
|
Exception in thread “main” java.lang.ExceptionInInitializerError
Caused by: java.lang.SecurityException: Unsafe
at sun.misc.Unsafe.getUnsafe(Unsafe.java:90)
at chapter01.TestUnsafe.(TestUnsafe.java:6)
Unsafe源码:
 1
 2
 3
 4
 5
 6
 7
 8
 9
10
11
12
13
14
15
16
17
|
private static final Unsafe theUnsafe = new Unsafe();

@CallerSensitive
public static Unsafe getUnsafe() {
    Class<?> caller = Reflection.getCallerClass();
    if (!VM.isSystemDomainLoader(caller.getClassLoader()))
        throw new SecurityException("Unsafe");
    return theUnsafe;
}

/**
 * Returns true if the given class loader is in the system domain
 * in which all permissions are granted.
 */
public static boolean isSystemDomainLoader(ClassLoader loader) {
    return loader == null;
}
|
上述代码判断是不是Bootstrap类加载器加载的localClass,在这里是看是不是Bootstrap加载器加载了TestUnSafe.class。很明显由于TestUnSafe.class是使用AppClassLoader加载的,所以这里直接抛出了异常。
Unsafe类是rt.jar包提供的,rt.jar包里面的类是使用Bootstrap类加载器加载的,而我们的启动main函数所在的类是使用AppClassLoader加载的,所以在main函数里面加载Unsafe类时,根据委托机制,会委托给Bootstrap去加载Unsafe类。
如果没有这个限制,那么应用程序就可以随意使用Unsafe做事情了,而Unsafe类可以直接操作内存,这是不安全的,所以JDK开发组特意做了这个限制,不让开发人员在正规渠道使用Unsafe类,而是在rt.jar包里面的核心类中使用Unsafe功能。
解决方法:使用万能的反射来获取Unsafe实例方法。
 1
 2
 3
 4
 5
 6
 7
 8
 9
10
11
12
13
14
15
16
17
18
19
20
21
22
23
24
|
public class TestUnsafe {
    static final Unsafe unsafe;
    static final long stateOffset;
    private volatile long state = 0;

    static {
        try {
            //使用反射获取Unsafe的成员变量theUnsafe
            Field field = Unsafe.class.getDeclaredField("theUnsafe");
            field.setAccessible(true);
            unsafe = (Unsafe) field.get(null);
            stateOffset = unsafe.objectFieldOffset(TestUnsafe.class.getDeclaredField("state"));
        } catch (Exception e) {
            System.out.println(e.getLocalizedMessage());
            throw new Error(e);
        }
    }

    public static void main(String[] args) {
        TestUnsafe test = new TestUnsafe();
        boolean success = unsafe.compareAndSwapInt(test, stateOffset, 0, 1);
        System.out.println(success);
    }
}
|
true
线程池
- 工作者线程:工作者线程主体就是一个循环,循环从队列中接受任务并执行
- 任务队列:任务队列保存待执行的任务
interface Executor
Executor表示最简单的执行服务,其定义为:
 1
 2
 3
 4
 5
 6
 7
 8
 9
10
11
12
13
14
|
public interface Executor {

    /**
     * Executes the given command at some time in the future.  The command
     * may execute in a new thread, in a pooled thread, or in the calling
     * thread, at the discretion of the {@code Executor} implementation.
     *
     * @param command the runnable task
     * @throws RejectedExecutionException if this task cannot be
     * accepted for execution
     * @throws NullPointerException if command is null
     */
    void execute(Runnable command);
}
|
void execute(Runnable command);可以执行一个Runnable,没有返回结果。
接口没有限定任务如何执行,可能是创建一个新线程,可能是在调用者线程中执行,也可能是复用线程池中的某个线程。
Executor:
An object that executes submitted Runnable tasks. This interface provides a way of decoupling task submission from the mechanics of how each task will be run, including details of thread use, scheduling, etc.
新线程:
An Executor is normally used instead of explicitly creating threads. For example, rather than invoking new Thread(new(RunnableTask())).start() for each of a set of tasks, you might use:
1
2
3
4
|
 Executor executor = anExecutor;
 executor.execute(new RunnableTask1());
 executor.execute(new RunnableTask2());
 ...
|
调用者线程:
However, the Executor interface does not strictly require that execution be asynchronous. In the simplest case, an executor can run the submitted task immediately in the caller's thread:
1
2
3
4
5
|
 class DirectExecutor implements Executor {
   public void execute(Runnable r) {
     r.run();
   }
 }
|
线程池:
More typically, tasks are executed in some thread other than the caller’s thread. The executor below spawns a new thread for each task.
1
2
3
4
5
|
 class ThreadPerTaskExecutor implements Executor {
   public void execute(Runnable r) {
     new Thread(r).start();
   }
 }
|
Many Executor implementations impose some sort of limitation on how and when tasks are scheduled. The executor below serializes the submission of tasks to a second executor, illustrating a composite executor.
 1
 2
 3
 4
 5
 6
 7
 8
 9
10
11
12
13
14
15
16
17
18
19
20
21
22
23
24
25
26
27
28
29
30
|
 class SerialExecutor implements Executor {
   final Queue<Runnable> tasks = new ArrayDeque<Runnable>();
   final Executor executor;
   Runnable active;

   SerialExecutor(Executor executor) {
     this.executor = executor;
   }

   public synchronized void execute(final Runnable r) {
     tasks.offer(new Runnable() {
       public void run() {
         try {
           r.run();
         } finally {
           scheduleNext();
         }
       }
     });
     if (active == null) {
       scheduleNext();
     }
   }

   protected synchronized void scheduleNext() {
     if ((active = tasks.poll()) != null) {
       executor.execute(active);
     }
   }
 }
|
The Executor implementations provided in this package implement ExecutorService, which is a more extensive interface.
1
|
public interface ExecutorService extends Executor
|
The ThreadPoolExecutor class provides an extensible thread pool implementation.
The Executors class provides convenient factory methods for these Executors.
Memory consistency effects: Actions in a thread prior to submitting a Runnable object to an Executor happen-before its execution begins, perhaps in another thread.
interface ExecutorService extends Executor
ExecutorService扩展了Executor,定义了更多服务,基本方法有:
1
2
3
4
5
6
|
public interface ExecutorService extends Executor {
  <T> Future<T> submit(Callable<T> task);
  <T> Future<T> submit(Runnable task, T result);
  Future<?> submit(Runnable task);
  ...
}
|
这三个submit都表示提交一个任务,返回值类型都是Future。
返回后,只是表示任务已提交,不代表已执行。
通过Future可以查询异步任务的状态、获取最终结果、取消任务等。
<T> Future<T> submit(Callable<T> task);
Submits a value-returning task for execution and returns a Future representing the pending results of the task. The Future’s get method will return the task’s result upon successful completion.
对于Callable,任务最终有个返回值
If you would like to immediately block waiting for a task, you can use constructions of the form result = exec.submit(aCallable).get();
Note: The Executorsclass includes a set of methods that can convert some other common closure-like objects, for example, PrivilegedActionto Callable form so they can be submitted.
<T> Future<T> submit(Runnable task, T result);
Submits a Runnable task for execution and returns a Future representing that task. The Future’s get method will return the given result upon successful completion.
提交Runnable的方法可以同时提供一个结果,在异步任务结束时返回
Future<?> submit(Runnable task);
Submits a Runnable task for execution and returns a Future representing that task. The Future’s get method will return null upon successful completion.
异步任务的最终返回值为null
关闭线程池
- shutdown:将线程池的状态设置成
SHUTDOWN状态,然后中断所有没有正在执行任务的线程。
- shutdownNow:首先将线程池的状态设置成
STOP,然后尝试停止所有的正在执行或暂停任务的线程,并返回等待执行任务的列表。
它们的原理是遍历线程池中的工作线程,然后逐个调用线程的interrupt方法来中断线程,所以无法响应中断的任务可能永远无法终止。
void shutdown();注释:
Initiates an orderly shutdown in which previously submitted tasks are executed, but no new tasks will be accepted. Invocation has no additional effect if already shut down.
This method does not wait for previously submitted tasks to complete execution. Use awaitTermination to do that.
List<Runnable> shutdownNow();注释:
Attempts to stop all actively executing tasks, halts the processing of waiting tasks, and returns a list of the tasks that were awaiting execution.
This method does not wait for actively executing tasks to terminate. Use awaitTerminationto do that.
There are no guarantees beyond best-effort attempts to stop processing actively executing tasks. For example, typical implementations will cancel via Thread.interrupt(), so any task that fails to respond to interrupts may never terminate.
Returns:
list of tasks that never commenced execution
shutdown和shutdownNow不会阻塞等待,它们返回后不代表所有任务都已结束,不过isShutdown方法会返回true。
调用者可以通过awaitTermination等待所有任务结束,它可以限定等待的时间,如果超时前所有任务都结束了,即isTerminated方法返回true,则返回true,否则返回false。
ExecutorService有两组批量提交任务的方法:invokeAll和invokeAny,它们都有两个版本,其中一个限定等待时间。
invokeAll等待所有任务完成,返回的Future列表中,每个Future的isDone方法都返回true,不过isDone为true不代表任务就执行成功了,可能是被取消了。invokeAll可以指定等待时间,如果超时后有的任务没完成,就会被取消。
而对于invokeAny,只要有一个任务在限时内成功返回了,它就会返回该任务的结果,其他任务会被取消;如果没有任务能在限时内成功返回,抛出TimeoutException;如果限时内所有任务都结束了,但都发生了异常,抛出ExecutionException。
abstract class AbstractExecutorService implements ExecutorService
class ThreadPoolExecutor extends AbstractExecutorService
JUC中线程池的实现类是ThreadPoolExecutor,它继承自AbstractExecutorService,实现了ExecutorService。
Creates a new ThreadPoolExecutor with the given initial parameters and default thread factory and rejected execution handler. It may be more convenient to use one of the Executors factory methods instead of this general purpose constructor.
1
2
3
4
5
6
7
8
|
public ThreadPoolExecutor(int corePoolSize,
                          int maximumPoolSize,
                          long keepAliveTime,
                          TimeUnit unit,
                          BlockingQueue<Runnable> workQueue) {
  this(corePoolSize, maximumPoolSize, keepAliveTime, unit, workQueue,
       Executors.defaultThreadFactory(), defaultHandler);
}
|
Creates a new ThreadPoolExecutor with the given initial parameters and default rejected execution handler.
1
2
3
4
5
6
7
8
9
|
public ThreadPoolExecutor(int corePoolSize,
                          int maximumPoolSize,
                          long keepAliveTime,
                          TimeUnit unit,
                          BlockingQueue<Runnable> workQueue,
                          ThreadFactory threadFactory) {
  this(corePoolSize, maximumPoolSize, keepAliveTime, unit, workQueue,
       threadFactory, defaultHandler);
}
|
Creates a new ThreadPoolExecutor with the given initial parameters and default thread factory.
1
2
3
4
5
6
7
8
9
|
public ThreadPoolExecutor(int corePoolSize,
                          int maximumPoolSize,
                          long keepAliveTime,
                          TimeUnit unit,
                          BlockingQueue<Runnable> workQueue,
                          RejectedExecutionHandler handler) {
  this(corePoolSize, maximumPoolSize, keepAliveTime, unit, workQueue,
       Executors.defaultThreadFactory(), handler);
}
|
Creates a new ThreadPoolExecutor with the given initial parameters.
 1
 2
 3
 4
 5
 6
 7
 8
 9
10
11
12
13
14
15
16
17
18
19
20
21
22
23
24
|
public ThreadPoolExecutor(int corePoolSize,
                          int maximumPoolSize,
                          long keepAliveTime,
                          TimeUnit unit,
                          BlockingQueue<Runnable> workQueue,
                          ThreadFactory threadFactory,
                          RejectedExecutionHandler handler) {
  if (corePoolSize < 0 ||
      maximumPoolSize <= 0 ||
      maximumPoolSize < corePoolSize ||
      keepAliveTime < 0)
    throw new IllegalArgumentException();
  if (workQueue == null || threadFactory == null || handler == null)
    throw new NullPointerException();
  this.acc = System.getSecurityManager() == null ?
    null :
  AccessController.getContext();
  this.corePoolSize = corePoolSize;
  this.maximumPoolSize = maximumPoolSize;
  this.workQueue = workQueue;
  this.keepAliveTime = unit.toNanos(keepAliveTime);
  this.threadFactory = threadFactory;
  this.handler = handler;
}
|
corePoolSize - the number of threads to keep in the pool, even if they are idle, unless allowCoreThreadTimeOut is set
corePoolSize(线程池的基本大小):当提交一个任务到线程池时,线程池会创建一个线程来执行任务,即使其他空闲的基本线程能够执行新任务也会创建线程,等到需要执行的任务数大于线程池基本大小时就不再创建。如果调用了线程池的prestartAllCoreThreads()方法,线程池会提前创建并启动所有基本线程。
maximumPoolSize - the maximum number of threads to allow in the pool
maximumPoolSize(线程池最大数量):线程池允许创建的最大线程数。如果队列满了,并且已创建的线程数小于最大线程数,则线程池会再创建新的线程执行任务。值得注意的是,如果使用了无界的任务队列这个参数就没什么效果。
keepAliveTime - when the number of threads is greater than the core, this is the maximum time that excess idle threads will wait for new tasks before terminating.
unit - the time unit for the keepAliveTime argument
workQueue - the queue to use for holding tasks before they are executed. This queue will hold only the Runnable tasks submitted by the execute method.
-
ArrayBlockingQueue:基于数组结构的有界阻塞队列,此队列按FIFO(先进先出)原则对元素进行排序。
-
LinkedBlockingQueue:基于链表结构的阻塞队列,此队列按FIFO排序元素,吞吐量通常要高于ArrayBlockingQueue。
静态工厂方法Executors.newFixedThreadPool()使用了这个队列。
-
SynchronousQueue:一个不存储元素的阻塞队列。每个插入操作必须等到另一个线程调用移除操作,否则插入操作一直处于阻塞状态,吞吐量通常要高于Linked-BlockingQueue。
静态工厂方法Executors.newCachedThreadPool()使用了这个队列。
-
PriorityBlockingQueue:一个具有优先级的无限阻塞队列。
threadFactory - the factory to use when the executor creates a new thread
handler - the handler to use when execution is blocked because the thread bounds and queue capacities are reached
ThreadPoolExecutor执行execute方法分下面4种情况。
1)如果当前运行的线程少于corePoolSize,则创建新线程来执行任务(注意,执行这一步骤需要获取全局锁)。
2)如果运行的线程等于或多于corePoolSize,则将任务加入BlockingQueue。
3)如果无法将任务加入BlockingQueue(队列已满),则创建新的线程来处理任务(注意,执行这一步骤需要获取全局锁)。
4)如果创建新线程将使当前运行的线程超出maximumPoolSize,任务将被拒绝,并调用RejectedExecutionHandler.rejectedExecution()方法。
RejectedExecutionHandler.rejectedExecution
任务拒绝策略
1
2
3
4
5
|
/**
 * The default rejected execution handler
 */
private static final RejectedExecutionHandler defaultHandler =
    new AbortPolicy();
|
默认情况下,提交任务的方法(如execute/submit/invokeAll等)会抛出异常,类型为RejectedExecutionException。
不过,拒绝策略是可以自定义的,ThreadPoolExecutor实现了4种处理方式。
1)ThreadPoolExecutor.AbortPolicy:这就是默认的方式,抛出异常。
 1
 2
 3
 4
 5
 6
 7
 8
 9
10
11
12
13
14
15
16
17
18
19
20
21
22
23
|
/**
 * A handler for rejected tasks that throws a
 * {@code RejectedExecutionException}.
 */
public static class AbortPolicy implements RejectedExecutionHandler {
    /**
     * Creates an {@code AbortPolicy}.
     */
    public AbortPolicy() { }

    /**
     * Always throws RejectedExecutionException.
     *
     * @param r the runnable task requested to be executed
     * @param e the executor attempting to execute this task
     * @throws RejectedExecutionException always
     */
    public void rejectedExecution(Runnable r, ThreadPoolExecutor e) {
        throw new RejectedExecutionException("Task " + r.toString() +
                                             " rejected from " +
                                             e.toString());
    }
}
|
2)ThreadPoolExecutor.DiscardPolicy:静默处理,忽略新任务,不抛出异常,也不执行。
 1
 2
 3
 4
 5
 6
 7
 8
 9
10
11
12
13
14
15
16
17
18
19
|
/**
 * A handler for rejected tasks that silently discards the
 * rejected task.
 */
public static class DiscardPolicy implements RejectedExecutionHandler {
    /**
     * Creates a {@code DiscardPolicy}.
     */
    public DiscardPolicy() { }

    /**
     * Does nothing, which has the effect of discarding task r.
     *
     * @param r the runnable task requested to be executed
     * @param e the executor attempting to execute this task
     */
    public void rejectedExecution(Runnable r, ThreadPoolExecutor e) {
    }
}
|
3)ThreadPoolExecutor.DiscardOldestPolicy:将等待时间最长的任务扔掉,然后自己排队。
 1
 2
 3
 4
 5
 6
 7
 8
 9
10
11
12
13
14
15
16
17
18
19
20
21
22
23
24
25
26
27
|
/**
 * A handler for rejected tasks that discards the oldest unhandled
 * request and then retries {@code execute}, unless the executor
 * is shut down, in which case the task is discarded.
 */
public static class DiscardOldestPolicy implements RejectedExecutionHandler {
    /**
     * Creates a {@code DiscardOldestPolicy} for the given executor.
     */
    public DiscardOldestPolicy() { }

    /**
     * Obtains and ignores the next task that the executor
     * would otherwise execute, if one is immediately available,
     * and then retries execution of task r, unless the executor
     * is shut down, in which case task r is instead discarded.
     *
     * @param r the runnable task requested to be executed
     * @param e the executor attempting to execute this task
     */
    public void rejectedExecution(Runnable r, ThreadPoolExecutor e) {
        if (!e.isShutdown()) {
            e.getQueue().poll();
            e.execute(r);
        }
    }
}
|
4)ThreadPoolExecutor.CallerRunsPolicy:在任务提交者线程中执行任务,而不是交给线程池中的线程执行。
 1
 2
 3
 4
 5
 6
 7
 8
 9
10
11
12
13
14
15
16
17
18
19
20
21
22
23
24
25
|
/**
 * A handler for rejected tasks that runs the rejected task
 * directly in the calling thread of the {@code execute} method,
 * unless the executor has been shut down, in which case the task
 * is discarded.
 */
public static class CallerRunsPolicy implements RejectedExecutionHandler {
    /**
     * Creates a {@code CallerRunsPolicy}.
     */
    public CallerRunsPolicy() { }

    /**
     * Executes task r in the caller's thread, unless the executor
     * has been shut down, in which case the task is discarded.
     *
     * @param r the runnable task requested to be executed
     * @param e the executor attempting to execute this task
     */
    public void rejectedExecution(Runnable r, ThreadPoolExecutor e) {
        if (!e.isShutdown()) {
            r.run();
        }
    }
}
|
它们都是ThreadPoolExecutor的public静态内部类,都实现了RejectedExecutionHandler接口。
拒绝策略只有在队列有界,且maximumPoolSize有限的情况下才会触发。
如果
- 队列无界:服务不了的任务总是会排队,请求处理队列可能会消耗非常大的内存,甚至引发内存不够的异常。
- 队列有界但maximumPoolSize无限:可能会创建过多的线程,占满CPU和内存,使得任何任务都难以完成。
所以,在任务量非常大的场景中,让拒绝策略有机会执行是保证系统稳定运行很重要的方面。
核心线程
线程个数小于等于corePoolSize时,我们称这些线程为核心线程,默认情况下。
class Executors 工厂类
ThreadPoolExecutor通常使用工厂类Executors来创建。Executors可以创建3种类型的ThreadPoolExecutor:FixedThreadPool、SingleThreadExecutor和CachedThreadPool。
类Executors提供了一些静态工厂方法,可以方便地创建一些预配置的线程池:
1
2
3
4
5
|
public static ExecutorService newFixedThreadPool(int nThreads) {
    return new ThreadPoolExecutor(nThreads, nThreads,
                                  0L, TimeUnit.MILLISECONDS,
                                  new LinkedBlockingQueue<Runnable>());
}
|
Creates a thread pool that reuses a fixed number of threads operating off a shared unbounded queue. At any point, at most nThreads threads will be active processing tasks. If additional tasks are submitted when all threads are active, they will wait in the queue until a thread is available. If any thread terminates due to a failure during execution prior to shutdown, a new one will take its place if needed to execute subsequent tasks. The threads in the pool will exist until it is explicitly shutdown.
使用固定数目的n个线程,使用无界队列LinkedBlockingQueue,线程创建后不会超时终止。和newSingleThreadExecutor一样,由于是无界队列,如果排队任务过多,可能会消耗过多的内存。
FixedThreadPool适用于为了满足资源管理的需求,而需要限制当前线程数量的应用场景,它适用于负载比较重的服务器。
1
2
3
4
5
6
|
public static ExecutorService newSingleThreadExecutor() {
    return new FinalizableDelegatedExecutorService
        (new ThreadPoolExecutor(1, 1,
                                0L, TimeUnit.MILLISECONDS,
                                new LinkedBlockingQueue<Runnable>()));
}
|
Creates an Executor that uses a single worker thread operating off an unbounded queue. (Note however that if this single thread terminates due to a failure during execution prior to shutdown, a new one will take its place if needed to execute subsequent tasks.) Tasks are guaranteed to execute sequentially, and no more than one task will be active at any given time. Unlike the otherwise equivalent newFixedThreadPool(1) the returned executor is guaranteed not to be reconfigurable to use additional threads.
只使用一个线程,使用无界队列LinkedBlockingQueue,线程创建后不会超时终止,该线程顺序执行所有任务。该线程池适用于需要确保所有任务被顺序执行的场合。
SingleThreadExecutor适用于需要保证顺序地执行各个任务;并且在任意时间点,不会有多个线程是活动的应用场景。
1
2
3
4
5
|
public static ExecutorService newCachedThreadPool() {
    return new ThreadPoolExecutor(0, Integer.MAX_VALUE,
                                  60L, TimeUnit.SECONDS,
                                  new SynchronousQueue<Runnable>());
}
|
Creates a thread pool that creates new threads as needed, but will reuse previously constructed threads when they are available. These pools will typically improve the performance of programs that execute many short-lived asynchronous tasks. Calls to execute will reuse previously constructed threads if available. If no existing thread is available, a new thread will be created and added to the pool. Threads that have not been used for sixty seconds are terminated and removed from the cache. Thus, a pool that remains idle for long enough will not consume any resources. Note that pools with similar properties but different details (for example, timeout parameters) may be created using ThreadPoolExecutor constructors.
它的corePoolSize为0, maximumPoolSize为Integer.MAⅩ_VALUE, keepAliveTime是60秒,队列为SynchronousQueue。它的含义是:当新任务到来时,如果正好有空闲线程在等待任务,则其中一个空闲线程接受该任务,否则就总是创建一个新线程,创建的总线程个数不受限制,对任一空闲线程,如果60秒内没有新任务,就终止。
CachedThreadPool是大小无界的线程池,适用于执行很多的短期异步任务的小程序,或者是负载较轻的服务器。
FutureTask
 1
 2
 3
 4
 5
 6
 7
 8
 9
10
11
|
public class FutureTask<V> implements RunnableFuture<V> {

}

public interface RunnableFuture<V> extends Runnable, Future<V> {
    /**
     * Sets this Future to the result of its computation
     * unless it has been cancelled.
     */
    void run();
}
|
CompletableFuture
从Java8开始引入了CompletableFuture,它是Future的功能增强版,可以传入回调对象,当异步任务完成或者发生异常时,自动调用回调对象的回调方法。
 1
 2
 3
 4
 5
 6
 7
 8
 9
10
11
12
13
14
15
16
17
18
19
20
21
22
23
24
25
26
27
28
29
30
31
32
33
|
public class CompletableFutureDemo3 {
    public static void main(String[] args) throws Exception {
        CompletableFuture<Integer> completableFuture = CompletableFuture.supplyAsync(() -> {
            System.out.println(Thread.currentThread().getName() + "\t" + "-----come in");
            int result = ThreadLocalRandom.current().nextInt(10);
            //暂停几秒钟线程
            try {
                TimeUnit.SECONDS.sleep(1);
            } catch (InterruptedException e) {
                e.printStackTrace();
            }
            System.out.println("-----计算结束耗时1秒钟,result: " + result);
            if (result > 6) {
                int age = 10 / 0;
            }
            return result;
        }).whenComplete((v, e) -> {
            if (e == null) {
                System.out.println("-----result: " + v);
            }
        }).exceptionally(e -> {
            System.out.println("-----exception: " + e.getCause() + "\t" + e.getMessage());
            return -44;
        });

        //主线程不要立刻结束,否则CompletableFuture默认使用的线程池会立刻关闭:暂停3秒钟线程
        try {
            TimeUnit.SECONDS.sleep(3);
        } catch (InterruptedException e) {
            e.printStackTrace();
        }
    }
}
|
whenComplete:
ForkJoinPool.commonPool-worker-1 —–come in
—–计算结束耗时1秒钟,result: 4
—–result: 4
exceptionally:
ForkJoinPool.commonPool-worker-1 —–come in
—–计算结束耗时1秒钟,result: 9
—–exception: java.lang.ArithmeticException: / by zero java.lang.ArithmeticException: / by zero
CompletableFuture的优点:
异步任务结束时,会自动回调某个对象的方法;
异步任务出错时,会自动回调某个对象的方法;
主线程设置好回调后,不再关心异步任务的执行,异步任务之间可以顺序执行。
案例——电商网站的比价
切记,功能→性能
 1
 2
 3
 4
 5
 6
 7
 8
 9
10
11
12
13
14
15
16
17
18
19
20
21
22
23
24
25
26
27
28
29
30
31
32
33
34
35
36
37
38
39
40
41
42
43
44
45
46
47
48
49
50
51
52
53
54
55
56
57
58
59
60
61
62
63
64
65
66
|
public class T1 {
    static List<NetMall> list = Arrays.asList(
            new NetMall("jd"),
            new NetMall("tmall"),
            new NetMall("pdd"),
            new NetMall("mi")
    );

    public static List<String> findPriceSync(List<NetMall> list, String productName) {
        return list.stream()
                .map(mall -> String.format(productName + " %s price is %.2f", mall.getNetMallName(), mall.getPriceByName(productName)))
                .collect(Collectors.toList());
    }

    public static List<String> findPriceASync(List<NetMall> list, String productName) {
        return list.stream()
                .map(mall -> CompletableFuture.supplyAsync(() -> String.format(productName + " %s price is %.2f", mall.getNetMallName(), mall.getPriceByName(productName))))
                .collect(Collectors.toList())
                .stream()
                .map(CompletableFuture::join)
                .collect(Collectors.toList());
    }

    public static void main(String[] args) {
        long startTime = System.currentTimeMillis();
        List<String> list1 = findPriceSync(list, "thinking in java");
        for (String element : list1) {
            System.out.println(element);
        }
        long endTime = System.currentTimeMillis();
        System.out.println("----costTime: " + (endTime - startTime) + " 毫秒");

        long startTime2 = System.currentTimeMillis();
        List<String> list2 = findPriceASync(list, "thinking in java");
        for (String element : list2) {
            System.out.println(element);
        }
        long endTime2 = System.currentTimeMillis();
        System.out.println("----costTime: " + (endTime2 - startTime2) + " 毫秒");
    }
}

class NetMall {
    private String netMallName;

    public String getNetMallName() {
        return netMallName;
    }

    public NetMall(String netMallName) {
        this.netMallName = netMallName;
    }

    public double getPriceByName(String productName) {
        return calcPrice(productName);
    }

    private double calcPrice(String productName) {
        try {
            TimeUnit.SECONDS.sleep(1);
        } catch (InterruptedException e) {
            e.printStackTrace();
        }
        return ThreadLocalRandom.current().nextDouble() + productName.charAt(0);
    }
}
|
运行结果:
thinking in java jd price is 116.41
thinking in java tmall price is 116.65
thinking in java pdd price is 116.76
thinking in java mi price is 116.53
—-costTime: 4082 毫秒
thinking in java jd price is 116.42
thinking in java tmall price is 116.28
thinking in java pdd price is 116.06
thinking in java mi price is 116.68
—-costTime: 1008 毫秒
CompletableFuture常用方法
获得结果和触发计算
获得结果:
1
2
3
4
5
|
public T get() throws InterruptedException, ExecutionException {
    Object r;
    return reportGet((r = result) == null ? waitingGet(true) : r);
}
Waits if necessary for this future to complete, and then returns its result.
|
1
2
3
4
5
6
7
|
public T get(long timeout, TimeUnit unit)
    throws InterruptedException, ExecutionException, TimeoutException {
    Object r;
    long nanos = unit.toNanos(timeout);
    return reportGet((r = result) == null ? timedGet(nanos) : r);
}
Waits if necessary for at most the given time for this future to complete, and then returns its result, if available.
|
示例:
 1
 2
 3
 4
 5
 6
 7
 8
 9
10
11
12
13
14
15
16
17
18
19
20
21
22
|
public class CompletableFutureDemo2 {
    public static void main(String[] args) throws ExecutionException, InterruptedException {
        CompletableFuture<Integer> completableFuture = CompletableFuture.supplyAsync(() -> {
            try {
                TimeUnit.SECONDS.sleep(1);
            } catch (InterruptedException e) {
                e.printStackTrace();
            }
            return 533;
        });

        //去掉等待时间上面计算没有完成,返回valueIfAbsent:444
        //开启等待时间上面计算完成,返回计算结果533
        try {
            TimeUnit.SECONDS.sleep(2);
        } catch (InterruptedException e) {
            e.printStackTrace();
        }

        System.out.println(completableFuture.getNow(444));
    }
}
|
主动触发计算:
1
2
3
4
5
6
|
public boolean complete(T value) {
    boolean triggered = completeValue(value);
    postComplete();
    return triggered;
}
If not already completed, sets the value returned by get() and related methods to the given value.
|
示例:
 1
 2
 3
 4
 5
 6
 7
 8
 9
10
11
12
13
14
15
16
17
18
19
20
21
22
|
public class CompletableFutureDemo2 {
    public static void main(String[] args) throws ExecutionException, InterruptedException {
        CompletableFuture<Integer> completableFuture = CompletableFuture.supplyAsync(() -> {
            try {
                TimeUnit.SECONDS.sleep(1);
            } catch (InterruptedException e) {
                e.printStackTrace();
            }
            return 533;
        });

        //注释掉暂停时间,get还没有算完只能返回complete方法设置的444;暂停2秒钟,异步线程能够计算完成返回get
        try {
            TimeUnit.SECONDS.sleep(2);
        } catch (InterruptedException e) {
            e.printStackTrace();
        }

        //当调用CompletableFuture.get()被阻塞的时候,complete方法就是结束阻塞并get()获取设置的complete里面的值.
        System.out.println(completableFuture.complete(444) + "\t" + completableFuture.get());
    }
}
|
运行结果:
暂停2秒钟,异步线程能够计算完成返回get:
false 533
注释掉暂停时间,get还没有算完只能返回complete方法设置的444:
true 444
对计算结果进行处理
thenApply
存在依赖关系(当前步错,不走下一步),当前步骤有异常的话就叫停。
 1
 2
 3
 4
 5
 6
 7
 8
 9
10
11
12
13
14
15
16
17
18
19
20
21
22
23
24
25
26
27
28
29
30
31
32
33
34
35
36
37
|
// 计算结果存在依赖关系,这两个线程串行化
public class CompletableFutureDemo4 {
    public static void main(String[] args) throws ExecutionException, InterruptedException {
        //当一个线程依赖另一个线程时用 thenApply 方法来把这两个线程串行化,
        CompletableFuture.supplyAsync(() -> {
            //暂停几秒钟线程
            try {
                TimeUnit.SECONDS.sleep(1);
            } catch (InterruptedException e) {
                e.printStackTrace();
            }
            System.out.println("111");
            return 1024;
        }).thenApply(f -> {
            System.out.println("222");
            return f + 1;
        }).thenApply(f -> {
            //int age = 10/0; // 异常情况:哪步出错就停在哪步。
            System.out.println("333");
            return f + 1;
        }).whenCompleteAsync((v, e) -> {
            System.out.println("*****v: " + v);
        }).exceptionally(e -> {
            e.printStackTrace();
            return null;
        });

        System.out.println("-----主线程结束,END");

        // 主线程不要立刻结束,否则CompletableFuture默认使用的线程池会立刻关闭:
        try {
            TimeUnit.SECONDS.sleep(2);
        } catch (InterruptedException e) {
            e.printStackTrace();
        }
    }
}
|
运行结果:
无异常情况:
—–主线程结束,END
111
222
333
*****v: 1026
有异常情况(int age = 10/0;):
—–主线程结束,END
111
222
*****v: null
java.util.concurrent.CompletionException: java.lang.ArithmeticException: / by zero
at
…
handle
有异常也可以往下一步走,根据带的异常参数可以进一步处理。
 1
 2
 3
 4
 5
 6
 7
 8
 9
10
11
12
13
14
15
16
17
18
19
20
21
22
23
24
25
26
27
28
29
30
31
32
33
34
35
36
37
|
public class CompletableFutureDemo4 {
    public static void main(String[] args) throws ExecutionException, InterruptedException {
        //当一个线程依赖另一个线程时用 handle 方法来把这两个线程串行化,
        //异常情况:有异常也可以往下一步走,根据带的异常参数可以进一步处理
        CompletableFuture.supplyAsync(() -> {
            //暂停几秒钟线程
            try {
                TimeUnit.SECONDS.sleep(1);
            } catch (InterruptedException e) {
                e.printStackTrace();
            }
            System.out.println("111");
            return 1024;
        }).handle((f, e) -> {
            int age = 10 / 0;
            System.out.println("222");
            return f + 1;
        }).handle((f, e) -> {
            System.out.println("333");
            return f + 1;
        }).whenCompleteAsync((v, e) -> {
            System.out.println("*****v: " + v);
        }).exceptionally(e -> {
            e.printStackTrace();
            return null;
        });

        System.out.println("-----主线程结束,END");

        // 主线程不要立刻结束,否则CompletableFuture默认使用的线程池会立刻关闭:
        try {
            TimeUnit.SECONDS.sleep(2);
        } catch (InterruptedException e) {
            e.printStackTrace();
        }
    }
}
|
运行结果:
无异常情况:同上thenApply
有异常情况:
—–主线程结束,END
111
333
*****v: null
java.util.concurrent.CompletionException: java.lang.NullPointerException
…
对计算结果进行消费
 1
 2
 3
 4
 5
 6
 7
 8
 9
10
11
|
public static void main(String[] args) throws ExecutionException, InterruptedException {
    CompletableFuture.supplyAsync(() -> {
        return 1;
    }).thenApply(f -> {
        return f + 2;
    }).thenApply(f -> {
        return f + 3;
    }).thenApply(f -> {
        return f + 4;
    }).thenAccept(r -> System.out.println(r));
}
|
运行结果:10
 1
 2
 3
 4
 5
 6
 7
 8
 9
10
11
|
thenRun
thenRun(Runnable runnable)
// 任务 A 执行完执行 B,并且 B 不需要 A 的结果

thenAccept
thenAccept(Consumer action)
// 任务 A 执行完执行 B,B 需要 A 的结果,但是任务 B 无返回值

thenApply
thenApply(Function fn)
// 任务 A 执行完执行 B,B 需要 A 的结果,同时任务 B 有返回值
|
1
2
3
4
5
6
7
8
|
public static void main(String[] args) {
    System.out.println(CompletableFuture.supplyAsync(() -> "resultA")
            .thenRun(() -> {}).join());
    System.out.println(CompletableFuture.supplyAsync(() -> "resultA")
            .thenAccept(resultA -> {}).join());
    System.out.println(CompletableFuture.supplyAsync(() -> "resultA")
            .thenApply(resultA -> resultA + " resultB").join());
}
|
运行结果:
null
null
resultA resultB
对计算速度进行选用
applyToEither: 谁快用谁
 1
 2
 3
 4
 5
 6
 7
 8
 9
10
11
12
13
14
15
16
17
18
19
20
21
22
23
24
25
26
27
28
29
30
31
|
public class CompletableFutureDemo5 {
    public static void main(String[] args) throws ExecutionException, InterruptedException {
        CompletableFuture<Integer> completableFuture1 = CompletableFuture.supplyAsync(() -> {
            System.out.println(Thread.currentThread().getName() + "\t" + "---come in ");
            //暂停几秒钟线程
            try {
                TimeUnit.SECONDS.sleep(2);
            } catch (InterruptedException e) {
                e.printStackTrace();
            }
            return 10;
        });

        CompletableFuture<Integer> completableFuture2 = CompletableFuture.supplyAsync(() -> {
            System.out.println(Thread.currentThread().getName() + "\t" + "---come in ");
            try {
                TimeUnit.SECONDS.sleep(1);
            } catch (InterruptedException e) {
                e.printStackTrace();
            }
            return 20;
        });

        CompletableFuture<Integer> thenCombineResult = completableFuture1.applyToEither(completableFuture2, f -> {
            System.out.println(Thread.currentThread().getName() + "\t" + "---come in ");
            return f + 1;
        });

        System.out.println(Thread.currentThread().getName() + "\t" + thenCombineResult.get());
    }
}
|
运行结果:
ForkJoinPool.commonPool-worker-1 —come in
ForkJoinPool.commonPool-worker-2 —come in
ForkJoinPool.commonPool-worker-2 —come in
main 21
对计算结果进行合并
thenCombine:
两个CompletionStage任务都完成后,最终能把两个任务的结果一起交给thenCombine来处理
先完成的先等着,等待其它分支任务
code标准版:
 1
 2
 3
 4
 5
 6
 7
 8
 9
10
11
12
13
14
15
16
17
18
19
20
|
public class CompletableFutureDemo2 {
    public static void main(String[] args) throws ExecutionException, InterruptedException {
        CompletableFuture<Integer> completableFuture1 = CompletableFuture.supplyAsync(() -> {
            System.out.println(Thread.currentThread().getName() + "\t" + "---come in ");
            return 10;
        });

        CompletableFuture<Integer> completableFuture2 = CompletableFuture.supplyAsync(() -> {
            System.out.println(Thread.currentThread().getName() + "\t" + "---come in ");
            return 20;
        });

        CompletableFuture<Integer> thenCombineResult = completableFuture1.thenCombine(completableFuture2, (x, y) -> {
            System.out.println(Thread.currentThread().getName() + "\t" + "---come in ");
            return x + y;
        });

        System.out.println(thenCombineResult.get());
    }
}
|
运行结果:
ForkJoinPool.commonPool-worker-1 —come in
ForkJoinPool.commonPool-worker-1 —come in
main —come in
30
code表达式:
 1
 2
 3
 4
 5
 6
 7
 8
 9
10
11
12
13
14
15
16
17
18
19
20
21
22
23
24
25
26
27
28
29
|
public class CompletableFutureDemo5 {
    public static void main(String[] args) throws ExecutionException, InterruptedException {
        CompletableFuture<Integer> thenCombineResult = CompletableFuture.supplyAsync(() -> {
            System.out.println(Thread.currentThread().getName() + "\t" + "---come in 1");
            return 10;
        }).thenCombine(CompletableFuture.supplyAsync(() -> {
            System.out.println(Thread.currentThread().getName() + "\t" + "---come in 2");
            return 20;
        }), (x, y) -> {
            System.out.println(Thread.currentThread().getName() + "\t" + "---come in 3");
            return x + y;
        }).thenCombine(CompletableFuture.supplyAsync(() -> {
            System.out.println(Thread.currentThread().getName() + "\t" + "---come in 4");
            return 30;
        }), (a, b) -> {
            System.out.println(Thread.currentThread().getName() + "\t" + "---come in 5");
            return a + b;
        });
        System.out.println("-----主线程结束,END");
        System.out.println(thenCombineResult.get());

        // 主线程不要立刻结束,否则CompletableFuture默认使用的线程池会立刻关闭:
        try {
            TimeUnit.SECONDS.sleep(10);
        } catch (InterruptedException e) {
            e.printStackTrace();
        }
    }
}
|
运行结果:
ForkJoinPool.commonPool-worker-1 —come in 1
ForkJoinPool.commonPool-worker-1 —come in 2
main —come in 3
ForkJoinPool.commonPool-worker-2 —come in 4
main —come in 5
—–主线程结束,END
60
锁
synchronized
-
修饰实例方法,作用于当前实例,进入同步代码前需要先获取实例的锁
synchronized实例方法实际保护的是同一个对象的方法调用,确保同时只能有一个线程执行。再具体来说,synchronized实例方法保护的是当前实例对象,即this。this对象有一个锁和一个等待队列,锁只能被一个线程持有,其他试图获得同样锁的线程需要等待。
一般在保护变量时,需要在所有访问该变量的方法上加上synchronized。
-
修饰静态方法,作用于类的Class对象,进入修饰的静态方法前需要先获取类的Class对象的锁
-
修饰代码块,需要指定加锁对象(记做lockobj),在进入同步代码块前需要先获取lockobj的锁
可重入性
每个锁对象拥有一个锁计数器和一个指向持有该锁的线程的指针。
当执行monitorenter时,如果目标锁对象的计数器为零,那么说明它没有被其他线程所持有,Java虚拟机会将该锁对象的持有线程设置为当前线程,并且将其计数器加1。
在目标锁对象的计数器不为零的情况下,如果锁对象的持有线程是当前线程,那么 Java 虚拟机可以将其计数器加1,否则需要等待,直至持有线程释放该锁。
当执行monitorexit时,Java虚拟机则需将锁对象的计数器减1。计数器为零代表锁已被释放。
内存可见性
synchronized除了保证原子操作外,它还有一个重要的作用,就是保证内存可见性,在释放锁时,所有写入都会写回内存,而获得锁后,都会从内存中读最新数据。
不过,如果只是为了保证内存可见性,使用synchronized的成本有点高,有一个更轻量级的方式,那就是给变量加修饰符volatile。
加了volatile之后,Java会在操作对应变量时插入特殊的指令,保证读写到内存最新值,而非缓存的值。
Lock
1
2
3
4
5
6
|
Lock lock = new ReentrantLock();
lock.lock();
try {
} finally {
    lock.unlock();
}
|
在finally块中释放锁,目的是保证在获取到锁之后,最终能够被释放。
不要将获取锁的过程写在try块中,因为如果在获取锁(自定义锁的实现)时发生了异常,异常抛出的同时,也会导致锁无故释放。
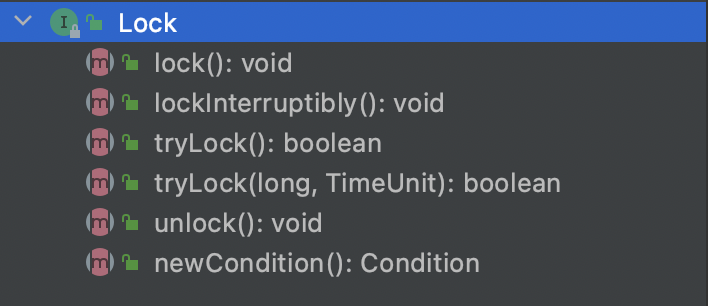
1)lock()/unlock():就是普通的获取锁和释放锁方法,lock()会阻塞直到成功。
2)lockInterruptibly():与lock()的不同是,它可以响应中断,如果被其他线程中断了,则抛出InterruptedException。
3)tryLock():只是尝试获取锁,立即返回,不阻塞,如果获取成功,返回true,否则返回false。
4)tryLock(long time, TimeUnit unit):先尝试获取锁,如果能成功则立即返回true,否则阻塞等待,但等待的最长时间由指定的参数设置,在等待的同时响应中断。如果发生了中断,抛出InterruptedException,如果在等待的时间内获得了锁,返回true,否则返回false。
5)newCondition:新建一个条件,一个Lock可以关联多个条件。
synchronized VS Lock
- synchronized是Java内置关键字,在JVM层面,Lock是个Java类;
- synchronized无法判断是否获取锁的状态,Lock可以判断是否获取到锁;
- synchronized会自动释放锁(a 线程执行完同步代码会释放锁 ;b 线程执行过程中发生异常会释放锁),Lock需在finally中手工释放锁(unlock()方法释放锁),否则容易造成线程死锁;
- 用synchronized关键字的两个线程1和线程2,如果当前线程1获得锁,线程2线程等待。如果线程1阻塞,线程2则会一直等待下去,而Lock锁就不一定会等待下去,如果尝试获取不到锁,线程可以不用一直等待就结束了;
- synchronized的锁可重入、不可中断、非公平,而Lock锁可重入、可中断、可公平(两者皆可)
- synchronized锁适合代码少量的同步问题,Lock锁适合大量同步代码的同步问题,。
ReentrantLock
ReentrantLock是Lock的默认实现:
-
可重入锁:可重入锁是指同一个线程可以多次获得同一把锁;ReentrantLock和关键字Synchronized都是可重入锁
-
可中断锁:可中断锁时子线程在获取锁的过程中,是否可以相应线程中断操作。synchronized是不可中断的,ReentrantLock是可中断的
-
公平锁和非公平锁:公平锁是指多个线程尝试获取同一把锁的时候,获取锁的顺序按照线程到达的先后顺序获取,而不是随机插队的方式获取。synchronized是非公平锁,而ReentrantLock是两种都可以实现,不过默认是非公平锁
在测试中公平性锁与非公平性锁相比,总耗时是其94.3倍,总切换次数是其133倍。可以看出,公平性锁保证了锁的获取按照FIFO原则,而代价是进行大量的线程切换。非公平性锁虽然可能造成线程“饥饿”,但极少的线程切换,保证了其更大的吞吐量。
 1
 2
 3
 4
 5
 6
 7
 8
 9
10
11
12
13
14
15
16
17
|
/**
 * Creates an instance of {@code ReentrantLock}.
 * This is equivalent to using {@code ReentrantLock(false)}.
 */
public ReentrantLock() {
    sync = new NonfairSync();
}

/**
 * Creates an instance of {@code ReentrantLock} with the
 * given fairness policy.
 *
 * @param fair {@code true} if this lock should use a fair ordering policy
 */
public ReentrantLock(boolean fair) {
    sync = fair ? new FairSync() : new NonfairSync();
}
|
ReentrantLock获取锁的过程是可中断的
对于synchronized关键字,如果一个线程在等待获取锁,最终只有2种结果:
- 要么获取到锁然后继续后面的操作
- 要么一直等待,直到其他线程释放锁为止
而ReentrantLock提供了另外一种可能,就是在等待获取锁的过程中(发起获取锁请求到还未获取到锁这段时间内)是可以被中断的,也就是说在等待锁的过程中,程序可以根据需要取消获取锁的请求。有些使用这个操作是非常有必要的。
关于获取锁的过程中被中断,注意几点:
- ReentrankLock中必须使用实例方法
lockInterruptibly()获取锁时,在线程调用interrupt()方法之后,才会引发InterruptedException异常
- 线程调用interrupt()之后,线程的中断标志会被置为true
- 触发InterruptedException异常之后,线程的中断标志会被清空,即置为false
- 所以当线程调用interrupt()引发InterruptedException异常,中断标志的变化是:false->true->false
synchronized VS ReentrantLock
相比synchronized, ReentrantLock可以实现与synchronized相同的语义,而且支持以非阻塞方式获取锁,可以响应中断,可以限时,更为灵活。不过,synchronized的使用更为简单,写的代码更少,也更不容易出错。
- synchronized代表一种声明式编程思维,程序员更多的是表达一种同步声明,由Java系统负责具体实现,程序员不知道其实现细节;
- 显式锁代表一种命令式编程思维,程序员实现所有细节。
声明式编程的好处除了简单,还在于性能,在较新版本的JVM上,ReentrantLock和synchronized的性能是接近的,但Java编译器和虚拟机可以不断优化synchronized的实现,比如自动分析synchronized的使用,对于没有锁竞争的场景,自动省略对锁获取/释放的调用。
简单总结下,能用synchronized就用synchronized,不满足要求时再考虑ReentrantLock。
悲观锁
认为自己在使用数据的时候一定有别的线程来修改数据,因此在获取数据的时候会先加锁,确保数据不会被别的线程修改。
synchronized关键字和Lock的实现类都是悲观锁
适合写操作多的场景,先加锁可以保证写操作时数据正确。
显式的锁定之后再操作同步资源
乐观锁
乐观锁认为自己在使用数据时不会有别的线程修改数据,所以不会添加锁,只是在更新数据的时候去判断之前有没有别的线程更新了这个数据。
如果这个数据没有被更新,当前线程将自己修改的数据成功写入。如果数据已经被其他线程更新,则根据不同的实现方式执行不同的操作
乐观锁在Java中是通过使用无锁编程来实现,最常采用的是CAS算法,Java原子类中的递增操作就通过CAS自旋实现的。
适合读操作多的场景,不加锁的特点能够使其读操作的性能大幅提升。
乐观锁则直接去操作同步资源,是一种无锁算法。
乐观锁一般有两种实现方式:
- 采用版本号机制
- CAS(Compare-and-Swap,即比较并替换)算法实现
可重入锁(又名递归锁)
是指在同一个线程在外层方法获取锁的时候,再进入该线程的内层方法会自动获取锁(前提,锁对象得是同一个对象),不会因为之前已经获取过还没释放而阻塞。
如果是1个有 synchronized 修饰的递归调用方法,程序第2次进入被自己阻塞了岂不是天大的笑话,出现了作茧自缚。所以Java中ReentrantLock和synchronized都是可重入锁,可重入锁的一个优点是可一定程度避免死锁。
排查死锁
线程中断
首先 一个线程不应该由其他线程来强制中断或停止,而是应该由线程自己自行停止。所以,Thread.stop, Thread.suspend, Thread.resume 都已经被废弃了。
其次 在Java中没有办法立即停止一条线程,然而停止线程却显得尤为重要,如取消一个耗时操作。因此,Java提供了一种用于停止线程的机制——中断。
中断只是一种协作机制,Java没有给中断增加任何语法,中断的过程完全需要程序员自己实现。若要中断一个线程,你需要手动调用该线程的interrupt方法,该方法也仅仅是将线程对象的中断标识设成true;接着你需要自己写代码不断地检测当前线程的标识位,如果为true,表示别的线程要求这条线程中断, 此时究竟该做什么需要你自己写代码实现。
每个线程对象中都有一个标识,用于表示线程是否被中断;该标识位为true表示中断,为false表示未中断;通过调用线程对象的interrupt方法将该线程的标识位设为true;可以在别的线程中调用,也可以在自己的线程中调用。
如何使用中断标识停止线程?
在需要中断的线程中不断监听中断状态,一旦发生中断,就执行相应的中断处理业务逻辑。
1、通过一个volatile变量
1
2
3
4
5
6
7
8
9
10
11
12
13
14
15
16
17
18
19
20
21
22
23
|
public class InterruptDemo {
private static volatile boolean isStop = false;
public static void main(String[] args) {
new Thread(() -> {
while (true) {
if (isStop) {
System.out.println(Thread.currentThread().getName() + "线程------isStop = true,自己退出了");
break;
}
System.out.println("-------hello interrupt");
}
}, "t1").start();
//暂停几秒钟线程
try {
TimeUnit.SECONDS.sleep(1);
} catch (InterruptedException e) {
e.printStackTrace();
}
isStop = true;
}
}
|
运行结果:
——-hello interrupt
——-hello interrupt
——-hello interrupt
——-hello interrupt
…
——-hello interrupt
——-hello interrupt
——-hello interrupt
t1线程——isStop = true,自己退出了
2、通过AtomicBoolean
 1
 2
 3
 4
 5
 6
 7
 8
 9
10
11
12
13
14
15
16
17
18
19
20
21
22
23
24
25
|
public class StopThreadDemo {
private final static AtomicBoolean atomicBoolean = new AtomicBoolean(true);
public static void main(String[] args) {
Thread t1 = new Thread(() -> {
while (atomicBoolean.get()) {
try {
TimeUnit.MILLISECONDS.sleep(500);
} catch (InterruptedException e) {
e.printStackTrace();
}
System.out.println("-----hello");
}
}, "t1");
t1.start();
try {
TimeUnit.SECONDS.sleep(3);
} catch (InterruptedException e) {
e.printStackTrace();
}
atomicBoolean.set(false);
}
}
|
—–hello
—–hello
—–hello
—–hello
—–hello
—–hello
3、通过Thread类自带的中断api方法
(1)、实例方法interrupt(),没有返回值
调用interrupt()方法仅仅是在当前线程中打了一个停止的标记,并不是真正立刻停止线程。
1
2
3
4
5
6
7
8
9
10
11
12
13
14
|
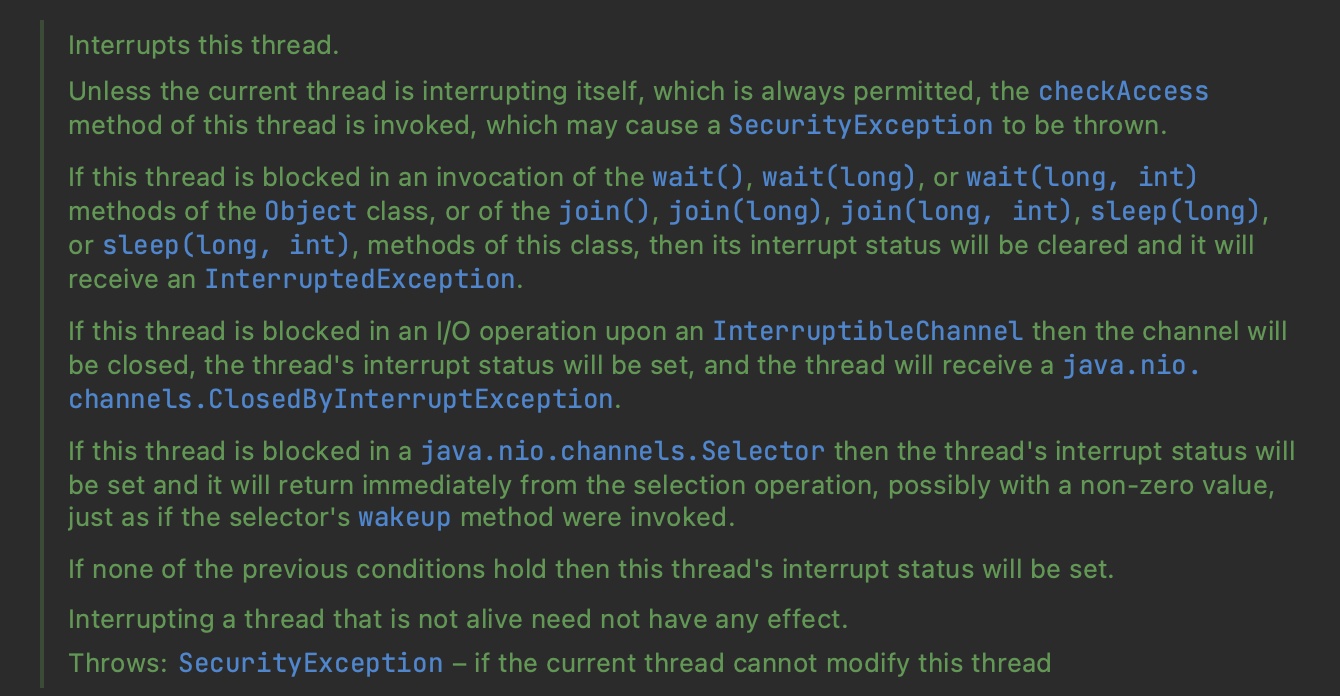
public void interrupt() {
if (this != Thread.currentThread())
checkAccess();
synchronized (blockerLock) {
Interruptible b = blocker;
if (b != null) {
interrupt0(); // Just to set the interrupt flag
b.interrupt(this);
return;
}
}
interrupt0();
}
|
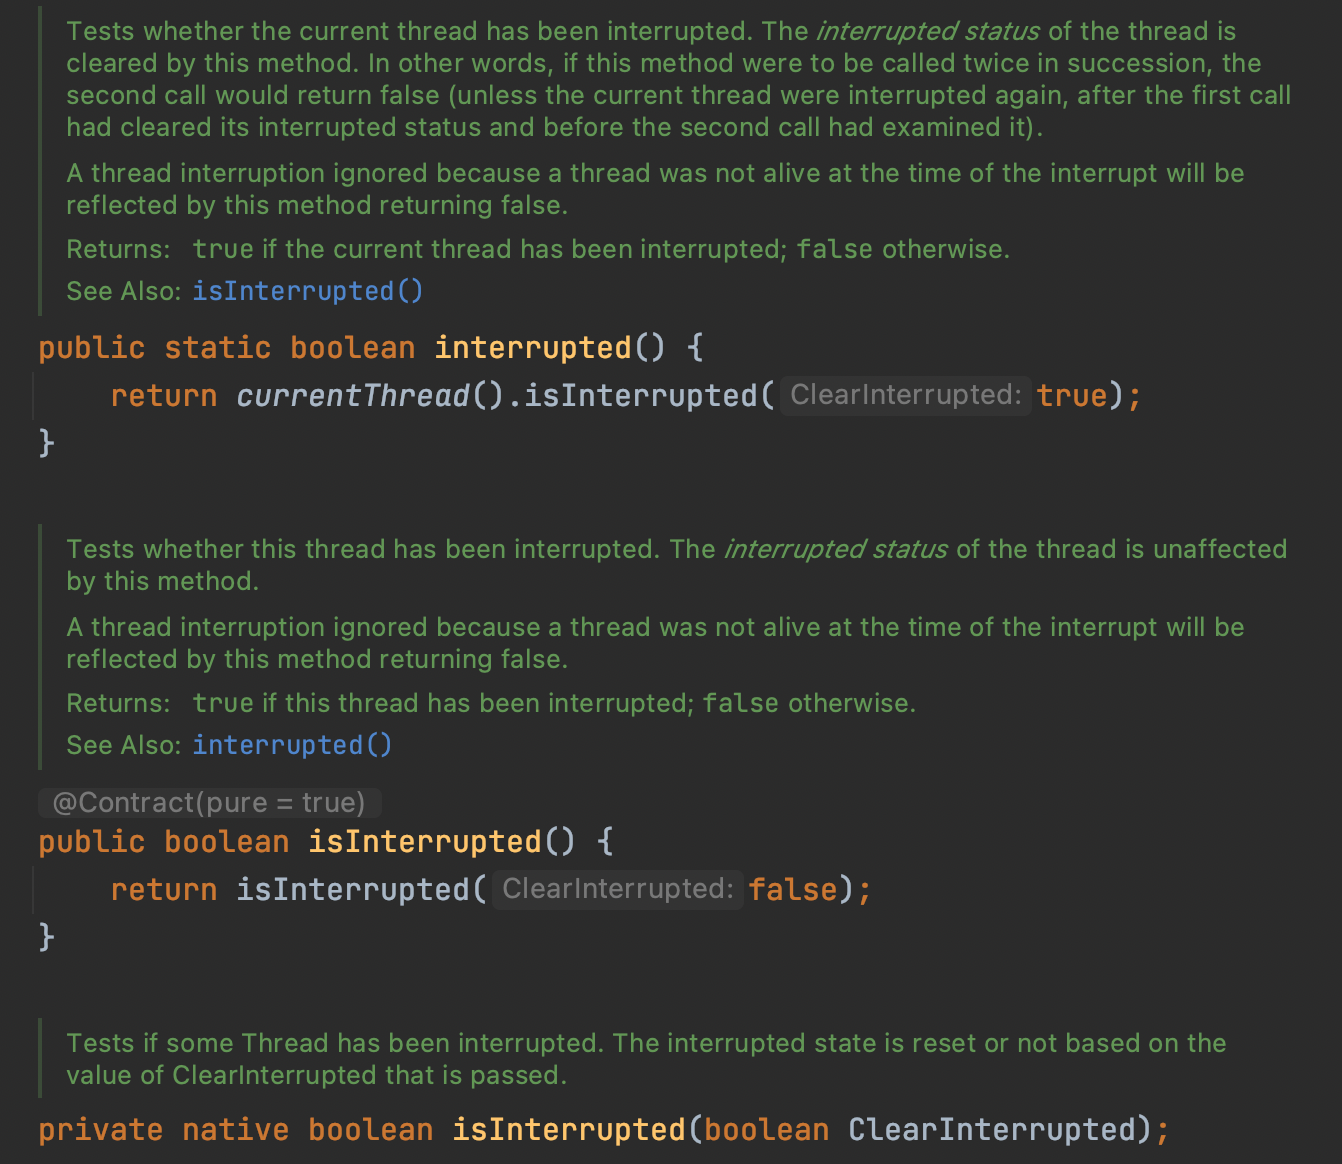
(2)、实例方法isInterrupted,返回布尔值
获取中断标志位的当前值是什么
判断当前线程是否被中断(通过检查中断标志位),默认是false
(3)、静态方法Thread.interrupted()
判断线程是否被中断,并清除当前中断状态,类似i++
这个方法做了两件事:
- 返回当前线程的中断状态
- 将当前线程的中断状态设为false
示例:
1
2
3
4
5
6
7
8
9
10
11
12
13
14
15
16
|
/**
* 测试当前线程是否被中断(检查中断标志),返回一个boolean并清除中断状态,
* 第二次再调用时中断状态已经被清除,将返回一个false。
*/
public class InterruptDemo {
public static void main(String[] args) throws InterruptedException {
System.out.println(Thread.currentThread().getName() + "---" + Thread.interrupted());
System.out.println(Thread.currentThread().getName() + "---" + Thread.interrupted());
System.out.println("111111");
Thread.currentThread().interrupt();
System.out.println("222222");
System.out.println(Thread.currentThread().getName() + "---" + Thread.interrupted());
System.out.println(Thread.currentThread().getName() + "---" + Thread.interrupted());
}
}
|
运行结果:
main—false
main—false
111111
222222
main—true
main—false
当前线程的中断标识为true,是不是就立刻停止?
具体来说,当对一个线程,调用 interrupt() 时:
① 如果线程处于正常活动状态,那么会将该线程的中断标志设置为 true,仅此而已。 被设置中断标志的线程将继续正常运行,不受影响。所以, interrupt() 并不能真正的中断线程,需要被调用的线程自己进行配合才行。
② 如果线程处于被阻塞状态(例如处于sleep, wait, join 等状态),在别的线程中调用当前线程对象的interrupt方法, 那么线程将立即退出被阻塞状态,并抛出一个InterruptedException异常。
LockSupport
0、3种让线程等待和唤醒的方法
- Object中的wait()方法让线程等待,notify()方法唤醒线程
- JUC包中Condition的await()方法让线程等待,signal()方法唤醒线程
- LockSupport类中的park()阻塞线程,unpark()解除阻塞线程
1、Object类中的wait和notify方法
 1
 2
 3
 4
 5
 6
 7
 8
 9
10
11
12
13
14
15
16
17
18
19
20
21
22
23
24
25
26
27
28
29
30
31
|
public class LockSupportDemo {
public static void main(String[] args) {
Object objectLock = new Object();
new Thread(() -> {
synchronized (objectLock) {
System.out.println(Thread.currentThread().getName() + "\t ---come in");
try {
objectLock.wait();//----------------------这里先让他等待
} catch (InterruptedException e) {
e.printStackTrace();
}
}
System.out.println(Thread.currentThread().getName() + "\t ---被唤醒了");
}, "t1").start();
//暂停几秒钟线程
try {
TimeUnit.SECONDS.sleep(3L);
} catch (InterruptedException e) {
e.printStackTrace();
}
new Thread(() -> {
synchronized (objectLock) {
objectLock.notify();//-------------------------再唤醒它
System.out.println(Thread.currentThread().getName() + "\t ---发出通知");
}
}, "t2").start();
}
}
|
t1 —come in
t2 —发出通知
t1 —被唤醒了
 1
 2
 3
 4
 5
 6
 7
 8
 9
10
11
12
13
14
15
16
17
18
19
20
21
22
23
24
25
26
27
28
29
30
31
|
public class LockSupportDemo {
public static void main(String[] args) {
Object objectLock = new Object();
new Thread(() -> {
// synchronized (objectLock) {
System.out.println(Thread.currentThread().getName() + "\t ---come in");
try {
objectLock.wait();//----------------------这里先让他等待
} catch (InterruptedException e) {
e.printStackTrace();
}
// }
System.out.println(Thread.currentThread().getName() + "\t ---被唤醒了");
}, "t1").start();
//暂停几秒钟线程
try {
TimeUnit.SECONDS.sleep(3L);
} catch (InterruptedException e) {
e.printStackTrace();
}
new Thread(() -> {
// synchronized (objectLock) {
objectLock.notify();//-------------------------再唤醒它
System.out.println(Thread.currentThread().getName() + "\t ---发出通知");
// }
}, "t2").start();
}
}
|
t1 —come in
Exception in thread “t1” java.lang.IllegalMonitorStateException
at java.lang.Object.wait(Native Method)
…
Exception in thread “t2” java.lang.IllegalMonitorStateException
at java.lang.Object.notify(Native Method)
…
 1
 2
 3
 4
 5
 6
 7
 8
 9
10
11
12
13
14
15
16
17
18
19
20
21
22
23
24
25
26
27
28
29
30
31
|
public class LockSupportDemo {
public static void main(String[] args) {
Object objectLock = new Object();
new Thread(() -> {
//暂停几秒钟线程
try {
TimeUnit.SECONDS.sleep(3L);
} catch (InterruptedException e) {
e.printStackTrace();
}
synchronized (objectLock) {
System.out.println(Thread.currentThread().getName() + "\t ---come in");
try {
objectLock.wait();//----------------------这里先让他等待
} catch (InterruptedException e) {
e.printStackTrace();
}
}
System.out.println(Thread.currentThread().getName() + "\t ---被唤醒了");
}, "t1").start();
new Thread(() -> {
synchronized (objectLock) {
objectLock.notify();//-------------------------再唤醒它
System.out.println(Thread.currentThread().getName() + "\t ---发出通知");
}
}, "t2").start();
}
}
|
一直处于运行中,无法停止:
t2 —发出通知
t1 —come in
总结:
Object中的wait和notify方法必须
- 要在同步块或者方法里面
- 先wait后notify的顺序成对使用
2、Condition接口中的await和signal方法
 1
 2
 3
 4
 5
 6
 7
 8
 9
10
11
12
13
14
15
16
17
18
19
20
21
22
23
24
25
26
27
28
29
30
31
32
33
34
35
36
37
38
39
|
public class LockSupportDemo {
public static void main(String[] args) {
Lock lock = new ReentrantLock();
Condition condition = lock.newCondition();
new Thread(() -> {
lock.lock();
try {
System.out.println(Thread.currentThread().getName() + "\t -----come in");
condition.await();
System.out.println(Thread.currentThread().getName() + "\t -----被唤醒");
} catch (InterruptedException e) {
e.printStackTrace();
} finally {
lock.unlock();
}
}, "t1").start();
//暂停几秒钟线程
try {
TimeUnit.SECONDS.sleep(1);
} catch (InterruptedException e) {
e.printStackTrace();
}
new Thread(() -> {
lock.lock();
try {
condition.signal();
} catch (Exception e) {
e.printStackTrace();
} finally {
lock.unlock();
}
System.out.println(Thread.currentThread().getName() + "\t" + "我要进行唤醒");
}, "t2").start();
}
}
|
t1 —–come in
t2 我要进行唤醒
t1 —–被唤醒
- 异常1原理同上
- 仍然返回
IllegalMonitorStateException
- 异常2原理同上
总结:
Condtion中的await和notify方法必须
Object和Condition使用的限制条件:
- 线程先要获得并持有锁,必须在锁块(synchronized或lock)中
- 必须要先等待后唤醒,线程才能够被唤醒
3、LockSupport类中的park等待和unpark唤醒
通过park()和unpark(thread)方法来实现阻塞和唤醒线程
1
2
3
4
5
6
7
8
9
10
11
12
13
14
15
|
public class LockSupportDemo {
public static void main(String[] args) {
Thread t1 = new Thread(() -> {
System.out.println(Thread.currentThread().getName() + "\t----------come in");
LockSupport.park();
System.out.println(Thread.currentThread().getName() + "\t----------被唤醒了");
}, "t1");
t1.start();
new Thread(() -> {
LockSupport.unpark(t1);
System.out.println(Thread.currentThread().getName() + "\t-----发出通知,去唤醒t1");
}, "t2").start();
}
}
|
t1 ———-come in
t2 —–发出通知,去唤醒t1
t1 ———-被唤醒了
- 之前错误的先唤醒后等待,LockSupport照样支持
1
2
3
4
5
6
7
8
9
10
11
12
13
14
15
16
17
18
19
20
|
public class LockSupportDemo {
public static void main(String[] args) {
Thread t1 = new Thread(() -> {
try {
TimeUnit.SECONDS.sleep(3);
} catch (InterruptedException e) {
e.printStackTrace();
}
System.out.println(Thread.currentThread().getName() + "\t----------come in" + "\t" + System.currentTimeMillis());
LockSupport.park();
System.out.println(Thread.currentThread().getName() + "\t----------被唤醒了" + "\t" + System.currentTimeMillis());
}, "t1");
t1.start();
new Thread(() -> {
LockSupport.unpark(t1);
System.out.println(Thread.currentThread().getName() + "\t-----发出通知,去唤醒t1");
}, "t2").start();
}
}
|
t2 —–发出通知,去唤醒t1
t1 ———-come in 1660201673319
t1 ———-被唤醒了 1660201673319
1
2
3
4
5
6
7
8
9
10
11
12
13
14
15
16
17
18
19
20
21
22
|
public class LockSupportDemo {
public static void main(String[] args) {
Thread t1 = new Thread(() -> {
try {
TimeUnit.SECONDS.sleep(3);
} catch (InterruptedException e) {
e.printStackTrace();
}
System.out.println(Thread.currentThread().getName() + "\t----------come in" + "\t" + System.currentTimeMillis());
LockSupport.park();
LockSupport.park();
System.out.println(Thread.currentThread().getName() + "\t----------被唤醒了" + "\t" + System.currentTimeMillis());
}, "t1");
t1.start();
new Thread(() -> {
LockSupport.unpark(t1);
LockSupport.unpark(t1);
System.out.println(Thread.currentThread().getName() + "\t-----发出通知,去唤醒t1");
}, "t2").start();
}
}
|
t2 —–发出通知,去唤醒t1
t1 ———-come in 1654750970677——————–卡在这里了
Lock Support和每个使用它的线程都有一个许可(permit) 关联。
每个线程都有一个相关的permit, permit最多只有一个, 重复调用unpark也不会积累凭证。
4、总结:
LockSupport是用来创建锁和其他同步类的基本线程阻塞原语。
LockSupport类使用了一种名为Permit(许可) 的概念来做到阻塞和唤醒线程, 每个线程都有一个许可(permit)。
permit(许可)只有两个值1和0,默认是0,0 是阻塞,1是唤醒。
可以把许可看成是一种(0,1)信号量(Semaphore),但与 Semaphore 不同的是,许可的累加上限是1。
JMM
Java虚拟机规范中试图定义一种Java内存模型(java Memory Model,简称JMM) 来屏蔽掉各种硬件和操作系统的内存访问差异,以实现让Java程序在各种平台下都能达到一致的内存访问效果。
Java中普通的共享变量不保证可见性,因为数据修改被写入内存的时机是不确定的,多线程并发下很可能出现"脏读",所以每个线程都有自己的工作内存,线程自己的工作内存中保存了该线程使用到的变量的主内存副本拷贝,线程对变量的所有操作(读取,赋值等 )都必需在线程自己的工作内存中进行,而不能够直接读写主内存中的变量。不同线程之间也无法直接访问对方工作内存中的变量,线程间变量值的传递均需要通过主内存来完成。
happens-before规则
JMM规范下,多线程先行发生原则之happens-before:
在JMM中,如果一个操作执行的结果需要对另一个操作可见性或者代码重排序,那么这两个操作之间必须存在happens-before关系。
JSR-133使用happens-before的概念来指定两个操作之间的执行顺序。由于这两个操作可以在一个线程之内,也可以是在不同线程之间。因此,JMM可以通过happens-before关系向程序员提供跨线程的内存可见性保证(如果A线程的写操作a与B线程的读操作b之间存在happens-before关系,尽管a操作和b操作在不同的线程中执行,但JMM向程序员保证a操作将对b操作可见)
《JSR-133:Java Memory Model and Thread Specification》定义了如下happens-before规则。
1)程序顺序规则:一个线程中的每个操作,happens-before于该线程中的任意后续操作。
2)监视器锁规则:对一个锁的解锁,happens-before于随后对这个锁的加锁。
3)volatile变量规则:对一个volatile域的写,happens-before于任意后续对这个volatile域的读。
4)传递性:如果A happens-before B,且B happens-before C,那么A happens-before C。
5)start()规则:如果线程A执行操作ThreadB.start()(启动线程B),那么A线程的ThreadB.start()操作happens-before于线程B中的任意操作。
6)join()规则:如果线程A执行操作ThreadB.join()并成功返回,那么线程B中的任意操作happens-before于线程A从ThreadB.join()操作成功返回。
volatile
被volatile修改的变量有2大特点:
volatile的内存语义:
- 当写一个volatile变量时,JMM会把该线程对应的本地内存中的共享变量值立即刷新回主内存中。
- 当读一个volatile变量时,JMM会把该线程对应的本地内存设置为无效,直接从主内存中读取共享变量
- 所以volatile的写内存语义是直接刷新到主内存中,读内存语义是直接从主内存中读取。
内存屏障 (Memory Barriers / Fences)
内存屏障(也称内存栅栏,内存栅障,屏障指令等,是一类同步屏障指令,是CPU或编译器在对内存随机访问的操作中的一个同步点,使得此点之前的所有读写操作都执行后才可以开始执行此点之后的操作),避免代码重排序。
内存屏障其实就是一种JVM指令,Java内存模型的重排规则会要求Java编译器在生成JVM指令时插入特定的内存屏障指令,通过这些内存屏障指令,volatile实现了Java内存模型中的可见性和有序性,但volatile无法保证原子性。
内存屏障之前的所有写操作都要回写到主内存,内存屏障之后的所有读操作都能获得内存屏障之前的所有写操作的最新结果(实现了可见性)。
因此重排序时,不允许把内存屏障之后的指令重排序到内存屏障之前。 一句话:对一个 volatile 域的写, happens-before 于任意后续对这个 volatile 域的读,也叫写后读。
happens-before 之 volatile 变量规则

当第一个操作为volatile读时,不论第二个操作是什么,都不能重排序。这个操作保证了volatile读之后的操作不会被重排到volatile读之前。
当第二个操作为volatile写时,不论第一个操作是什么,都不能重排序。这个操作保证了volatile写之前的操作不会被重排到volatile写之后。
当第一个操作为volatile写时,第二个操作为volatile读时,不能重排。
JMM 就将内存屏障插⼊策略分为 4 种
- 读
- 在每个 volatile 读操作的后⾯插⼊⼀个 LoadLoad 屏障
- 在每个 volatile 读操作的后⾯插⼊⼀个 LoadStore 屏障
- 写
- 在每个 volatile 写操作的前⾯插⼊⼀个 StoreStore 屏障
- 在每个 volatile 写操作的后⾯插⼊⼀个 StoreLoad 屏障
volatile特性
1、保证可见性
保证不同线程对这个变量进行操作时的可见性,即变量一旦改变所有线程立即可见
1
2
3
4
5
6
7
8
9
10
11
12
13
14
15
16
17
18
19
20
21
22
23
24
25
|
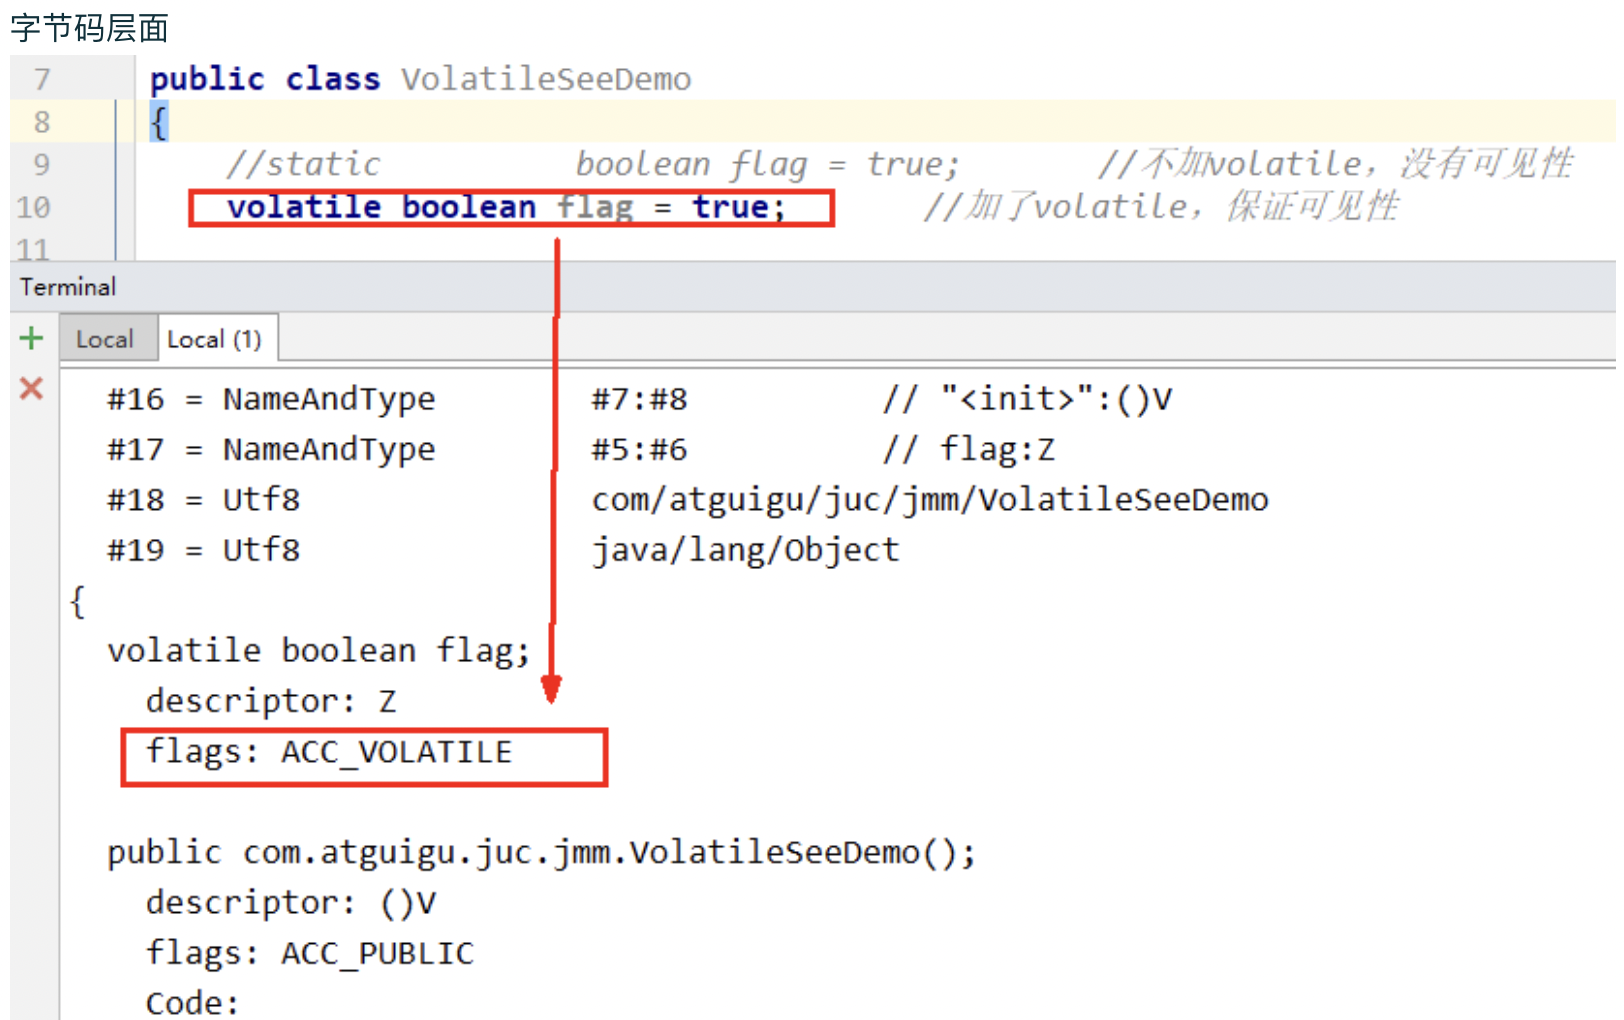
public class VolatileSeeDemo {
static boolean flag = true; //不加volatile,没有可见性
//static volatile boolean flag = true; //加了volatile,保证可见性
public static void main(String[] args) {
new Thread(() -> {
System.out.println(Thread.currentThread().getName() + "\t come in");
while (flag) {
}
System.out.println(Thread.currentThread().getName() + "\t flag被修改为false,退出.....");
}, "t1").start();
//暂停2秒钟后让main线程修改flag值
try {
TimeUnit.SECONDS.sleep(2);
} catch (InterruptedException e) {
e.printStackTrace();
}
flag = false;
System.out.println("main线程修改完成");
}
}
|
t1 come in
main线程修改完成
//卡住了
t1 come in
main线程修改完成
t1 flag被修改为false,退出…..
线程t1中为何看不到被主线程main修改为false的flag的值?
问题可能:
- 主线程修改了flag之后没有将其刷新到主内存,所以t1线程看不到。
- 主线程将flag刷新到了主内存,但是t1一直读取的是自己工作内存中flag的值,没有去主内存中更新获取flag最新的值。
诉求:
1.线程中修改了工作内存中的副本之后,立即将其刷新到主内存;
2.工作内存中每次读取共享变量时,都去主内存中重新读取,然后拷贝到工作内存。
解决:
使用volatile修饰共享变量,就可以达到上面的效果,被volatile修改的变量有以下特点:
- 线程中读取的时候,每次读取都会去主内存中读取共享变量最新的值,然后将其复制到工作内存
- 线程中修改了工作内存中变量的副本,修改之后会立即刷新到主内存
volatile变量的读写过程
Java内存模型中定义的8种工作内存与主内存之间的原子操作
read(读取)→load(加载)→use(使用)→assign(赋值)→store(存储)→write(写入)→lock(锁定)→unlock(解锁)
2、没有原子性
volatile变量的复合操作(如i++)不具有原子性
1
2
3
4
5
6
7
8
9
10
11
12
13
14
15
16
17
18
19
20
21
|
public class VolatileNoAtomicDemo {
public static void main(String[] args) throws InterruptedException {
MyNumber myNumber = new MyNumber();
for (int i = 1; i <= 10; i++) {
new Thread(() -> {
for (int j = 1; j <= 1000; j++) {
myNumber.addPlusPlus();
}
}, String.valueOf(i)).start();
}
//暂停几秒钟线程
try {
TimeUnit.SECONDS.sleep(3);
} catch (InterruptedException e) {
e.printStackTrace();
}
System.out.println(Thread.currentThread().getName() + "\t" + myNumber.number);
}
}
|
运行结果一般都不是10000:
main 9733
原子性指的是一个操作是不可中断的,即使是在多线程环境下,一个操作一旦开始就不会被其他线程影响。
public void add()
{
i++;
//不具备原子性,该操作是先读取值,然后写回一个新值,相当于原来的值加上1,分3步完成
}
如果第二个线程在第一个线程读取旧值和写回新值期间读取i的域值,那么第二个线程就会与第一个线程一起看到同一个值,并执行相同值的加1操作,这也就造成了线程安全失败,因此对于add方法必须使用synchronized修饰,以便保证线程安全。
3、指令禁重排
重排序:重排序是指编译器和处理器为了优化程序性能而对指令序列进行重新排序的一种手段,有时候会改变程序语句的先后顺序
不存在数据依赖关系,可以重排序;存在数据依赖关系,禁止重排序。
但重排后的指令绝对不能改变原有的串行语义!这点在并发设计中必须要重点考虑!
volatile的底层实现是通过内存屏障
当第一个操作为volatile读时,不论第二个操作是什么,都不能重排序。这个操作保证了volatile读之后的操作不会被重排到volatile读之前。
当第二个操作为volatile写时,不论第一个操作是什么,都不能重排序。这个操作保证了volatile写之前的操作不会被重排到volatile写之后。
当第一个操作为volatile写时,第二个操作为volatile读时,不能重排。
为什么Java写了一个volatile关键字系统底层加入内存屏障?
volatile应用
1、单一赋值可以,但是含复合运算赋值不可以(i++之类)
1
2
|
volatile int a = 10
volatile boolean flag = false
|
2、状态标志,判断业务是否结束
1
2
3
4
5
6
7
8
9
10
11
12
13
14
15
16
17
18
19
20
21
22
23
24
25
26
27
|
/**
* 使用:作为一个布尔状态标志,用于指示发生了一个重要的一次性事件,例如完成初始化或任务结束
* 理由:状态标志并不依赖于程序内任何其他状态,且通常只有一种状态转换
* 例子:判断业务是否结束
*/
public class UseVolatileDemo {
private volatile static boolean flag = true;
public static void main(String[] args) {
new Thread(() -> {
while (flag) {
//do something......
}
}, "t1").start();
//暂停几秒钟线程
try {
TimeUnit.SECONDS.sleep(2L);
} catch (InterruptedException e) {
e.printStackTrace();
}
new Thread(() -> {
flag = false;
}, "t2").start();
}
}
|
3、开销较低的读,写锁策略
1
2
3
4
5
6
7
8
9
10
11
12
13
14
15
16
17
|
public class UseVolatileDemo {
/**
* 使用:当读远多于写,结合使用 内部锁 和 volatile 变量来减少同步的开销
* 理由:利用volatile保证读取操作的可见性;利用synchronized保证复合操作的原子性
*/
public class Counter {
private volatile int value;
public int getValue() {
return value; //利用volatile保证读取操作的可见性
}
public synchronized int increment() {
return value++; //利用synchronized保证复合操作的原子性
}
}
}
|
DCL双重检查锁与延迟初始化
问题由来
在Java程序中,有时候可能需要推迟一些高开销的对象初始化操作,并且只有在使用这些对象时才进行初始化。此时,程序员可能会采用延迟初始化。但要正确实现线程安全的延迟初始化需要一些技巧,否则很容易出现问题。
synchronized(甚至是无竞争的synchronized)存在巨大的性能开销。因此,人们想出了一个“聪明”的技巧:双重检查锁定(Double-Checked Locking)。人们想通过双重检查锁定来降低同步的开销。
问题代码:
1
2
3
4
5
6
7
8
9
10
11
12
13
14
15
16
17
18
19
20
21
22
|
public class SafeDoubleCheckSingleton {
private static SafeDoubleCheckSingleton singleton;
//私有化构造方法
private SafeDoubleCheckSingleton() {
}
//双重锁设计
public static SafeDoubleCheckSingleton getInstance() {
if (singleton == null) {
//1.多线程并发创建对象时,会通过加锁保证只有一个线程能创建对象
synchronized (SafeDoubleCheckSingleton.class) {
if (singleton == null) {
//隐患:多线程环境下,由于重排序,该对象可能还未完成初始化就被其他线程读取
singleton = new SafeDoubleCheckSingleton();
}
}
}
//2.对象创建完毕,执行getInstance()将不需要获取锁,直接返回创建对象
return singleton;
}
}
|
单线程看问题代码
单线程环境下(或者说正常情况下),在"问题代码处",会执行如下操作,保证能获取到已完成初始化的实例
right
memory=allocate(); //1.分配对象的内存空间
Instance(memory); //2.初始化对象
instance=memory; //3.设置instance指向刚分配的内存地址
由于存在指令重排序……
根据《The Java Language Specification,Java SE 7 Edition》(Java语言规范),所有线程在执行Java程序时必须要遵守intra-thread semantics。intra-thread semantics保证重排序不会改变单线程内的程序执行结果。换句话说,intra-thread semantics允许那些在单线程内,不会改变单线程程序执行结果的重排序。上面3行伪代码的2和3之间虽然被重排序了,但这个重排序并不会违反intra-thread semantics。这个重排序在没有改变单线程程序执行结果的前提下,可以提高程序的执行性能。
多线程看问题代码
隐患:多线程环境下,在"问题代码处",会执行如下操作,由于重排序导致2,3乱序,后果就是其他线程得到的是null而不是完成初始化的对象
problem
memory=allocate(); //1.分配对象的内存空间
instance=memory; //3.设置instance指向刚分配的内存地址
//注意,此时对象还没有被初始化!
Instance(memory); //2.初始化对象
解决方法:
有两个办法来实现线程安全的延迟初始化。
1)不允许2和3重排序。
2)允许2和3重排序,但不允许其他线程“看到”这个重排序。
基于volatile的解决方案
把instance声明为volatile型
这个方案本质上是通过禁止2和3之间的重排序,来保证线程安全的延迟初始化。
基于类初始化的解决方案
实现另一种线程安全的延迟初始化方案(被称之为Initialization On Demand Holder idiom)
采用静态内部类的方式实现
1
2
3
4
5
6
7
8
9
10
11
12
13
14
|
//现在比较好的做法就是采用静态内部类的方式实现
public class SingletonDemo {
private SingletonDemo() {
}
private static class SingletonDemoHandler {
private static SingletonDemo instance = new SingletonDemo();
}
public static SingletonDemo getInstance() {
return SingletonDemoHandler.instance;
}
}
|
这个方案的实质是:允许上述3行伪代码中的2和3重排序,但不允许非构造线程(这里指线程B)“看到”这个重排序。
初始化一个类,包括执行这个类的静态初始化和初始化在这个类中声明的静态字段。
根据Java语言规范,在首次发生下列任意一种情况时,一个类或接口类型T将被立即初始化。
1)T是一个类,而且一个T类型的实例被创建。
2)T是一个类,且T中声明的一个静态方法被调用。
3)T中声明的一个静态字段被赋值。
4)T中声明的一个静态字段被使用,而且这个字段不是一个常量字段。
5)T是一个顶级类(Top Level Class,见Java语言规范的§7.6),而且一个断言语句嵌套在T内部被执行。
在示例代码中,首次执行getInstance()方法的线程将导致SingletonDemoHandler类被初始化(符合情况4)。
根据Java内存模型规范的锁规则,这里将存在如下的happens-before关系。
这个happens-before关系将保证:线程A执行类的初始化时的写入操作(执行类的静态初始化和初始化类中声明的静态字段),线程B一定能看到。
总结
通过对比基于volatile的双重检查锁定的方案和基于类初始化的方案,会发现基于类初始化的方案的实现代码更简洁。但基于volatile的双重检查锁定的方案有一个额外的优势:除了可以对静态字段实现延迟初始化外,还可以对实例字段实现延迟初始化。
字段延迟初始化降低了初始化类或创建实例的开销,但增加了访问被延迟初始化的字段的开销。在大多数时候,正常的初始化要优于延迟初始化。如果确实需要对实例字段使用线程安全的延迟初始化,请使用基于volatile的延迟初始化的方案;如果确实需要对静态字段使用线程安全的延迟初始化,请使用基于类初始化的方案。
CAS
1、多线程环境不使用原子类保证线程安全(基本数据类型)
1
2
3
4
5
6
7
8
9
10
11
12
13
|
public class T3 {
volatile int number = 0;
//读取
public int getNumber() {
return number;
}
//写入加锁保证原子性
public synchronized void setNumber() {
number++;
}
}
|
2、多线程环境使用原子类保证线程安全(基本数据类型)
1
2
3
4
5
6
7
8
9
10
11
|
public class T3 {
AtomicInteger atomicInteger = new AtomicInteger();
public int getAtomicInteger() {
return atomicInteger.get();
}
public void setAtomicInteger() {
atomicInteger.getAndIncrement();
}
}
|
CAS定义
CAS:compare and swap的缩写,中文翻译成比较并交换,实现并发算法时常用到的一种技术。
它包含三个操作数——内存位置、预期原值及更新值。
执行CAS操作的时候,将内存位置的值与预期原值比较:
如果相匹配,那么处理器会自动将该位置值更新为新值,如果不匹配,处理器不做任何操作,多个线程同时执行CAS操作只有一个会成功。
CAS是JDK提供的非阻塞原子性操作,它通过硬件保证了比较——更新的原子性。它是非阻塞的且自身原子性,也就是说它效率更高且通过硬件保证,说明更可靠。
CAS是一条CPU的原子指令(cmpxchg指令),不会造成所谓的数据不一致问题,Unsafe提供的CAS方法(如compareAndSwapXXX)底层实现即为CPU指令cmpxchg。
执行cmpxchg指令的时候,会判断当前系统是否为多核系统,如果是就给总线加锁,只有一个线程会对总线加锁成功,加锁成功之后会执行cas操作,也就是说CAS的原子性实际上是CPU实现的, 其实在这一点上还是有排他锁的,只是比起用synchronized, 这里的排他时间要短的多, 所以在多线程情况下性能会比较好。
CAS原理
getAndIncrement
1
2
3
4
5
6
7
8
|
/**
* Atomically increments by one the current value.
*
* @return the previous value
*/
public final int getAndIncrement() {
return unsafe.getAndAddInt(this, valueOffset, 1);
}
|
getAndAddInt
1
2
3
4
5
6
7
|
public final int getAndAddInt(Object o, long offset, int delta) {
int v;
do {
v = getIntVolatile(o, offset);
} while (!compareAndSwapInt(o, offset, v, v + delta));
return v;
}
|
CAS的全称为Compare-And-Swap,是一条CPU并发原语。 它的功能是判断内存某个位置的值是否为预期值,如果是则更改为新的值,这个过程是原子的。
AtomicInteger 类主要利用 CAS (compare and swap) + volatile 和 native 方法来保证原子操作,从而避免 synchronized 的高开销,执行效率大为提升。
底层汇编
native修饰的方法代表是底层方法
Unsafe类中的compareAndSwapInt,是一个本地方法,该方法的实现位于unsafe.cpp中
1
2
3
4
5
6
7
8
|
UNSAFE_ENTRY(jboolean, Unsafe_CompareAndSwapInt(JNIEnv *env, jobject unsafe, jobject obj, jlong offset, jint e, jint x))
UnsafeWrapper("Unsafe_CompareAndSwapInt");
oop p = JNIHandles::resolve(obj);
// 先想办法拿到变量value在内存中的地址,根据偏移量valueOffset,计算 value 的地址
jint* addr = (jint *) index_oop_from_field_offset_long(p, offset);
// 调用 Atomic 中的函数 cmpxchg来进行比较交换,其中参数x是即将更新的值,参数e是原内存的值
return (jint)(Atomic::cmpxchg(x, addr, e)) == e;
UNSAFE_END
|
自旋锁(spinlock)
是指尝试获取锁的线程不会立即阻塞,而是采用循环的方式去尝试获取锁, 当线程发现锁被占用时,会不断循环判断锁的状态,直到获取。这样的好处是减少线程上下文切换的消耗,缺点是循环会消耗CPU。
 1
 2
 3
 4
 5
 6
 7
 8
 9
10
11
12
13
14
15
16
17
18
19
20
21
22
23
24
25
26
27
28
29
30
31
32
33
34
35
36
37
38
39
40
41
42
43
44
45
46
47
48
49
50
51
|
/**
* 题目:实现一个自旋锁
* 自旋锁好处:循环比较获取没有类似wait的阻塞。
*
* 通过CAS操作完成自旋锁,A线程先进来调用myLock方法自己持有锁5秒钟,B随后进来后发现
* 当前有线程持有锁,不是null,所以只能通过自旋等待,直到A释放锁后B随后抢到。
*/
public class SpinLockDemo {
AtomicReference<Thread> atomicReference = new AtomicReference<>();
public void myLock() {
Thread thread = Thread.currentThread();
System.out.println(Thread.currentThread().getName() + "\t come in");
while (!atomicReference.compareAndSet(null, thread)) {
}
}
public void myUnLock() {
Thread thread = Thread.currentThread();
atomicReference.compareAndSet(thread, null);
System.out.println(Thread.currentThread().getName() + "\t myUnLock over");
}
public static void main(String[] args) {
SpinLockDemo spinLockDemo = new SpinLockDemo();
new Thread(() -> {
spinLockDemo.myLock();
try {
TimeUnit.SECONDS.sleep(5);
} catch (InterruptedException e) {
e.printStackTrace();
}
spinLockDemo.myUnLock();
}, "A").start();
//暂停一会儿线程,保证A线程先于B线程启动并完成
try {
TimeUnit.SECONDS.sleep(1);
} catch (InterruptedException e) {
e.printStackTrace();
}
new Thread(() -> {
spinLockDemo.myLock();
spinLockDemo.myUnLock();
}, "B").start();
}
}
|
A come in
B come in
B myUnLock over
A myUnLock over
CAS缺点
1、循环时间长开销很大
会给CPU带来很大的开销。
2、ABA问题
CAS会导致“ABA问题”。
CAS算法实现一个重要前提需要取出内存中某时刻的数据并在当下时刻比较并替换,那么在这个时间差类会导致数据的变化。
比如说一个线程one从内存位置V中取出A,这时候另一个线程two也从内存中取出A,并且线程two进行了一些操作将值变成了B,然后线程two又将V位置的数据变成A,这时候线程one进行CAS操作发现内存中仍然是A,然后线程one操作成功。
尽管线程one的CAS操作成功,但是不代表这个过程就是没有问题的。
 1
 2
 3
 4
 5
 6
 7
 8
 9
10
11
12
13
14
15
16
17
18
19
20
21
22
23
24
25
26
27
28
29
30
31
32
33
34
35
36
37
38
39
40
41
42
43
44
45
46
47
48
49
50
51
52
53
54
55
56
57
58
|
public class ABADemo {
static AtomicInteger atomicInteger = new AtomicInteger(100);
static AtomicStampedReference atomicStampedReference = new AtomicStampedReference(100, 1);
public static void main(String[] args) {
new Thread(() -> {
atomicInteger.compareAndSet(100, 101);
atomicInteger.compareAndSet(101, 100);
}, "t1").start();
new Thread(() -> {
//暂停一会儿线程
try {
Thread.sleep(500);
} catch (InterruptedException e) {
e.printStackTrace();
}
System.out.println(atomicInteger.compareAndSet(100, 2019) + "\t" + atomicInteger.get());
}, "t2").start();
//暂停一会儿线程,main彻底等待上面的ABA出现演示完成。
try {
Thread.sleep(2000);
} catch (InterruptedException e) {
e.printStackTrace();
}
System.out.println("============以下是ABA问题的解决=============================");
new Thread(() -> {
int stamp = atomicStampedReference.getStamp();
System.out.println(Thread.currentThread().getName() + "\t 首次版本号:" + stamp);//1
//暂停一会儿线程,
try {
Thread.sleep(1000);
} catch (InterruptedException e) {
e.printStackTrace();
}
atomicStampedReference.compareAndSet(100, 101, atomicStampedReference.getStamp(), atomicStampedReference.getStamp() + 1);
System.out.println(Thread.currentThread().getName() + "\t 2次版本号:" + atomicStampedReference.getStamp());
atomicStampedReference.compareAndSet(101, 100, atomicStampedReference.getStamp(), atomicStampedReference.getStamp() + 1);
System.out.println(Thread.currentThread().getName() + "\t 3次版本号:" + atomicStampedReference.getStamp());
}, "t3").start();
new Thread(() -> {
int stamp = atomicStampedReference.getStamp();
System.out.println(Thread.currentThread().getName() + "\t 首次版本号:" + stamp);//1
//暂停一会儿线程,获得初始值100和初始版本号1,故意暂停3秒钟让t3线程完成一次ABA操作产生问题
try {
Thread.sleep(3000);
} catch (InterruptedException e) {
e.printStackTrace();
}
boolean result = atomicStampedReference.compareAndSet(100, 2019, stamp, stamp + 1);
System.out.println(Thread.currentThread().getName() + "\t" + result + "\t" + atomicStampedReference.getReference());
}, "t4").start();
}
}
|
true 2019
============以下是ABA问题的解决=============================
t3 首次版本号:1
t4 首次版本号:1
t3 2次版本号:2
t3 3次版本号:3
t4 false 100
原子操作类
- AtomicBoolean
- AtomicInteger
- AtomicIntegerArray
- AtomicIntegerFieldUpdater
- AtomicLong
- AtomicLongArray
- AtomicLongFieldUpdater
- AtomicMarkableReference
- AtomicReference
- AtomicReferenceArray
- AtomicReferenceFieldUpdater
- AtomicStampedReference
- DoubleAccumulator
- DoubleAdder
- LongAccumulator
- LongAdder
1、基本类型原子类
- AtomicInteger
- AtomicBoolean
- AtomicLong
1
2
3
4
5
6
7
8
9
10
11
12
13
14
15
16
17
18
19
20
21
22
23
24
25
26
27
28
29
30
31
32
33
34
|
class MyNumber {
private AtomicInteger atomicInteger = new AtomicInteger();
public AtomicInteger getAtomicInteger() {
return atomicInteger;
}
public void addPlusPlus() {
atomicInteger.incrementAndGet();
}
}
public class AtomicIntegerDemo {
public static void main(String[] args) throws InterruptedException {
MyNumber myNumber = new MyNumber();
CountDownLatch countDownLatch = new CountDownLatch(100);
for (int i = 1; i <= 100; i++) {
new Thread(() -> {
try {
for (int j = 1; j <= 5000; j++) {
myNumber.addPlusPlus();
}
} finally {
countDownLatch.countDown();
}
}, String.valueOf(i)).start();
}
countDownLatch.await();
System.out.println(myNumber.getAtomicInteger().get());
}
}
|
500000
2、数组类型原子类
- AtomicIntegerArray
- AtomicLongArray
- AtomicReferenceArray
1
2
3
4
5
6
7
8
9
10
11
12
13
14
15
16
17
18
19
|
public class AtomicIntegerArrayDemo {
public static void main(String[] args) {
// AtomicIntegerArray atomicIntegerArray = new AtomicIntegerArray(new int[5]);
// AtomicIntegerArray atomicIntegerArray = new AtomicIntegerArray(5);
AtomicIntegerArray atomicIntegerArray = new AtomicIntegerArray(new int[]{1, 2, 3, 4, 5});
for (int i = 0; i < atomicIntegerArray.length(); i++) {
System.out.println(atomicIntegerArray.get(i));
}
int tmpInt = 0;
tmpInt = atomicIntegerArray.getAndSet(0, 1122);
System.out.println(tmpInt + "\t" + atomicIntegerArray.get(0));
atomicIntegerArray.getAndIncrement(1);
atomicIntegerArray.getAndIncrement(1);
tmpInt = atomicIntegerArray.getAndIncrement(1);
System.out.println(tmpInt + "\t" + atomicIntegerArray.get(1));
}
}
|
1
2
3
4
5
1 1122
4 5
3、引用类型原子类
-
AtomicReference
-
AtomicStampedReference
- 携带版本号的引用类型原子类,可以解决ABA问题
- 解决修改过几次
- 状态戳原子引用
 1
 2
 3
 4
 5
 6
 7
 8
 9
10
11
12
13
14
15
16
17
18
19
20
21
22
23
24
25
26
27
28
29
30
31
32
33
34
35
36
37
38
39
40
41
42
43
44
45
46
47
48
49
50
51
52
53
54
55
56
|
public class ABADemo {
static AtomicInteger atomicInteger = new AtomicInteger(100);
static AtomicStampedReference atomicStampedReference = new AtomicStampedReference(100, 1);
public static void main(String[] args) {
abaProblem();
abaResolve();
}
public static void abaProblem() {
new Thread(() -> {
atomicInteger.compareAndSet(100, 101);
atomicInteger.compareAndSet(101, 100);
}, "t1").start();
try {
TimeUnit.MILLISECONDS.sleep(200);
} catch (InterruptedException e) {
e.printStackTrace();
}
new Thread(() -> {
boolean result = atomicInteger.compareAndSet(100, 20210308);
System.out.println(Thread.currentThread().getName() + "\t" + result + "\t" + atomicInteger.get());
}, "t2").start();
}
public static void abaResolve() {
new Thread(() -> {
int stamp = atomicStampedReference.getStamp();
System.out.println("t3 ----第1次stamp " + stamp);
try {
TimeUnit.SECONDS.sleep(1);
} catch (InterruptedException e) {
e.printStackTrace();
}
atomicStampedReference.compareAndSet(100, 101, stamp, stamp + 1);
System.out.println("t3 ----第2次stamp " + atomicStampedReference.getStamp());
atomicStampedReference.compareAndSet(101, 100, atomicStampedReference.getStamp(), atomicStampedReference.getStamp() + 1);
System.out.println("t3 ----第3次stamp " + atomicStampedReference.getStamp());
}, "t3").start();
new Thread(() -> {
int stamp = atomicStampedReference.getStamp();
System.out.println("t4 ----第1次stamp " + stamp);
//暂停几秒钟线程
try {
TimeUnit.SECONDS.sleep(3);
} catch (InterruptedException e) {
e.printStackTrace();
}
boolean result = atomicStampedReference.compareAndSet(100, 20210308, stamp, stamp + 1);
System.out.println(Thread.currentThread().getName() + "\t" + result + "\t" + atomicStampedReference.getReference());
}, "t4").start();
}
}
|
t2 true 20210308
t4 —-第1次stamp 1
t3 —-第1次stamp 1
t3 —-第2次stamp 2
t3 —-第3次stamp 3
t4 false 100
- AtomicMarkableReference
- 原子更新带有标记位的引用类型对象
- 解决是否修改过:将状态戳简化为true|false——类似一次性筷子
- 状态戳(true/false)原子引用
 1
 2
 3
 4
 5
 6
 7
 8
 9
10
11
12
13
14
15
16
17
18
19
20
21
22
23
24
25
26
27
28
29
30
31
32
33
34
|
public class ABADemo {
static AtomicMarkableReference<Integer> markableReference = new AtomicMarkableReference<>(100, false);
public static void main(String[] args) {
System.out.println("============AtomicMarkableReference不关心引用变量更改过几次,只关心是否更改过======================");
new Thread(() -> {
boolean marked = markableReference.isMarked();
System.out.println(Thread.currentThread().getName() + "\t 1次版本号" + marked);
try {
TimeUnit.MILLISECONDS.sleep(100);
} catch (InterruptedException e) {
e.printStackTrace();
}
markableReference.compareAndSet(100, 101, marked, !marked);
System.out.println(Thread.currentThread().getName() + "\t 2次版本号" + markableReference.isMarked());
markableReference.compareAndSet(101, 100, markableReference.isMarked(), !markableReference.isMarked());
System.out.println(Thread.currentThread().getName() + "\t 3次版本号" + markableReference.isMarked());
}, "t5").start();
new Thread(() -> {
boolean marked = markableReference.isMarked();
System.out.println(Thread.currentThread().getName() + "\t 1次版本号" + marked);
//暂停几秒钟线程
try {
TimeUnit.MILLISECONDS.sleep(100);
} catch (InterruptedException e) {
e.printStackTrace();
}
markableReference.compareAndSet(100, 2020, marked, !marked);
System.out.println(Thread.currentThread().getName() + "\t" + markableReference.getReference() + "\t" + markableReference.isMarked());
}, "t6").start();
}
}
|
t5 1次版本号false
t6 1次版本号false
t5 2次版本号true
t5 3次版本号false
t6 101 false
4、对象的属性修改原子类
- AtomicIntegerFieldUpdater
- AtomicLongFieldUpdater
- AtomicReferenceFieldUpdater
1、使用目的
以一种线程安全的方式操作非线程安全对象内的某些字段
2、使用要求
AtomicIntegerFieldUpdater
 1
 2
 3
 4
 5
 6
 7
 8
 9
10
11
12
13
14
15
16
17
18
19
20
21
22
23
24
25
26
27
28
29
30
31
32
33
34
35
36
37
38
39
|
class BankAccount {
private String bankName = "CCB";//银行
public volatile int money = 0;//钱数
AtomicIntegerFieldUpdater<BankAccount> accountAtomicIntegerFieldUpdater = AtomicIntegerFieldUpdater.newUpdater(BankAccount.class, "money");
//不加锁+性能高,局部微创
public void transferMoney(BankAccount bankAccount) {
accountAtomicIntegerFieldUpdater.incrementAndGet(bankAccount);
}
}
/**
* 以一种线程安全的方式操作非线程安全对象的某些字段。
* 需求:
* 1000个人同时向一个账号转账一元钱,那么累计应该增加1000元,
* 除了synchronized和CAS,还可以使用AtomicIntegerFieldUpdater来实现。
*/
public class AtomicIntegerFieldUpdaterDemo {
public static void main(String[] args) {
BankAccount bankAccount = new BankAccount();
for (int i = 1; i <= 1000; i++) {
new Thread(() -> {
bankAccount.transferMoney(bankAccount);
}, String.valueOf(i)).start();
}
//暂停毫秒
try {
TimeUnit.MILLISECONDS.sleep(500);
} catch (InterruptedException e) {
e.printStackTrace();
}
System.out.println(bankAccount.money);
}
}
|
1000
AtomicReferenceFieldUpdater
 1
 2
 3
 4
 5
 6
 7
 8
 9
10
11
12
13
14
15
16
17
18
19
20
21
22
23
24
25
26
27
28
29
30
31
32
33
34
|
class MyVar {
public volatile Boolean isInit = Boolean.FALSE;
AtomicReferenceFieldUpdater<MyVar, Boolean> atomicReferenceFieldUpdater = AtomicReferenceFieldUpdater.newUpdater(MyVar.class, Boolean.class, "isInit");
public void init(MyVar myVar) {
if (atomicReferenceFieldUpdater.compareAndSet(myVar, Boolean.FALSE, Boolean.TRUE)) {
System.out.println(Thread.currentThread().getName() + "\t" + "---init.....");
//暂停几秒钟线程
try {
TimeUnit.SECONDS.sleep(2);
} catch (InterruptedException e) {
e.printStackTrace();
}
System.out.println(Thread.currentThread().getName() + "\t" + "---init.....over");
} else {
System.out.println(Thread.currentThread().getName() + "\t" + "------其它线程正在初始化");
}
}
}
/**
* 多线程并发调用一个类的初始化方法,如果未被初始化过,将执行初始化工作,要求只能初始化一次
*/
public class AtomicReferenceFieldUpdaterDemo {
public static void main(String[] args) throws InterruptedException {
MyVar myVar = new MyVar();
for (int i = 1; i <= 5; i++) {
new Thread(() -> {
myVar.init(myVar);
}, String.valueOf(i)).start();
}
}
}
|
1 —init…..
4 ——其它线程正在初始化
2 ——其它线程正在初始化
5 ——其它线程正在初始化
3 ——其它线程正在初始化
1 —init…..over
5、原子操作增强类
- DoubleAccumulator
- DoubleAdder
- LongAccumulator:提供了自定义的函数操作
- LongAdder:只能用来计算加法,且从零开始计算
LongAdder
1
2
3
4
5
6
7
8
9
10
11
12
13
14
15
|
public class LongAdderAPIDemo {
public static void main(String[] args) {
LongAdder longAdder = new LongAdder();
longAdder.increment();
longAdder.increment();
longAdder.increment();
System.out.println(longAdder.longValue());
LongAccumulator longAccumulator = new LongAccumulator((x, y) -> x * y, 2);
longAccumulator.accumulate(1);
longAccumulator.accumulate(2);
longAccumulator.accumulate(3);
System.out.println(longAccumulator.longValue());
}
}
|
3
12
LongAccumulator
 1
 2
 3
 4
 5
 6
 7
 8
 9
10
11
12
13
14
15
16
17
18
19
20
21
22
23
24
25
26
27
28
|
public class LongAccumulatorDemo {
LongAdder longAdder = new LongAdder();
public void add_LongAdder() {
longAdder.increment();
}
//long类型的聚合器,需要传入一个long类型的二元操作,可以用来计算各种聚合操作,包括加乘等
//LongAccumulator longAccumulator = new LongAccumulator((x, y) -> x + y,0);
LongAccumulator longAccumulator = new LongAccumulator(new LongBinaryOperator() {
@Override
public long applyAsLong(long left, long right) {
return left - right;
}
}, 777);
public void add_LongAccumulator() {
longAccumulator.accumulate(1);
}
public static void main(String[] args) {
LongAccumulatorDemo demo = new LongAccumulatorDemo();
demo.add_LongAccumulator();
demo.add_LongAccumulator();
System.out.println(demo.longAccumulator.longValue());
}
}
|
775
LongAdder高性能对比Code演示
 1
 2
 3
 4
 5
 6
 7
 8
 9
10
11
12
13
14
15
16
17
18
19
20
21
22
23
24
25
26
27
28
29
30
31
32
33
34
35
36
37
38
39
40
41
42
43
44
45
46
47
48
49
50
51
52
53
54
55
56
57
58
59
60
61
62
63
64
65
66
67
68
69
70
71
72
73
74
75
76
77
78
79
80
81
82
83
84
85
86
87
88
89
90
91
92
93
94
95
96
97
98
99
100
101
102
103
104
105
106
|
class ClickNumberNet {
int number = 0;
public synchronized void clickBySync() {
number++;
}
AtomicLong atomicLong = new AtomicLong(0);
public void clickByAtomicLong() {
atomicLong.incrementAndGet();
}
LongAdder longAdder = new LongAdder();
public void clickByLongAdder() {
longAdder.increment();
}
LongAccumulator longAccumulator = new LongAccumulator((x, y) -> x + y, 0);
public void clickByLongAccumulator() {
longAccumulator.accumulate(1);
}
}
/**
* 50个线程,每个线程100W次,总点赞数出来
*/
public class LongAdderDemo {
public static void main(String[] args) throws InterruptedException {
ClickNumberNet clickNumberNet = new ClickNumberNet();
long startTime;
long endTime;
CountDownLatch countDownLatch = new CountDownLatch(50);
CountDownLatch countDownLatch2 = new CountDownLatch(50);
CountDownLatch countDownLatch3 = new CountDownLatch(50);
CountDownLatch countDownLatch4 = new CountDownLatch(50);
startTime = System.currentTimeMillis();
for (int i = 1; i <= 50; i++) {
new Thread(() -> {
try {
for (int j = 1; j <= 100 * 10000; j++) {
clickNumberNet.clickBySync();
}
} finally {
countDownLatch.countDown();
}
}, String.valueOf(i)).start();
}
countDownLatch.await();
endTime = System.currentTimeMillis();
System.out.println("----costTime: " + (endTime - startTime) + " 毫秒" + "\t clickBySync result: " + clickNumberNet.number);
startTime = System.currentTimeMillis();
for (int i = 1; i <= 50; i++) {
new Thread(() -> {
try {
for (int j = 1; j <= 100 * 10000; j++) {
clickNumberNet.clickByAtomicLong();
}
} finally {
countDownLatch2.countDown();
}
}, String.valueOf(i)).start();
}
countDownLatch2.await();
endTime = System.currentTimeMillis();
System.out.println("----costTime: " + (endTime - startTime) + " 毫秒" + "\t clickByAtomicLong result: " + clickNumberNet.atomicLong);
startTime = System.currentTimeMillis();
for (int i = 1; i <= 50; i++) {
new Thread(() -> {
try {
for (int j = 1; j <= 100 * 10000; j++) {
clickNumberNet.clickByLongAdder();
}
} finally {
countDownLatch3.countDown();
}
}, String.valueOf(i)).start();
}
countDownLatch3.await();
endTime = System.currentTimeMillis();
System.out.println("----costTime: " + (endTime - startTime) + " 毫秒" + "\t clickByLongAdder result: " + clickNumberNet.longAdder.sum());
startTime = System.currentTimeMillis();
for (int i = 1; i <= 50; i++) {
new Thread(() -> {
try {
for (int j = 1; j <= 100 * 10000; j++) {
clickNumberNet.clickByLongAccumulator();
}
} finally {
countDownLatch4.countDown();
}
}, String.valueOf(i)).start();
}
countDownLatch4.await();
endTime = System.currentTimeMillis();
System.out.println("----costTime: " + (endTime - startTime) + " 毫秒" + "\t clickByLongAccumulator result: " + clickNumberNet.longAccumulator.longValue());
}
}
|
—-costTime: 1487 毫秒 clickBySync result: 50000000
—-costTime: 2042 毫秒 clickByAtomicLong result: 50000000
—-costTime: 93 毫秒 clickByLongAdder result: 50000000
—-costTime: 115 毫秒 clickByLongAccumulator result: 50000000
源码、原理分析
1
2
3
4
5
6
|
public class LongAdder extends Striped64 implements Serializable {
...
}
abstract class Striped64 extends Number {
...
}
|
Striped64中几个比较重要的成员属性:
1
2
3
4
5
6
7
8
9
10
11
12
13
14
15
16
17
18
|
/** Number of CPUS, to place bound on table size */
static final int NCPU = Runtime.getRuntime().availableProcessors();
/**
* Table of cells. When non-null, size is a power of 2.
*/
transient volatile Cell[] cells;
/**
* Base value, used mainly when there is no contention, but also as
* a fallback during table initialization races. Updated via CAS.
*/
transient volatile long base;
/**
* Spinlock (locked via CAS) used when resizing and/or creating Cells.
*/
transient volatile int cellsBusy;
|
LongAdder的基本思路就是分散热点,将value值分散到一个Cell数组中,不同线程会命中到数组的不同槽中,各个线程只对自己槽中的那个值进行CAS操作,这样热点就被分散了,冲突的概率就小很多。如果要获取真正的long值,只要将各个槽中的变量值累加返回。
sum()会将所有Cell数组中的value和base累加作为返回值,核心的思想就是将之前AtomicLong一个value的更新压力分散到多个value中去, 从而降级更新热点。
内部有一个base变量,一个Cell[]数组。
base变量:非竞态条件下,直接累加到该变量上
Cell[]数组:竞态条件下,累加个各个线程自己的槽Cell[i]中
LongAdder在无竞争的情况,跟AtomicLong一样,对同一个base进行操作,当出现竞争关系时则是采用化整为零的做法,从空间换时间,用一个数组cells,将一个value拆分进这个数组cells。多个线程需要同时对value进行操作时候,可以对线程id进行hash得到hash值,再根据hash值映射到这个数组cells的某个下标,再对该下标所对应的值进行自增操作。当所有线程操作完毕,将数组cells的所有值和无竞争值base都加起来作为最终结果。
AtomicLong VS LongAdder
- AtomicLong
- 线程安全,可允许一些性能损耗,要求高精度时可使用
- 保证精度,性能代价
- AtomicLong是多个线程针对单个热点值value进行原子操作
- LongAdder
- 当需要在高并发下有较好的性能表现,且对值的精确度要求不高时,可以使用
- 保证性能,精度代价
- LongAdder是每个线程拥有自己的槽,各个线程一般只对自己槽中的那个值进行CAS操作
总结
AtomicLong
- 原理
- 场景
- 低并发下的全局计算
- AtomicLong能保证并发情况下计数的准确性,其内部通过CAS来解决并发安全性的问题。
- 缺陷
- 高并发后性能急剧下降
- AtomicLong的自旋会成为瓶颈
- N个线程CAS操作修改线程的值,每次只有一个成功过,其它N-1失败,失败的不停的自旋直到成功,这样大量失败自旋的情况,一下子cpu就打高了
LongAdder
- 原理
- CAS+Base+Cell数组分散
- 空间换时间并分散了热点数据
- 场景
- 缺陷
- sum求和后还有计算线程修改结果的话,最后结果不够准确
ThreadLocal
简介
This class provides thread-local variables. These variables differ from their normal counterparts in that each thread that accesses one (via its get or set method) has its own, independently initialized copy of the variable. ThreadLocal instances are typically private static fields in classes that wish to associate state with a thread (e.g., a user ID or Transaction ID).
ThreadLocal提供线程局部变量。这些变量与正常的变量不同,因为每一个线程在访问ThreadLocal实例的时候(通过其get或set方法)都有自己的、独立初始化的变量副本。ThreadLocal实例通常是类中的私有静态字段,使用它的目的是希望将状态(例如,用户ID或事务ID)与线程关联起来。
实现每一个线程都有自己专属的本地变量副本(自己用自己的变量,不和其他人共享,人人有份,人各一份),主要解决了让每个线程绑定自己的值,通过使用get()和set()方法,获取默认值或将其值更改为当前线程所存的副本的值从而避免了线程安全问题。
 1
 2
 3
 4
 5
 6
 7
 8
 9
10
11
12
13
14
15
16
17
18
19
20
21
22
23
24
25
26
27
28
29
30
31
32
33
34
35
36
37
38
39
40
41
42
43
44
45
46
47
48
49
50
|
class House {
ThreadLocal<Integer> threadLocal = ThreadLocal.withInitial(() -> 0);
public void saleHouse() {
Integer value = threadLocal.get();
value++;
threadLocal.set(value);
}
}
public class ThreadLocalDemo {
public static void main(String[] args) {
House house = new House();
new Thread(() -> {
try {
for (int i = 1; i <= 3; i++) {
house.saleHouse();
}
System.out.println(Thread.currentThread().getName() + "\t" + "---" + house.threadLocal.get());
} finally {
house.threadLocal.remove();//如果不清理自定义的 ThreadLocal 变量,可能会影响后续业务逻辑和造成内存泄露等问题
}
}, "t1").start();
new Thread(() -> {
try {
for (int i = 1; i <= 2; i++) {
house.saleHouse();
}
System.out.println(Thread.currentThread().getName() + "\t" + "---" + house.threadLocal.get());
} finally {
house.threadLocal.remove();
}
}, "t2").start();
new Thread(() -> {
try {
for (int i = 1; i <= 5; i++) {
house.saleHouse();
}
System.out.println(Thread.currentThread().getName() + "\t" + "---" + house.threadLocal.get());
} finally {
house.threadLocal.remove();
}
}, "t3").start();
System.out.println(Thread.currentThread().getName() + "\t" + "---" + house.threadLocal.get());
}
}
|
t1 —3
t2 —2
main —0
t3 —5
Thread,ThreadLocal,ThreadLocalMap
 1
 2
 3
 4
 5
 6
 7
 8
 9
10
11
12
13
14
15
16
17
18
19
20
21
22
23
24
|
public class ThreadLocal<T> {
static class ThreadLocalMap {
/**
* The entries in this hash map extend WeakReference, using
* its main ref field as the key (which is always a
* ThreadLocal object). Note that null keys (i.e. entry.get()
* == null) mean that the key is no longer referenced, so the
* entry can be expunged from table. Such entries are referred to
* as "stale entries" in the code that follows.
*/
static class Entry extends WeakReference<ThreadLocal<?>> {
/** The value associated with this ThreadLocal. */
Object value;
Entry(ThreadLocal<?> k, Object v) {
super(k);
value = v;
}
}
...
}
...
}
|
ThreadLocalMap实际上就是一个以ThreadLocal实例为key,任意对象为value的Entry对象。 当为ThreadLocal变量赋值,实际上就是以当前ThreadLocal实例为key,值为value的Entry往这个threadLocalMap中存放。
近似可以理解为: ThreadLocalMap从字面上就可以看出这是一个保存ThreadLocal对象的map(其实是以ThreadLocal为Key),不过是经过了两层包装的ThreadLocal对象。
JVM内部维护了一个线程版的Map<Thread,T>(通过ThreadLocal对象的set方法,结果把ThreadLocal对象自己当做key,放进了ThreadLoalMap中),每个线程要用到这个T的时候,用当前的线程去Map里面获取,通过这样让每个线程都拥有了自己独立的变量,人手一份,竞争条件被彻底消除,在并发模式下是绝对安全的变量。
ThreadLocal内存泄漏
不再会被使用的对象或者变量占用的内存不能被回收,就是内存泄露。
Java 允许使用 finalize() 方法在垃圾收集器将对象从内存中清除出去之前做必要的清理工作。
Entry弱引用
为什么ThreadLocalMap的Entry要用弱引用?不用如何?
1
2
3
4
5
6
7
8
|
public void function01()
{
ThreadLocal tl = new ThreadLocal<Integer>(); //line1
tl.set(2021); //line2
tl.get(); //line3
}
//line1新建了一个ThreadLocal对象,tl 是强引用指向这个对象;
//line2调用set()方法后新建一个Entry,通过源码可知Entry对象里的k是弱引用指向这个对象。
|
当function01方法执行完毕后,栈帧销毁强引用 tl 也就没有了。
但此时线程的ThreadLocalMap里某个entry的key引用还指向这个对象,若这个key引用是强引用,就会导致key指向的ThreadLocal对象及Object v指向的对象不能被GC回收,造成内存泄漏。
若这个key引用是弱引用就大概率会减少内存泄漏的问题(还有一个key为null的雷)。
使用弱引用,就可以使ThreadLocal对象在方法执行完毕后顺利被回收且Entry的key引用指向为null。
此后我们调用get,set或remove方法时,就会尝试删除key为null的entry,可以释放value对象所占用的内存
弱引用就万事大吉了吗?
-
当我们为threadLocal变量赋值,实际上就是当前的Entry(ThreadLocal实例为key,值为value)往这个ThreadLocalMap中存放。
Entry中的key是弱引用,当ThreadLocal外部强引用被置为null(tl=null),那么系统 GC 的时候,根据可达性分析,这个ThreadLocal实例就没有任何一条链路能够引用到它,这个ThreadLocal势必会被回收,这样一来,ThreadLocalMap中就会出现key为null的Entry,就没有办法访问这些key为null的Entry的value,如果当前线程再迟迟不结束的话,这些key为null的Entry的value就会一直存在一条强引用链:
Thread Ref -> Thread -> ThreaLocalMap -> Entry -> value
永远无法回收,造成内存泄漏。
-
如果当前Thread运行结束,ThreadLocal、ThreadLocalMap、Entry没有引用链可达,在垃圾回收的时候都会被系统进行回收。
-
但在实际使用中有时候会用线程池去维护线程,比如在Executors.newFixedThreadPool()时创建线程的时候,为了复用线程是不会结束的,所以ThreadLocal内存泄漏就要小心。
key为null的Entry
ThreadLocalMap使用ThreadLocal的弱引用作为key,如果一个ThreadLocal没有外部强引用引用他,那么系统GC的时候,这个ThreadLocal势必会被回收,这样一来,ThreadLocalMap中就会出现key为null的Entry,就没有办法访问这些key为null的Entry的value,如果当前线程再迟迟不结束的话(比如正好用在线程池),这些key为null的Entry的value就会一直存在一条强引用链。
虽然弱引用,保证了key指向的ThreadLocal对象能被及时回收,但是v指向的value对象是需要ThreadLocalMap调用get、set时发现key为null时才会去回收整个entry、value,因此弱引用不能100%保证内存不泄露。
要在不使用某个ThreadLocal对象后,手动调用remoev方法来删除它,尤其是在线程池中,不仅仅是内存泄露的问题,因为线程池中的线程是重复使用的,意味着这个线程的ThreadLocalMap对象也是重复使用的,如果我们不手动调用remove方法,那么后面的线程就有可能获取到上个线程遗留下来的value值,造成bug。
从ThreadLocal的set、getEntry、remove方法看出,在ThreadLocal的生命周期里,针对ThreadLocal存在的内存泄漏的问题, 都会通过expungeStaleEntry,cleanSomeSlots,replaceStaleEntry这三个方法清理掉key为null的脏entry。
总结
每个Thread对象维护着一个ThreadLocalMap的引用
ThreadLocalMap是ThreadLocal的内部类,用Entry来进行存储
调用ThreadLocal的set()方法时,实际上就是往ThreadLocalMap设置值,key是ThreadLocal对象,值Value是传递进来的对象
调用ThreadLocal的get()方法时,实际上就是往ThreadLocalMap获取值,key是ThreadLocal对象
ThreadLocal本身并不存储值,它只是自己作为一个key来让线程从ThreadLocalMap获取value,正因为这个原理,所以ThreadLocal能够实现“数据隔离”,获取当前线程的局部变量值,不受其他线程影响。
- ThreadLocal
并不解决线程间共享数据的问题
- ThreadLocal 适用于
变量在线程间隔离且在方法间共享的场景
- ThreadLocal 通过隐式的在不同线程内创建独立实例副本避免了实例线程安全的问题
- 每个线程持有一个只属于自己的专属Map并维护了ThreadLocal对象与具体实例的映射,该Map由于只被持有它的线程访问,故不存在线程安全以及锁的问题
- ThreadLocalMap的Entry对ThreadLocal的引用为弱引用,避免了ThreadLocal对象无法被回收的问题
- 都会通过expungeStaleEntry、cleanSomeSlots、replaceStaleEntry这三个方法回收键为 null 的 Entry 对象的值(即为具体实例)以及 Entry 对象本身从而防止内存泄漏,属于安全加固的方法
最佳实践
- 一定要进行初始化避免空指针问题ThreadLocal.withInitial(()- > 初始化值);
- 建议把ThreadLocal修饰为static
- 用完记得手动remove
引用
引用:强——>软——>弱——>虚
1、强引用(默认支持模式)
当内存不足,JVM开始垃圾回收,对于强引用的对象,就算是出现了OOM也不会对该对象进行回收,死都不收。
强引用是我们最常见的普通对象引用,只要还有强引用指向一个对象,就能表明对象还“活着”,垃圾收集器不会碰这种对象。在 Java 中最常见的就是强引用,把一个对象赋给一个引用变量,这个引用变量就是一个强引用。当一个对象被强引用变量引用时,它处于可达状态,它是不可能被垃圾回收机制回收的,即使该对象以后永远都不会被用到JVM也不会回收。因此强引用是造成Java内存泄漏的主要原因之一。
对于一个普通的对象,如果没有其他的引用关系,只要超过了引用的作用域或者显式地将相应(强)引用赋值为 null,一般认为就是可以被垃圾收集的了(当然具体回收时机还是要看垃圾收集策略)。
 1
 2
 3
 4
 5
 6
 7
 8
 9
10
11
12
13
14
15
16
17
18
19
20
21
22
23
24
25
26
27
|
class MyObject {
@Override
protected void finalize() throws Throwable {
System.out.println("-----invoke finalize method");
}
}
public class ReferenceDemo {
public static void main(String[] args) {
strongReference();
}
public static void strongReference() {
MyObject myObject = new MyObject();
System.out.println("-----gc before: " + myObject);
myObject = null;
System.gc();
try {
TimeUnit.SECONDS.sleep(1);
} catch (InterruptedException e) {
e.printStackTrace();
}
System.out.println("-----gc after: " + myObject);
}
}
|
—–gc before: shuo.laoma.concurrent.test.MyObject@5a07e868
—–invoke finalize method
—–gc after: null
2、软引用
软引用需要用java.lang.ref.SoftReference类来实现,可以让对象豁免一些垃圾收集。
对于只有软引用的对象来说,
- 当系统内存充足时不会被回收,
- 当系统内存不足时会被回收。
软引用通常用在对内存敏感的程序中,比如高速缓存就有用到软引用,内存够用的时候就保留,不够用就回收!
3、弱引用
弱引用需要用java.lang.ref.WeakReference类来实现,它比软引用的生存期更短,对于只有弱引用的对象来说,只要垃圾回收机制一运行,不管JVM的内存空间是否足够,都会回收该对象占用的内存。
软引用和弱引用的适用场景
假如有一个应用需要读取大量的本地图片,如果每次读取图片都从硬盘读取则会严重影响性能,如果一次性全部加载到内存中又可能造成内存溢出,此时使用软引用可以解决这个问题。
设计思路是:用一个HashMap来保存图片的路径和相应图片对象关联的软引用之间的映射关系,在内存不足时,JVM会自动回收这些缓存图片对象所占用的空间,从而有效地避免了OOM的问题。
1
|
Map<String, SoftReference<Bitmap>> imageCache = new HashMap<String, SoftReference<Bitmap>>();
|
4、虚引用
虚引用需要java.lang.ref.PhantomReference类来实现。
顾名思义,就是形同虚设,与其他几种引用都不同,虚引用并不会决定对象的生命周期。如果一个对象仅持有虚引用,那么它就和没有任何引用一样,在任何时候都可能被垃圾回收器回收,它不能单独使用也不能通过它访问对象,虚引用必须和引用队列 (ReferenceQueue)联合使用。
虚引用的主要作用是跟踪对象被垃圾回收的状态。 仅仅是提供了一种确保对象被 finalize以后,做某些事情的机制。
PhantomReference的get方法总是返回null,因此无法访问对应的引用对象。
其意义在于:说明一个对象已经进入finalization阶段,可以被gc回收,用来实现比finalization机制更灵活的回收操作。
换句话说,设置虚引用关联的唯一目的,就是在这个对象被收集器回收的时候收到一个系统通知或者后续添加进一步的处理。
Java对象内存布局和对象头
对象在堆内存中布局
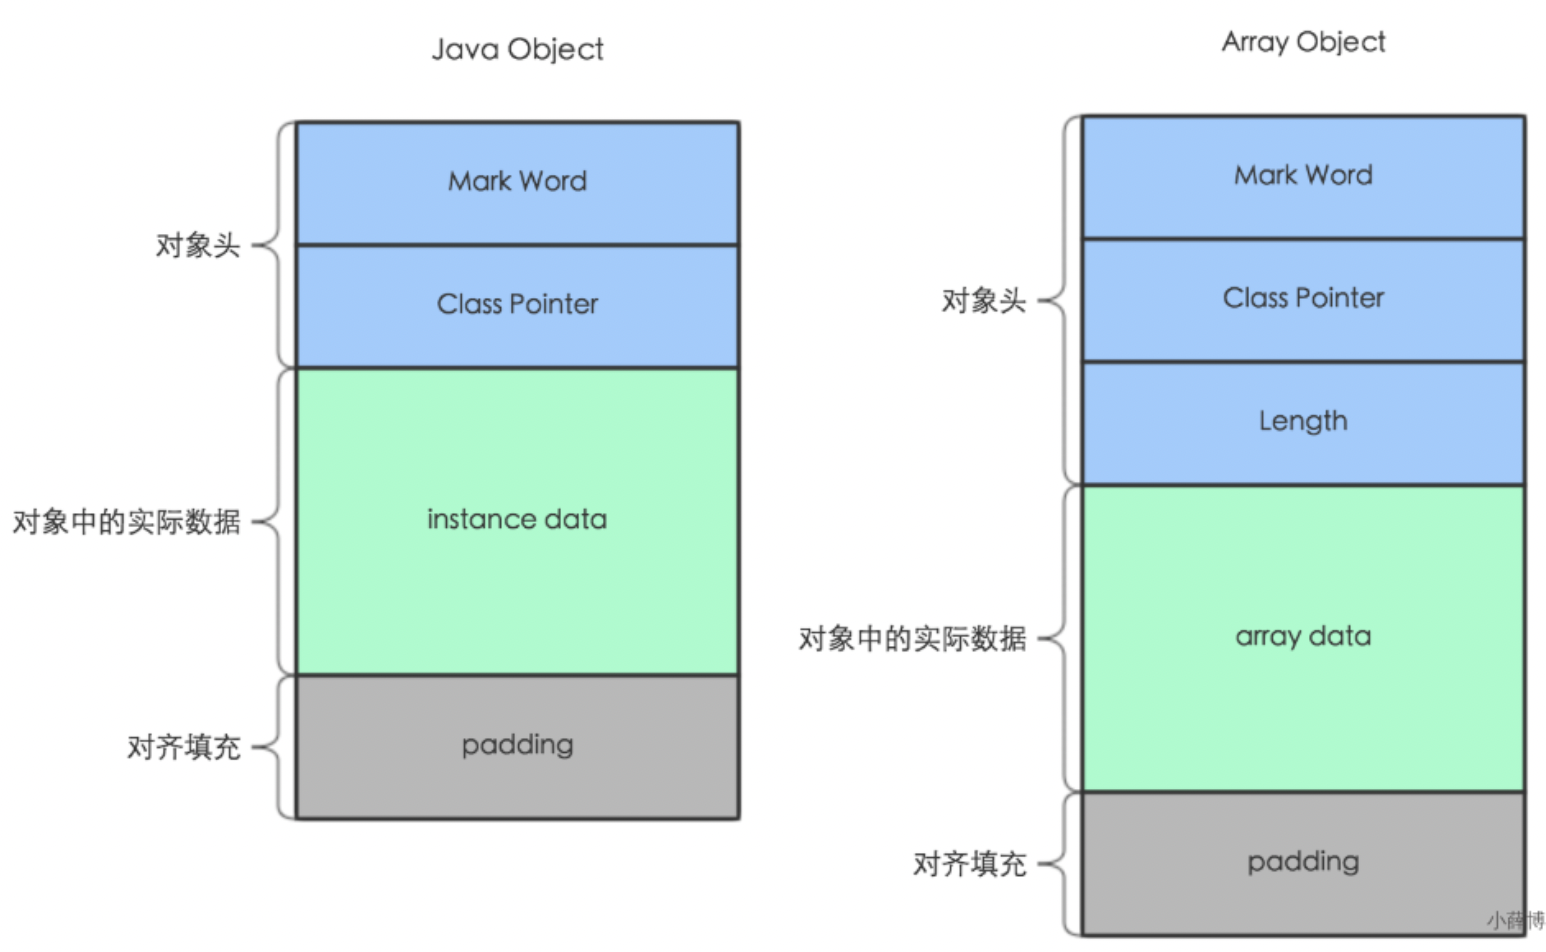
对象内部结构分为:对象头、实例数据、对齐填充(保证8个字节的倍数)。 对象头分为对象标记(markOop)和类元信息(klassOop),类元信息存储的是指向该对象类元数据(klass)的首地址。
对象头
对象标记Mark Word
在64位系统中,Mark Word占了8个字节,类型指针占了8个字节,一共是16个字节。
默认存储对象的HashCode、分代年龄和锁标志位等信息。这些信息都是与对象自身定义无关的数据,所以MarkWord被设计成一个非固定的数据结构以便在极小的空间内存存储尽量多的数据。它会根据对象的状态复用自己的存储空间,也就是说在运行期间MarkWord里存储的数据会随着锁标志位的变化而变化。
类元信息(对象指针)
对象指向它的类元数据的指针,虚拟机通过这个指针来确定这个对象是哪个类的实例。
实例数据
存放类的属性(Field)数据信息,包括父类的属性信息,如果是数组的实例部分还包括数组的长度,这部分内存按4字节对齐。
对齐填充
虚拟机要求对象起始地址必须是8字节的整数倍。填充数据不是必须存在的,仅仅是为了字节对齐这部分内存按8字节补充对齐。
Synchronized与锁升级
1、Synchronized 锁优化的背景
用锁能够实现数据的安全性,但是会带来性能下降。 无锁能够基于线程并行提升程序性能,但是会带来安全性下降。
synchronized锁:由对象头中的Mark Word根据锁标志位的不同而被复用及锁升级策略
2、Synchronized的性能变化
java5以前,只有Synchronized,这个是操作系统级别的重量级操作,重量级锁,假如锁的竞争比较激烈的话,性能下降
Java5之前,用户态和内核态之间的切换
Java的线程是映射到操作系统原生线程之上的,如果要阻塞或唤醒一个线程就需要操作系统介入,需要在户态与核心态之间切换,这种切换会消耗大量的系统资源,因为用户态与内核态都有各自专用的内存空间,专用的寄存器等,用户态切换至内核态需要传递给许多变量、参数给内核,内核也需要保护好用户态在切换时的一些寄存器值、变量等,以便内核态调用结束后切换回用户态继续工作。
在Java早期版本中,synchronized属于重量级锁,效率低下,因为监视器锁(monitor)是依赖于底层的操作系统的Mutex Lock来实现的,挂起线程和恢复线程都需要转入内核态去完成,阻塞或唤醒一个Java线程需要操作系统切换CPU状态来完成,这种状态切换需要耗费处理器时间,如果同步代码块中内容过于简单,这种切换的时间可能比用户代码执行的时间还长”,时间成本相对较高,这也是为什么早期的synchronized效率低的原因 Java 6之后,为了减少获得锁和释放锁所带来的性能消耗,引入了轻量级锁和偏向锁
为什么每一个对象都可以成为一个锁?
Monitor可以理解为一种同步工具,也可理解为一种同步机制,常常被描述为一个Java对象。Java对象是天生的Monitor,每一个Java对象都有成为Monitor的潜质,因为在Java的设计中 ,每一个Java对象自打娘胎里出来就带了一把看不见的锁,它叫做内部锁或者Monitor锁。
Monitor的本质是依赖于底层操作系统的Mutex Lock实现,操作系统实现线程之间的切换需要从用户态到内核态的转换,成本非常高。
Mutex Lock Monitor是在jvm底层实现的,底层代码是c++。本质是依赖于底层操作系统的Mutex Lock实现,操作系统实现线程之间的切换需要从用户态到内核态的转换,状态转换需要耗费很多的处理器时间成本非常高。所以synchronized是Java语言中的一个重量级操作。
Monitor与java对象以及线程是如何关联 ?
1.如果一个java对象被某个线程锁住,则该java对象的Mark Word字段中LockWord指向monitor的起始地址
2.Monitor的Owner字段会存放拥有相关联对象锁的线程id
Mutex Lock 的切换需要从用户态转换到核心态中,因此状态转换需要耗费很多的处理器时间。
java6开始,优化Synchronized
Java 6之后,为了减少获得锁和释放锁所带来的性能消耗,引入了轻量级锁和偏向锁
需要有个逐步升级的过程,别一开始就捅到重量级锁
3、Synchronized锁种类及升级步骤
多线程访问情况,3种
- 只有一个线程来访问,有且唯一Only One
- 有2个线程A、B来交替访问
- 竞争激烈,多个线程来访问
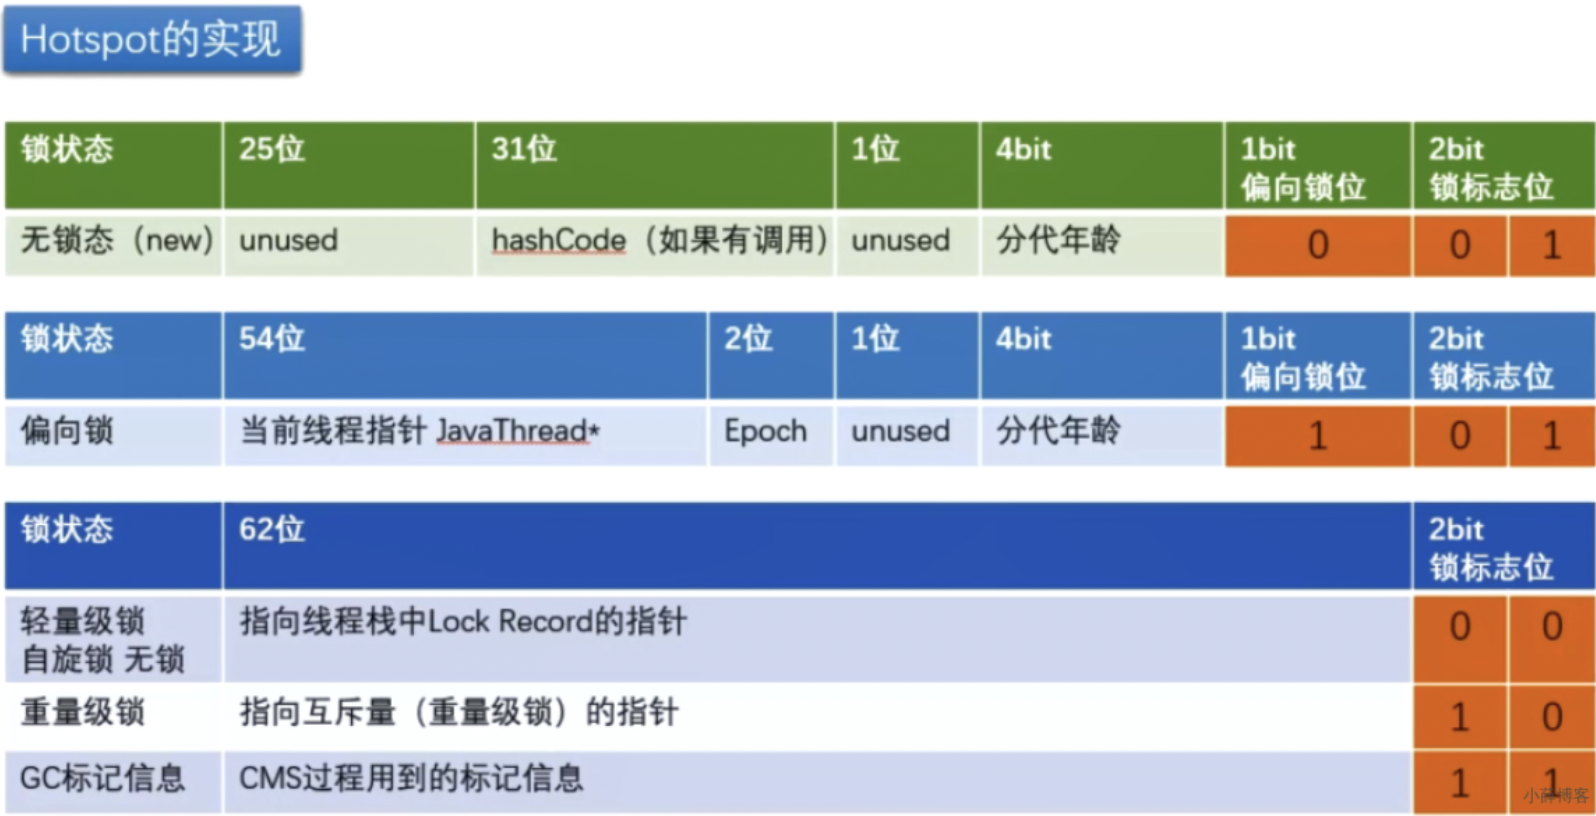
无锁
偏向锁
Hotspot 的作者经过研究发现,大多数情况下:
多线程的情况下,锁不仅不存在多线程竞争,还存在锁由同一线程多次获得的情况,
偏向锁就是在这种情况下出现的,它的出现是为了解决只有在一个线程执行同步时提高性能。
理论落地: 在实际应用运行过程中发现,“锁总是同一个线程持有,很少发生竞争”,也就是说锁总是被第一个占用他的线程拥有,这个线程就是锁的偏向线程。
那么只需要在锁第一次被拥有的时候,记录下偏向线程ID。这样偏向线程就一直持有着锁(后续这个线程进入和退出这段加了同步锁的代码块时,不需要再次加锁和释放锁。而是直接比较对象头里面是否存储了指向当前线程的偏向锁)。 如果相等表示偏向锁是偏向于当前线程的,就不需要再尝试获得锁了,直到竞争发生才释放锁。以后每次同步,检查锁的偏向线程ID与当前线程ID是否一致,如果一致直接进入同步。无需每次加锁解锁都去CAS更新对象头。如果自始至终使用锁的线程只有一个,很明显偏向锁几乎没有额外开销,性能极高。
假如不一致意味着发生了竞争,锁已经不是总是偏向于同一个线程了,这时候可能需要升级变为轻量级锁,才能保证线程间公平竞争锁。偏向锁只有遇到其他线程尝试竞争偏向锁时,持有偏向锁的线程才会释放锁,线程是不会主动释放偏向锁的。
技术实现: 一个synchronized方法被一个线程抢到了锁时,那这个方法所在的对象就会在其所在的Mark Word中将偏向锁修改状态位,同时还 会有占用前54位来存储线程指针作为标识。若该线程再次访问同一个synchronized方法时,该线程只需去对象头的Mark Word 中去判断一下是否有偏向锁指向本身的ID,无需再进入 Monitor 去竞争对象了。
偏向锁JVM命令:
java -XX:+PrintFlagsInitial |grep BiasedLock
- 实际上偏向锁在JDK1.6之后是默认开启的,但是启动时间有延迟,
- 所以需要添加参数-XX:BiasedLockingStartupDelay=0,让其在程序启动时立刻启动。
- 开启偏向锁:
- -XX:+UseBiasedLocking -XX:BiasedLockingStartupDelay=0
- 关闭偏向锁:关闭之后程序默认会直接进入——————————————»»»» 轻量级锁状态。
- -XX:-UseBiasedLocking
偏向锁的撤销
当有另外线程逐步来竞争锁的时候,就不能再使用偏向锁了,要升级为轻量级锁
竞争线程尝试CAS更新对象头失败,会等待到全局安全点(此时不会执行任何代码)撤销偏向锁。
偏向锁使用一种等到竞争出现才释放锁的机制,只有当其他线程竞争锁时,持有偏向锁的原来线程才会被撤销。 撤销需要等待全局安全点(该时间点上没有字节码正在执行),同时检查持有偏向锁的线程是否还在执行:
① 第一个线程正在执行synchronized方法(处于同步块),它还没有执行完,其它线程来抢夺,该偏向锁会被取消掉并出现锁升级。 此时轻量级锁由原持有偏向锁的线程持有,继续执行其同步代码,而正在竞争的线程会进入自旋等待获得该轻量级锁。
② 第一个线程执行完成synchronized方法(退出同步块),则将对象头设置成无锁状态并撤销偏向锁,重新偏向 。
有线程来参与锁的竞争,但是获取锁的冲突时间极短
本质就是自旋锁
轻量级锁的获取
轻量级锁是为了在线程近乎交替执行同步块时提高性能。 主要目的: 在没有多线程竞争的前提下,通过CAS减少重量级锁使用操作系统互斥量产生的性能消耗,说白了先自旋再阻塞。 升级时机: 当关闭偏向锁功能或多线程竞争偏向锁会导致偏向锁升级为轻量级锁
假如线程A已经拿到锁,这时线程B又来抢该对象的锁,由于该对象的锁已经被线程A拿到,当前该锁已是偏向锁了。 而线程B在争抢时发现对象头Mark Word中的线程ID不是线程B自己的线程ID(而是线程A),那线程B就会进行CAS操作希望能获得锁。 此时线程B操作中有两种情况: 如果锁获取成功,直接替换Mark Word中的线程ID为B自己的ID(A → B),重新偏向于其他线程(即将偏向锁交给其他线程,相当于当前线程"被"释放了锁),该锁会保持偏向锁状态,A线程Over,B线程上位;
如果锁获取失败,则偏向锁升级为轻量级锁,此时轻量级锁由原持有偏向锁的线程持有,继续执行其同步代码,而正在竞争的线程B会进入自旋等待获得该轻量级锁。
自旋达到一定次数和程度
java6之前
默认启用,默认情况下自旋的次数是 10 次 -XX:PreBlockSpin=10来修改,或者自旋线程数超过cpu核数一半
Java6之后
自适应,自适应意味着自旋的次数不是固定不变的
而是根据:同一个锁上一次自旋的时间,拥有锁线程的状态来决定。
争夺轻量级锁失败时,自旋尝试抢占锁
轻量级锁每次退出同步块都需要释放锁,而偏向锁是在竞争发生时才释放锁
重锁
有大量的线程参与锁的竞争,冲突性很高
各种锁优缺点、synchronized锁升级和实现原理
synchronized锁升级过程总结:一句话,就是先自旋,不行再阻塞。 实际上是把之前的悲观锁(重量级锁)变成在一定条件下使用偏向锁以及使用轻量级(自旋锁CAS)的形式
synchronized在修饰方法和代码块在字节码上实现方式有很大差异,但是内部实现还是基于对象头的MarkWord来实现的。 JDK1.6之前synchronized使用的是重量级锁,JDK1.6之后进行了优化,拥有了无锁——>偏向锁——>轻量级锁——>重量级锁的升级过程,而不是无论什么情况都使用重量级锁。
偏向锁:适用于单线程适用的情况,在不存在锁竞争的时候进入同步方法/代码块则使用偏向锁。
轻量级锁:适用于竞争较不激烈的情况(这和乐观锁的使用范围类似), 存在竞争时升级为轻量级锁,轻量级锁采用的是自旋锁,如果同步方法/代码块执行时间很短的话,采用轻量级锁虽然会占用cpu资源但是相对比使用重量级锁还是更高效。
重量级锁:适用于竞争激烈的情况,如果同步方法/代码块执行时间很长,那么使用轻量级锁自旋带来的性能消耗就比使用重量级锁更严重,这时候就需要升级为重量级锁。
4、JIT编译器对锁的优化
Just In Time Compiler,一般翻译为即时编译器
锁消除
 1
 2
 3
 4
 5
 6
 7
 8
 9
10
11
12
13
14
15
16
17
18
19
20
21
22
23
24
25
26
27
28
|
/**
* 锁消除
* 从JIT角度看相当于无视它,synchronized (o)不存在了,这个锁对象并没有被共用扩散到其它线程使用,
* 极端的说就是根本没有加这个锁对象的底层机器码,消除了锁的使用
*/
public class LockClearUpDemo {
//正常的
static Object objectLock = new Object();
public void m1() {
//锁消除,JIT会无视它,synchronized(对象锁)不存在了。不正常的
Object o = new Object();
synchronized (o) {
System.out.println("-----hello LockClearUPDemo" + "\t" + o.hashCode() + "\t" + objectLock.hashCode());
}
}
public static void main(String[] args) {
LockClearUpDemo demo = new LockClearUpDemo();
for (int i = 1; i <= 10; i++) {
new Thread(() -> {
demo.m1();
}, String.valueOf(i)).start();
}
}
}
|
锁粗化
 1
 2
 3
 4
 5
 6
 7
 8
 9
10
11
12
13
14
15
16
17
18
19
20
21
22
23
24
25
26
27
28
29
30
31
|
/**
* 锁粗化
* 假如方法中首尾相接,前后相邻的都是同一个锁对象,那JIT编译器就会把这几个synchronized块合并成一个大块,
* 加粗加大范围,一次申请锁使用即可,避免次次的申请和释放锁,提升了性能
*/
public class LockBigDemo {
static Object objectLock = new Object();
public static void main(String[] args) {
new Thread(() -> {
synchronized (objectLock) {
System.out.println("11111");
}
synchronized (objectLock) {
System.out.println("22222");
}
synchronized (objectLock) {
System.out.println("33333");
}
}, "a").start();
new Thread(() -> {
synchronized (objectLock) {
System.out.println("11111");
System.out.println("22222");
System.out.println("33333");
}
}, "b").start();
}
}
|
AbstractQueuedSynchronizer(AQS)
AQS概念
AbstractOwnableSynchronizer
AbstractQueuedLongSynchronizer
AbstractQueuedSynchronizer
通常地:AbstractQueuedSynchronizer简称为AQS
AQS:是用来构建锁或者其它同步器组件的基础框架及整个JUC体系的基石,通过内置的FIFO队列来完成资源获取线程的排队工作,并通过一个int类变量表示持有锁的状态。
CLH:Craig、Landin and Hagersten 队列,是一个单向链表,AQS中的队列是CLH变体的虚拟双向队列FIFO
锁和同步器
锁:面向锁的使用者。定义了程序员和锁交互的使用层API,隐藏了实现细节,调用即可。
同步器:面向锁的实现者。比如Java并发大神Doug Lee,提出统一规范并简化了锁的实现,屏蔽了同步状态管理、阻塞线程排队和通知、唤醒机制等。
加锁会导致阻塞,有阻塞就需要排队,实现排队必然需要队列
抢到资源的线程直接使用处理业务,抢不到资源的必然涉及一种排队等候机制。抢占资源失败的线程继续去等待(类似银行业务办理窗口都满了,暂时没有受理窗口的顾客只能去候客区排队等候),但等候线程仍然保留获取锁的可能且获取锁流程仍在继续(候客区的顾客也在等着叫号,轮到了再去受理窗口办理业务)。
既然说到了排队等候机制,那么就一定会有某种队列形成,这样的队列是什么数据结构呢?
如果共享资源被占用,就需要一定的阻塞等待唤醒机制来保证锁分配。这个机制主要用的是CLH队列的变体实现的,将暂时获取不到锁的线程加入到队列中,这个队列就是AQS的抽象表现。它将请求共享资源的线程封装成队列的结点(Node),通过CAS、自旋以及LockSupport.park()的方式,维护state变量的状态,使并发达到同步的效果。
AQS源码
有阻塞就需要排队,实现排队必然需要队列
AQS使用一个volatile的int类型的成员变量来表示同步状态,通过内置的FIFO队列来完成资源获取的排队工作将每条要去抢占资源的线程封装成一个Node节点来实现锁的分配,通过CAS完成对State值的修改。
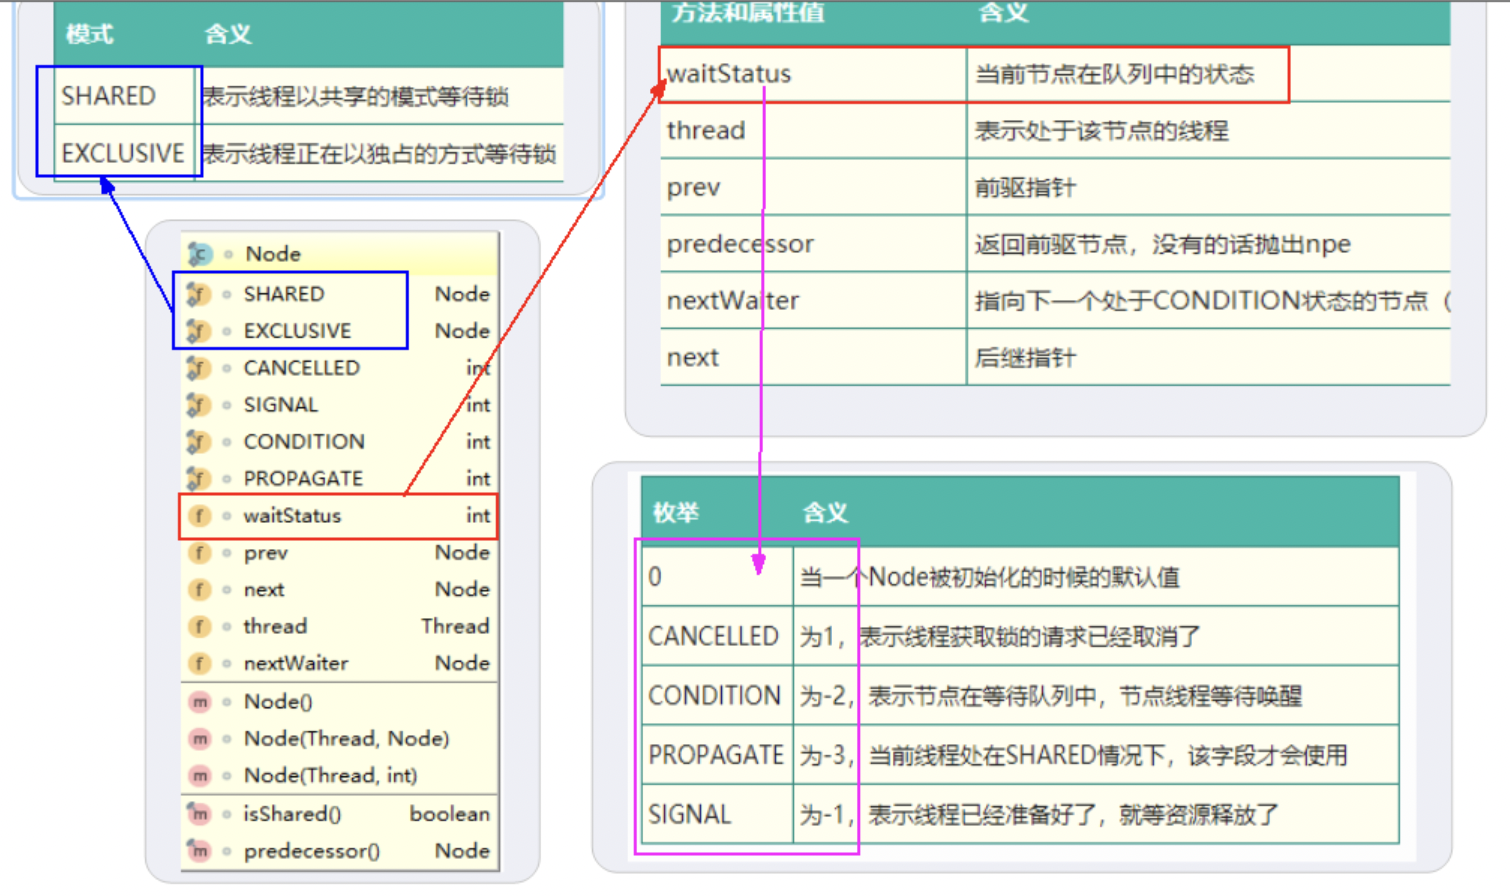
可以明显看出公平锁与非公平锁的lock()方法唯一的区别就在于公平锁在获取同步状态时多了一个限制条件: hasQueuedPredecessors()
hasQueuedPredecessors是公平锁加锁时判断等待队列中是否存在有效节点的方法

对比公平锁和非公平锁的 tryAcquire()方法的实现代码,其实差别就在于非公平锁获取锁时比公平锁中少了一个判断 !hasQueuedPredecessors()
hasQueuedPredecessors() 中判断了是否需要排队,导致公平锁和非公平锁的差异如下:
公平锁:公平锁讲究先来先到,线程在获取锁时,如果这个锁的等待队列中已经有线程在等待,那么当前线程就会进入等待队列中;
非公平锁:不管是否有等待队列,如果可以获取锁,则立刻占有锁对象。也就是说队列的第一个排队线程在unpark(),之后还是需要竞争锁(存在线程竞争的情况下)
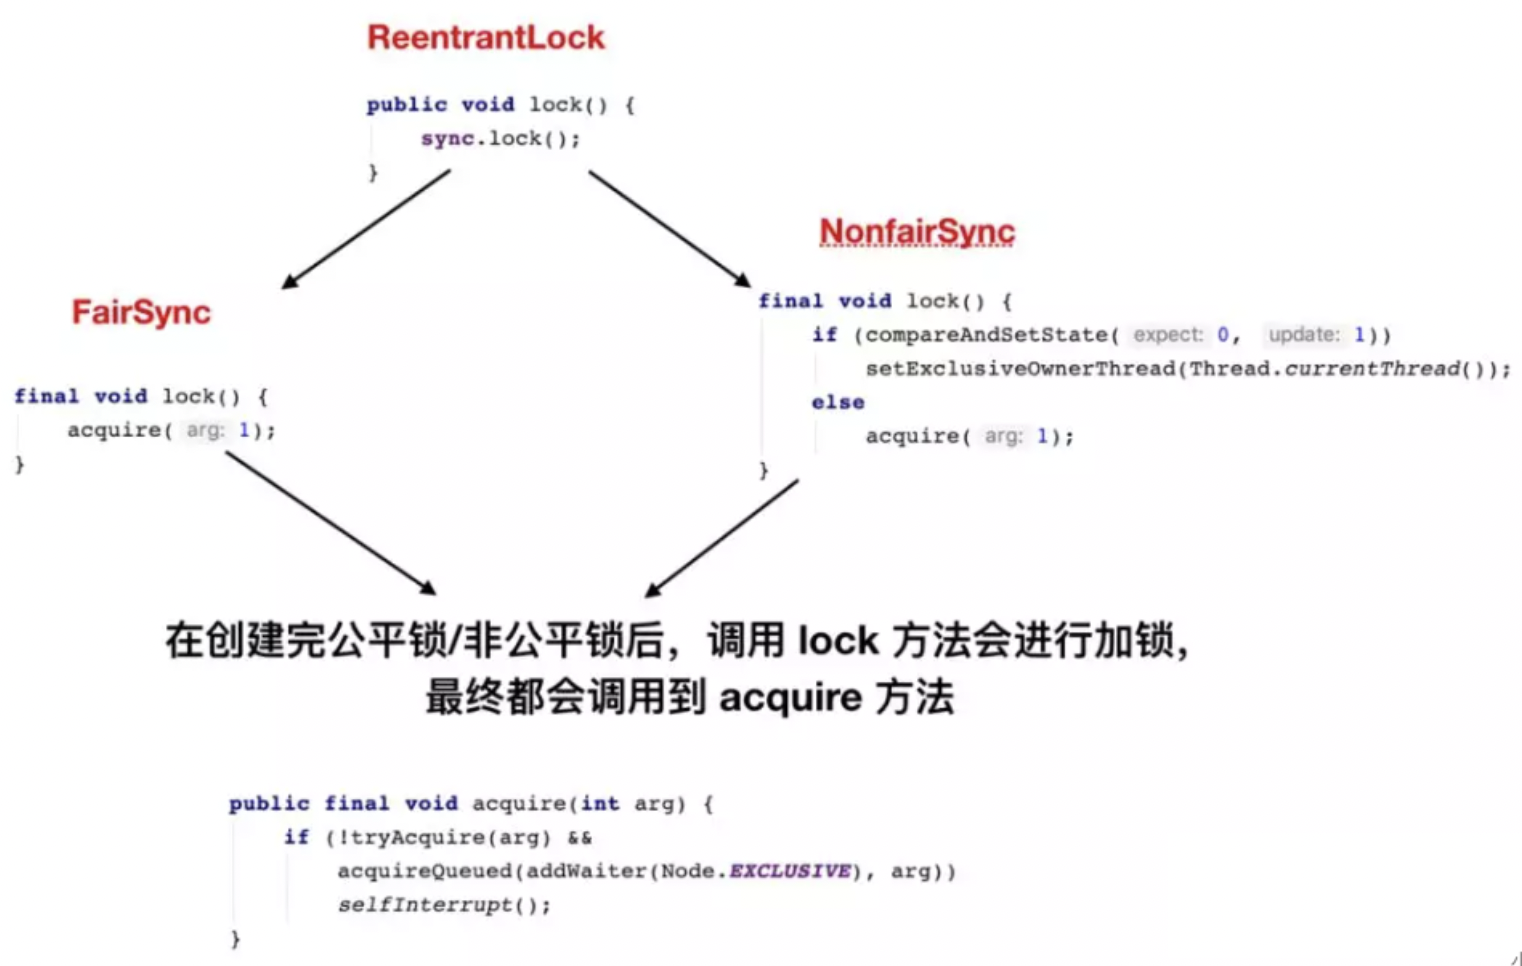
acquire
1
2
3
4
5
6
|
@ReservedStackAccess
public final void acquire(int arg) {
if (!tryAcquire(arg) &&
acquireQueued(addWaiter(Node.EXCLUSIVE), arg))
selfInterrupt();
}
|
上述代码主要完成了同步状态获取、节点构造、加入同步队列以及在同步队列中自旋等待的相关工作,其主要逻辑是:首先调用自定义同步器实现的tryAcquire(int arg)方法,该方法保证线程安全的获取同步状态,如果同步状态获取失败,则构造同步节点(独占式Node.EXCLUSIVE,同一时刻只能有一个线程成功获取同步状态)并通过addWaiter(Node node)方法将该节点加入到同步队列的尾部,最后调用acquireQueued(Node node,int arg)方法,使得该节点以“死循环”的方式获取同步状态。如果获取不到则阻塞节点中的线程,而被阻塞线程的唤醒主要依靠前驱节点的出队或阻塞线程被中断来实现。
tryAcquire
FairSync
 1
 2
 3
 4
 5
 6
 7
 8
 9
10
11
12
13
14
15
16
17
18
19
20
21
22
23
24
25
26
27
28
29
30
31
32
33
34
35
|
/**
* Sync object for fair locks
*/
static final class FairSync extends Sync {
private static final long serialVersionUID = -3000897897090466540L;
final void lock() {
acquire(1);
}
/**
* Fair version of tryAcquire. Don't grant access unless
* recursive call or no waiters or is first.
*/
@ReservedStackAccess
protected final boolean tryAcquire(int acquires) {
final Thread current = Thread.currentThread();
int c = getState();
if (c == 0) {
if (!hasQueuedPredecessors() &&
compareAndSetState(0, acquires)) {
setExclusiveOwnerThread(current);
return true;
}
}
else if (current == getExclusiveOwnerThread()) {
int nextc = c + acquires;
if (nextc < 0)
throw new Error("Maximum lock count exceeded");
setState(nextc);
return true;
}
return false;
}
}
|
NonfairSync
1
2
3
4
5
6
7
8
9
10
11
12
13
14
15
16
17
18
19
20
21
22
|
/**
* Sync object for non-fair locks
*/
static final class NonfairSync extends Sync {
private static final long serialVersionUID = 7316153563782823691L;
/**
* Performs lock. Try immediate barge, backing up to normal
* acquire on failure.
*/
@ReservedStackAccess
final void lock() {
if (compareAndSetState(0, 1))
setExclusiveOwnerThread(Thread.currentThread());
else
acquire(1);
}
protected final boolean tryAcquire(int acquires) {
return nonfairTryAcquire(acquires);
}
}
|
nonfairTryAcquire
1
2
3
4
5
6
7
8
9
10
11
12
13
14
15
16
17
18
19
20
21
22
23
|
/**
* Performs non-fair tryLock. tryAcquire is implemented in
* subclasses, but both need nonfair try for trylock method.
*/
@ReservedStackAccess
final boolean nonfairTryAcquire(int acquires) {
final Thread current = Thread.currentThread();
int c = getState();
if (c == 0) {
if (compareAndSetState(0, acquires)) {
setExclusiveOwnerThread(current);
return true;
}
}
else if (current == getExclusiveOwnerThread()) {
int nextc = c + acquires;
if (nextc < 0) // overflow
throw new Error("Maximum lock count exceeded");
setState(nextc);
return true;
}
return false;
}
|
addWaiter
1
2
3
4
5
6
7
8
9
10
11
12
13
14
15
16
17
18
19
20
|
/**
* Creates and enqueues node for current thread and given mode.
*
* @param mode Node.EXCLUSIVE for exclusive, Node.SHARED for shared
* @return the new node
*/
private Node addWaiter(Node mode) {
Node node = new Node(Thread.currentThread(), mode);
// Try the fast path of enq; backup to full enq on failure
Node pred = tail;
if (pred != null) {
node.prev = pred;
if (compareAndSetTail(pred, node)) {
pred.next = node;
return node;
}
}
enq(node);
return node;
}
|
enq(node)
1
2
3
4
5
6
7
8
9
10
11
12
13
14
15
16
17
18
19
20
|
/**
* Inserts node into queue, initializing if necessary. See picture above.
* @param node the node to insert
* @return node's predecessor
*/
private Node enq(final Node node) {
for (;;) {
Node t = tail;
if (t == null) { // Must initialize
if (compareAndSetHead(new Node()))
tail = head;
} else {
node.prev = t;
if (compareAndSetTail(t, node)) {
t.next = node;
return t;
}
}
}
}
|
acquireQueued
1
2
3
4
5
6
7
8
9
10
11
12
13
14
15
16
17
18
19
20
21
22
23
24
25
26
27
28
29
30
|
/**
* Acquires in exclusive uninterruptible mode for thread already in
* queue. Used by condition wait methods as well as acquire.
*
* @param node the node
* @param arg the acquire argument
* @return {@code true} if interrupted while waiting
*/
@ReservedStackAccess
final boolean acquireQueued(final Node node, int arg) {
boolean failed = true;
try {
boolean interrupted = false;
for (;;) {
final Node p = node.predecessor();
if (p == head && tryAcquire(arg)) {
setHead(node);
p.next = null; // help GC
failed = false;
return interrupted;
}
if (shouldParkAfterFailedAcquire(p, node) &&
parkAndCheckInterrupt())
interrupted = true;
}
} finally {
if (failed)
cancelAcquire(node);
}
}
|
shouldParkAfterFailedAcquire
1
2
3
4
5
6
7
8
9
10
11
12
13
14
15
16
17
18
19
20
21
22
23
24
25
26
27
28
29
30
31
32
33
34
35
36
|
/**
* Checks and updates status for a node that failed to acquire.
* Returns true if thread should block. This is the main signal
* control in all acquire loops. Requires that pred == node.prev.
*
* @param pred node's predecessor holding status
* @param node the node
* @return {@code true} if thread should block
*/
private static boolean shouldParkAfterFailedAcquire(Node pred, Node node) {
int ws = pred.waitStatus;
if (ws == Node.SIGNAL)
/*
* This node has already set status asking a release
* to signal it, so it can safely park.
*/
return true;
if (ws > 0) {
/*
* Predecessor was cancelled. Skip over predecessors and
* indicate retry.
*/
do {
node.prev = pred = pred.prev;
} while (pred.waitStatus > 0);
pred.next = node;
} else {
/*
* waitStatus must be 0 or PROPAGATE. Indicate that we
* need a signal, but don't park yet. Caller will need to
* retry to make sure it cannot acquire before parking.
*/
compareAndSetWaitStatus(pred, ws, Node.SIGNAL);
}
return false;
}
|
parkAndCheckInterrupt
1
2
3
4
5
6
7
8
9
|
/**
* Convenience method to park and then check if interrupted
*
* @return {@code true} if interrupted
*/
private final boolean parkAndCheckInterrupt() {
LockSupport.park(this);
return Thread.interrupted();
}
|
自定义同步组件——TwinsLock
 1
 2
 3
 4
 5
 6
 7
 8
 9
10
11
12
13
14
15
16
17
18
19
20
21
22
23
24
25
26
27
28
29
30
31
32
33
34
35
36
37
38
39
40
41
42
43
44
45
46
47
48
49
50
51
52
53
54
55
56
57
58
59
60
61
62
63
64
65
66
67
68
69
70
|
public class TwinsLock implements Lock {
private final Sync sync = new Sync(2);
private static final class Sync extends AbstractQueuedSynchronizer {
private static final long serialVersionUID = -7889272986162341211L;
Sync(int count) {
if (count <= 0) {
throw new IllegalArgumentException("count must large than zero.");
}
setState(count);
}
@Override
public int tryAcquireShared(int reduceCount) {
for (; ; ) {
int current = getState();
int newCount = current - reduceCount;
if (newCount < 0 || compareAndSetState(current, newCount)) {
return newCount;
}
}
}
@Override
public boolean tryReleaseShared(int returnCount) {
for (; ; ) {
int current = getState();
int newCount = current + returnCount;
if (compareAndSetState(current, newCount)) {
return true;
}
}
}
final ConditionObject newCondition() {
return new ConditionObject();
}
}
@Override
public void lock() {
sync.acquireShared(1);
}
@Override
public void unlock() {
sync.releaseShared(1);
}
@Override
public void lockInterruptibly() throws InterruptedException {
sync.acquireSharedInterruptibly(1);
}
@Override
public boolean tryLock() {
return sync.tryAcquireShared(1) >= 0;
}
@Override
public boolean tryLock(long time, TimeUnit unit) throws InterruptedException {
return sync.tryAcquireSharedNanos(1, unit.toNanos(time));
}
@Override
public Condition newCondition() {
return sync.newCondition();
}
}
|
TwinsLock实现了Lock接口,提供了面向使用者的接口,使用者调用lock()方法获取锁,随后调用unlock()方法释放锁,而同一时刻只能有两个线程同时获取到锁。TwinsLock同时包含了一个自定义同步器Sync,而该同步器面向线程访问和同步状态控制。以共享式获取同步状态为例:同步器会先计算出获取后的同步状态,然后通过CAS确保状态的正确设置,当tryAcquireShared(int reduceCount)方法返回值大于等于0时,当前线程才获取同步状态,对于上层的TwinsLock而言,则表示当前线程获得了锁。
读写锁
ReadWriteLock
1
2
3
4
5
6
7
8
9
10
11
12
13
14
15
|
public interface ReadWriteLock {
/**
* Returns the lock used for reading.
*
* @return the lock used for reading
*/
Lock readLock();
/**
* Returns the lock used for writing.
*
* @return the lock used for writing
*/
Lock writeLock();
}
|
通过一个ReadWriteLock产生两个锁:一个读锁,一个写锁。读操作使用读锁,写操作使用写锁。需要注意的是,只有“读-读”操作是可以并行的,“读-写”和“写-写”都不可以。
A ReadWriteLock maintains a pair of associated locks, one for read-only operations and one for writing. Theread lock may be held simultaneously by multiple reader threads, so long as there are no writers. The write lock is exclusive.
All ReadWriteLock implementations must guarantee that the memory synchronization effects of writeLockoperations (as specified in the Lock interface) also hold with respect to the associated readLock. That is, a thread successfully acquiring the read lock will see all updates made upon previous release of the write lock.
ReentrantReadWriteLock
一个ReentrantReadWriteLock同时只能存在一个写锁但是可以存在多个读锁,但不能同时存在写锁和读锁。也即一个资源可以被多个读操作访问或一个写操作访问,但两者不能同时进行。
只有在读多写少情境之下,读写锁才具有较高的性能体现。
读写状态的设计
读写锁同样依赖自定义同步器来实现同步功能,而读写状态就是其同步器的同步状态。回想ReentrantLock中自定义同步器的实现,同步状态表示锁被一个线程重复获取的次数,而读写锁的自定义同步器需要在同步状态(一个整型变量)上维护多个读线程和一个写线程的状态,使得该状态的设计成为读写锁实现的关键。
如果在一个整型变量上维护多种状态,就一定需要“按位切割使用”这个变量,读写锁将变量切分成了两个部分,高16位表示读,低16位表示写,
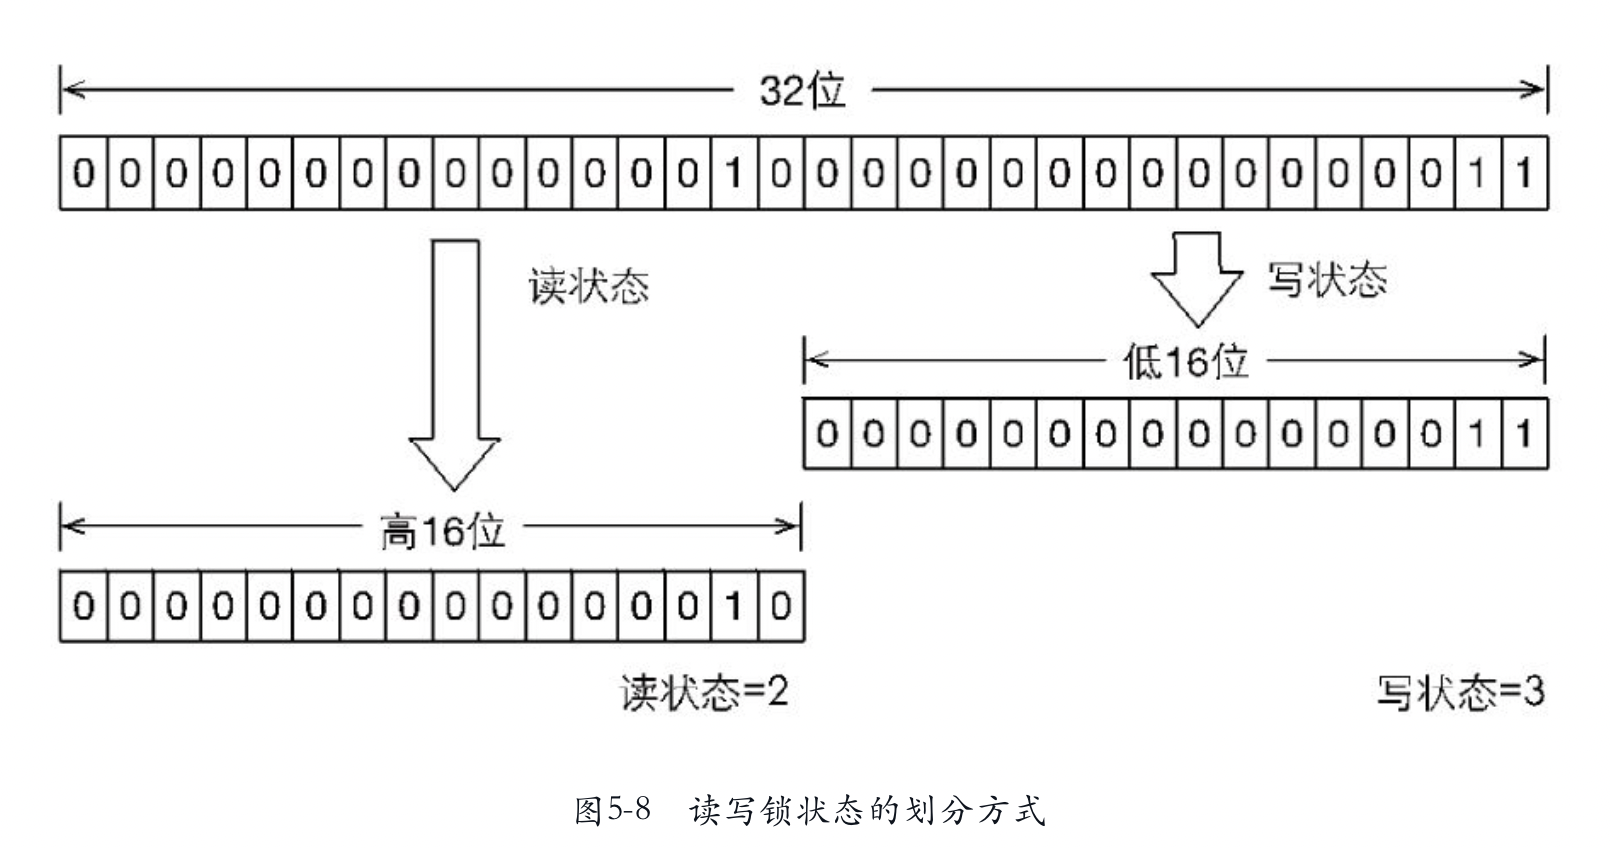
当前同步状态表示一个线程已经获取了写锁,且重进入了两次,同时也连续获取了两次读锁。
读写锁是如何迅速确定读和写各自的状态呢?答案是通过位运算。假设当前同步状态值为S,写状态等于S&0x0000FFFF(将高16位全部抹去),读状态等于S»>16(无符号补0右移16位)。当写状态增加1时,等于S+1,当读状态增加1时,等于S+(1«16),也就是S+0x00010000。
根据状态的划分能得出一个推论:S不等于0时,当写状态(S&0x0000FFFF)等于0时,则读状态(S»>16)大于0,即读锁已被获取。
写锁的获取与释放
写锁是一个支持重进入的排它锁。如果当前线程已经获取了写锁,则增加写状态。如果当前线程在获取写锁时,读锁已经被获取(读状态不为0)或者该线程不是已经获取写锁的线程,则当前线程进入等待状态。
获取写锁的代码:
1
2
3
4
5
6
7
8
9
10
11
12
13
14
15
16
17
18
19
20
21
22
23
24
25
26
27
28
29
30
31
|
protected final boolean tryAcquire(int acquires) {
/*
* Walkthrough:
* 1. If read count nonzero or write count nonzero
* and owner is a different thread, fail.
* 2. If count would saturate, fail. (This can only
* happen if count is already nonzero.)
* 3. Otherwise, this thread is eligible for lock if
* it is either a reentrant acquire or
* queue policy allows it. If so, update state
* and set owner.
*/
Thread current = Thread.currentThread();
int c = getState();
int w = exclusiveCount(c);
if (c != 0) {
// (Note: if c != 0 and w == 0 then shared count != 0)
if (w == 0 || current != getExclusiveOwnerThread())
return false;
if (w + exclusiveCount(acquires) > MAX_COUNT)
throw new Error("Maximum lock count exceeded");
// Reentrant acquire
setState(c + acquires);
return true;
}
if (writerShouldBlock() ||
!compareAndSetState(c, c + acquires))
return false;
setExclusiveOwnerThread(current);
return true;
}
|
该方法除了重入条件(当前线程为获取了写锁的线程)之外,增加了一个读锁是否存在的判断。如果存在读锁,则写锁不能被获取,原因在于:读写锁要确保写锁的操作对读锁可见,如果允许读锁在已被获取的情况下对写锁的获取,那么正在运行的其他读线程就无法感知到当前写线程的操作。因此,只有等待其他读线程都释放了读锁,写锁才能被当前线程获取,而写锁一旦被获取,则其他读写线程的后续访问均被阻塞。
写锁的释放与ReentrantLock的释放过程基本类似,每次释放均减少写状态,当写状态为0时表示写锁已被释放,从而等待的读写线程能够继续访问读写锁,同时前次写线程的修改对后续读写线程可见。
锁降级
锁降级指的是写锁降级成为读锁。如果当前线程拥有写锁,然后将其释放,最后再获取读锁,这种分段完成的过程不能称之为锁降级。锁降级是指把持住(当前拥有的)写锁,再获取到读锁,随后释放(先前拥有的)写锁的过程。
锁的严苛程度变强叫做升级,反之叫做降级
锁降级:将写入锁降级为读锁(类似Linux文件读写权限理解,就像写权限要高于读权限一样)
获得写锁——>获得读锁——>释放写锁 ——>释放读锁
-
Lock downgrading
Reentrancy also allows downgrading from the write lock to a read lock, by acquiring the write lock, then the read lock and then releasing the write lock. However, upgrading from a read lock to the write lock is notpossible.
-
Interruption of lock acquisition
The read lock and write lock both support interruption during lock acquisition.
重入还允许通过获取写入锁定,然后读取锁然后释放写锁从写锁到读取锁, 但是,从读锁定升级到写锁是不可能的。
锁降级是为了让当前线程感知到数据的变化,目的是保证数据可见性
锁降级中读锁的获取是否必要呢?答案是必要的。主要是为了保证数据的可见性,如果当前线程不获取读锁而是直接释放写锁,假设此刻另一个线程(记作线程T)获取了写锁并修改了数据,那么当前线程无法感知线程T的数据更新。如果当前线程获取读锁,即遵循锁降级的步骤,则线程T将会被阻塞,直到当前线程使用数据并释放读锁之后,线程T才能获取写锁进行数据更新。
如果有线程在读,那么写线程是无法获取写锁的,是悲观锁的策略
不可锁升级
线程获取读锁是不能直接升级为写入锁的。
在ReentrantReadWriteLock中,当读锁被使用时,如果有线程尝试获取写锁,该写线程会被阻塞。所以,需要释放所有读锁,才可获取写锁
StampedLock的改进之处在于:读的过程中也允许获取写锁介入(相当牛B,读和写两个操作也让你“共享”(注意引号)),这样会导致读的数据就可能不一致!所以,需要额外的方法来判断读的过程中是否有写入,这是一种乐观的读锁。 显然乐观锁的并发效率更高,但一旦有小概率的写入导致读取的数据不一致,需要能检测出来,再读一遍就行。
如何缓解锁饥饿问题?
使用“公平”策略可以一定程度上缓解这个问题
1
|
new ReentrantReadWriteLock(true);
|
但是“公平”策略是以牺牲系统吞吐量为代价的
StampedLock类的乐观读锁闪亮登场
ReentrantReadWriteLock
允许多个线程同时读,但是只允许一个线程写,在线程获取到写锁的时候,其他写操作和读操作都会处于阻塞状态,
读锁和写锁也是互斥的,所以在读的时候是不允许写的,读写锁比传统的synchronized速度要快很多,
原因就是在于ReentrantReadWriteLock支持读并发
StampedLock
ReentrantReadWriteLock的读锁被占用的时候,其他线程尝试获取写锁的时候会被阻塞。
但是,StampedLock采取乐观获取锁后,其他线程尝试获取写锁时不会被阻塞,这其实是对读锁的优化,
所以,在获取乐观读锁后,还需要对结果进行校验。
StampedLock邮戳锁
无锁→独占锁→读写锁→邮戳锁
StampedLock是JDK1.8中新增的一个读写锁,也是对JDK1.5中的读写锁ReentrantReadWriteLock的优化。
邮戳锁 - 也叫票据锁
stamp(戳记,long类型)
代表了锁的状态。当stamp返回零时,表示线程获取锁失败。并且,当释放锁或者转换锁的时候,都要传入最初获取的stamp值。
StampedLock由锁饥饿问题引出
ReentrantReadWriteLock实现了读写分离,但是一旦读操作比较多的时候,想要获取写锁就变得比较困难了,假如当前1000个线程,999个读,1个写,有可能999个读取线程长时间抢到了锁,那1个写线程就悲剧了 因为当前有可能会一直存在读锁,而无法获得写锁,根本没机会写
特点
- 所有获取锁的方法,都返回一个邮戳(Stamp),Stamp为零表示获取失败,其余都表示成功;
- 所有释放锁的方法,都需要一个邮戳(Stamp),这个Stamp必须是和成功获取锁时得到的Stamp一致;
- StampedLock是不可重入的,危险(如果一个线程已经持有了写锁,再去获取写锁的话就会造成死锁)
访问模式
- Reading(读模式):功能和ReentrantReadWriteLock的读锁类似
- Writing(写模式):功能和ReentrantReadWriteLock的写锁类似
- Optimistic reading(乐观读模式):无锁机制,类似于数据库中的乐观锁,支持读写并发,很乐观认为读取时没人修改,假如被修改再实现升级为悲观读模式
缺点
- StampedLock 不支持重入,没有Re开头
- StampedLock 的悲观读锁和写锁都不支持条件变量(Condition),这个也需要注意。
- 使用 StampedLock一定不要调用中断操作,即不要调用interrupt() 方法
- 如果需要支持中断功能,一定使用可中断的悲观读锁 readLockInterruptibly()和写锁writeLockInterruptibly()
并发工具类
倒计时门栓CountDownLatch
使用join方法让主线程等待子线程结束,join实际上就是调用了wait。
1
2
3
|
while (isAlive()) {
wait(0);
}
|
只要线程是活着的,isAlive()返回true, join就一直等待。谁来通知它呢?当线程运行结束的时候,Java系统调用notifyAll来通知。
使用join有时比较麻烦,需要主线程逐一等待每个子线程。
MyLatch
主线程与各个子线程协作的共享变量是一个数,这个数表示未完成的线程个数,初始值为子线程个数,主线程等待该值变为0,而每个子线程结束后都将该值减一,当减为0时调用notifyAll,使用MyLatch来表示这个协作对象。
1
2
3
4
5
6
7
8
9
10
11
12
13
14
15
16
17
18
19
20
21
|
public class MyLatch {
private int count;
public MyLatch(int count) {
this.count = count;
}
public synchronized void await() throws InterruptedException {
while (count > 0) {
wait();
}
}
public synchronized void countDown() {
count--;
if (count <= 0) {
notifyAll();
}
}
}
|
MyLatch构造方法的参数count应初始化为子线程的个数,主线程应该调用await(),而子线程在执行完后应该调用countDown()。
使用MyLatch的工作子线程:
1
2
3
4
5
6
7
8
9
10
11
12
13
14
15
16
17
18
|
static class Worker extends Thread {
MyLatch latch;
public Worker(MyLatch latch) {
this.latch = latch;
}
@Override
public void run() {
try {
// simulate working on task
Thread.sleep((int) (Math.random() * 1000));
this.latch.countDown();
} catch (InterruptedException e) {
}
}
}
|
主线程:
1
2
3
4
5
6
7
8
9
10
11
12
|
public static void main(String[] args) throws InterruptedException {
int workerNum = 100;
MyLatch latch = new MyLatch(workerNum);
Worker[] workers = new Worker[workerNum];
for (int i = 0; i < workerNum; i++) {
workers[i] = new Worker(latch);
workers[i].start();
}
latch.await();
System.out.println("collect worker results");
}
|
MyLatch是一个用于同步协作的工具类,主要用于演示基本原理,在Java中有一个专门的同步类CountDownLatch,在实际开发中应该使用它。
MyLatch的功能是比较通用的,它也可以应用于上面“同时开始”的场景,初始值设为1, Racer类调用await(),主线程调用countDown()即可。
使用MyLatch实现同时开始:
1
2
3
4
5
6
7
8
9
10
11
12
13
14
15
16
17
18
19
20
21
22
23
24
25
26
27
28
29
30
31
32
|
public class RacerWithLatchDemo {
static class Racer extends Thread {
MyLatch latch;
public Racer(MyLatch latch) {
this.latch = latch;
}
@Override
public void run() {
try {
this.latch.await();
System.out.println("start run "
+ Thread.currentThread().getName());
} catch (InterruptedException e) {
}
}
}
public static void main(String[] args) throws InterruptedException {
int num = 10;
MyLatch latch = new MyLatch(1);
Thread[] racers = new Thread[num];
for (int i = 0; i < num; i++) {
racers[i] = new Racer(latch);
racers[i].start();
}
Thread.sleep(1000);
latch.countDown();
}
}
|
CountDownLatch
CountDownLatch相当于是一个门栓,一开始是关闭的,所有希望通过该门的线程都需要等待,然后开始倒计时,倒计时变为0后,门栓打开,等待的所有线程都可以通过,它是一次性的,打开后就不能再关上了。
1
2
3
4
5
6
7
8
9
10
11
12
13
14
15
16
17
18
19
20
|
public class CountDownLatchTest {
static CountDownLatch c = new CountDownLatch(2);
public static void main(String[] args) throws InterruptedException {
new Thread(new Runnable() {
@Override
public void run() {
System.out.println(1);
c.countDown();
System.out.println(2);
c.countDown();
}
}).start();
c.await();
System.out.println("3");
}
}
|
1
2
3
countDown
1
2
3
4
5
6
7
8
9
10
11
12
13
|
/**
* Decrements the count of the latch, releasing all waiting threads if
* the count reaches zero.
*
* <p>If the current count is greater than zero then it is decremented.
* If the new count is zero then all waiting threads are re-enabled for
* thread scheduling purposes.
*
* <p>If the current count equals zero then nothing happens.
*/
public void countDown() {
sync.releaseShared(1);
}
|
countDown检查计数,如果已经为0,直接返回,否则减少计数,如果新的计数变为0,则唤醒所有等待的线程
releaseShared(1)
1
2
3
4
5
6
7
8
9
10
11
12
13
14
15
16
17
|
/**
* Releases in shared mode. Implemented by unblocking one or more
* threads if {@link #tryReleaseShared} returns true.
*
* @param arg the release argument. This value is conveyed to
* {@link #tryReleaseShared} but is otherwise uninterpreted
* and can represent anything you like.
* @return the value returned from {@link #tryReleaseShared}
*/
@ReservedStackAccess
public final boolean releaseShared(int arg) {
if (tryReleaseShared(arg)) {
doReleaseShared();
return true;
}
return false;
}
|
tryReleaseShared(1)
1
2
3
4
5
6
7
8
9
10
11
|
protected boolean tryReleaseShared(int releases) {
// Decrement count; signal when transition to zero
for (;;) {
int c = getState();
if (c == 0)
return false;
int nextc = c-1;
if (compareAndSetState(c, nextc))
return nextc == 0;
}
}
|
doReleaseShared()
 1
 2
 3
 4
 5
 6
 7
 8
 9
10
11
12
13
14
15
16
17
18
19
20
21
22
23
24
25
26
27
28
29
30
31
32
33
34
|
/**
* Release action for shared mode -- signals successor and ensures
* propagation. (Note: For exclusive mode, release just amounts
* to calling unparkSuccessor of head if it needs signal.)
*/
private void doReleaseShared() {
/*
* Ensure that a release propagates, even if there are other
* in-progress acquires/releases. This proceeds in the usual
* way of trying to unparkSuccessor of head if it needs
* signal. But if it does not, status is set to PROPAGATE to
* ensure that upon release, propagation continues.
* Additionally, we must loop in case a new node is added
* while we are doing this. Also, unlike other uses of
* unparkSuccessor, we need to know if CAS to reset status
* fails, if so rechecking.
*/
for (;;) {
Node h = head;
if (h != null && h != tail) {
int ws = h.waitStatus;
if (ws == Node.SIGNAL) {
if (!compareAndSetWaitStatus(h, Node.SIGNAL, 0))
continue; // loop to recheck cases
unparkSuccessor(h);
}
else if (ws == 0 &&
!compareAndSetWaitStatus(h, 0, Node.PROPAGATE))
continue; // loop on failed CAS
}
if (h == head) // loop if head changed
break;
}
}
|
await
1
2
3
|
public void await() throws InterruptedException {
sync.acquireSharedInterruptibly(1);
}
|
await检查计数是否为0,如果大于0,就等待,await可以被中断,也可以设置最长等待时间。
CountDownLatch的构造函数接收一个int类型的参数作为计数器,如果想等待N个点完成,这里就传入N。
当调用CountDownLatch的countDown方法时,N就会减1,CountDownLatch的await方法会阻塞当前线程,直到N变成零。由于countDown方法可以用在任何地方,所以这里说的N个点,可以是N个线程,也可以是1个线程里的N个执行步骤。用在多个线程时,只需要把这个CountDownLatch的引用传递到线程里即可。
注意:
计数器必须大于等于0,只是等于0时候,计数器就是零,调用await方法时不会阻塞当前线程。CountDownLatch不可能重新初始化或者修改CountDownLatch对象的内部计数器的值。一个线程调用countDown方法happen-before,另外一个线程调用await方法。
同步屏障CyclicBarrier
CyclicBarrier的字面意思是可循环使用(Cyclic)的屏障(Barrier)。它要做的事情是,让一组线程到达一个屏障(也可以叫同步点)时被阻塞,直到最后一个线程到达屏障时,屏障才会开门,所有被屏障拦截的线程才会继续运行。
CountDownLatch VS CyclicBarrier
CountDownLatch的计数器只能使用一次,而CyclicBarrier的计数器可以使用reset()方法重置。所以CyclicBarrier能处理更为复杂的业务场景。例如,如果计算发生错误,可以重置计数器,并让线程重新执行一次。
CyclicBarrier还提供其他有用的方法,比如getNumberWaiting方法可以获得Cyclic-Barrier阻塞的线程数量。isBroken()方法用来了解阻塞的线程是否被中断。
控制并发线程数的Semaphore
Semaphore(信号量)是用来控制同时访问特定资源的线程数量,它通过协调各个线程,以保证合理的使用公共资源。
Semaphore可以用于做流量控制,特别是公用资源有限的应用场景,比如数据库连接。假如有一个需求,要读取几万个文件的数据,因为都是IO密集型任务,我们可以启动几十个线程并发地读取,但是如果读到内存后,还需要存储到数据库中,而数据库的连接数只有10个,这时我们必须控制只有10个线程同时获取数据库连接保存数据,否则会报错无法获取数据库连接。这个时候,就可以使用Semaphore来做流量控制。
Semaphore的构造方法Semaphore(int permits)接受一个整型的数字,表示可用的许可证数量。Semaphore(10)表示允许10个线程获取许可证,也就是最大并发数是10。Semaphore的用法也很简单,首先线程使用Semaphore的acquire()方法获取一个许可证,使用完之后调用release()方法归还许可证。还可以用tryAcquire()方法尝试获取许可证。