官网示例:

Creating a Batch Service

Create a Business Class

Person.java:

 1
 2
 3
 4
 5
 6
 7
 8
 9
10
11
12
13
14
15
16
17
18
19
20
21
22
23
24
25
26
27
28
29
30
31
32
33
34
35
36
37
package com.example.batchprocessing;

public class Person {

  private String lastName;
  private String firstName;

  public Person() {
  }

  public Person(String firstName, String lastName) {
    this.firstName = firstName;
    this.lastName = lastName;
  }

  public void setFirstName(String firstName) {
    this.firstName = firstName;
  }

  public String getFirstName() {
    return firstName;
  }

  public String getLastName() {
    return lastName;
  }

  public void setLastName(String lastName) {
    this.lastName = lastName;
  }

  @Override
  public String toString() {
    return "firstName: " + firstName + ", lastName: " + lastName;
  }

}

Create an Intermediate Processor

A common paradigm in batch processing is to ingest data, transform it, and then pipe it out somewhere else. Here, you need to write a simple transformer that converts the names to uppercase.

PersonItemProcessor.java:

 1
 2
 3
 4
 5
 6
 7
 8
 9
10
11
12
13
14
15
16
17
18
19
20
21
22
23
24
package com.example.batchprocessing;

import org.slf4j.Logger;
import org.slf4j.LoggerFactory;

import org.springframework.batch.item.ItemProcessor;

public class PersonItemProcessor implements ItemProcessor<Person, Person> {

  private static final Logger log = LoggerFactory.getLogger(PersonItemProcessor.class);

  @Override
  public Person process(final Person person) throws Exception {
    final String firstName = person.getFirstName().toUpperCase();
    final String lastName = person.getLastName().toUpperCase();

    final Person transformedPerson = new Person(firstName, lastName);

    log.info("Converting (" + person + ") into (" + transformedPerson + ")");

    return transformedPerson;
  }

}

PersonItemProcessor implements Spring Batch’s ItemProcessor interface. This makes it easy to wire the code into a batch job that you will define later in this guide. According to the interface, you receive an incoming Person object, after which you transform it to an upper-cased Person.

The input and output types need not be the same. In fact, after one source of data is read, sometimes the application’s data flow needs a different data type.

Put Together a Batch Job

Now you need to put together the actual batch job. Spring Batch provides many utility classes that reduce the need to write custom code. Instead, you can focus on the business logic.

To configure your job, you must first create a Spring @Configuration class like the following example in BatchConfiguration.java:

 1
 2
 3
 4
 5
 6
 7
 8
 9
10
11
12
13
@Configuration
@EnableBatchProcessing
public class BatchConfiguration {

  @Autowired
  public JobBuilderFactory jobBuilderFactory;

  @Autowired
  public StepBuilderFactory stepBuilderFactory;

    ...

}

For starters, the @EnableBatchProcessing annotation adds many critical beans that support jobs and save you a lot of leg work. This example uses a memory-based database (provided by @EnableBatchProcessing), meaning that, when it is done, the data is gone. It also autowires a couple factories needed further below. Now add the following beans to your BatchConfiguration class to define a reader, a processor, and a writer:

 1
 2
 3
 4
 5
 6
 7
 8
 9
10
11
12
13
14
15
16
17
18
19
20
21
22
23
24
25
26
@Bean
public FlatFileItemReader<Person> reader() {
  return new FlatFileItemReaderBuilder<Person>()
    .name("personItemReader")
    .resource(new ClassPathResource("sample-data.csv"))
    .delimited()
    .names(new String[]{"firstName", "lastName"})
    .fieldSetMapper(new BeanWrapperFieldSetMapper<Person>() {{
      setTargetType(Person.class);
    }})
    .build();
}

@Bean
public PersonItemProcessor processor() {
  return new PersonItemProcessor();
}

@Bean
public JdbcBatchItemWriter<Person> writer(DataSource dataSource) {
  return new JdbcBatchItemWriterBuilder<Person>()
    .itemSqlParameterSourceProvider(new BeanPropertyItemSqlParameterSourceProvider<>())
    .sql("INSERT INTO people (first_name, last_name) VALUES (:firstName, :lastName)")
    .dataSource(dataSource)
    .build();
}

The first chunk of code defines the input, processor, and output.

  • reader() creates an ItemReader. It looks for a file called sample-data.csv and parses each line item with enough information to turn it into a Person.
  • processor() creates an instance of the PersonItemProcessor that you defined earlier, meant to convert the data to upper case.
  • writer(DataSource) creates an ItemWriter. This one is aimed at a JDBC destination and automatically gets a copy of the dataSource created by @EnableBatchProcessing. It includes the SQL statement needed to insert a single Person, driven by Java bean properties.

The last chunk shows the actual job configuration:

 1
 2
 3
 4
 5
 6
 7
 8
 9
10
11
12
13
14
15
16
17
18
19
20
21
// tag::jobstep[]
@Bean
public Job importUserJob(JobCompletionNotificationListener listener, Step step1) {
  return jobBuilderFactory.get("importUserJob")
    .incrementer(new RunIdIncrementer())
    .listener(listener)
    .flow(step1)
    .end()
    .build();
}

@Bean
public Step step1(JdbcBatchItemWriter<Person> writer) {
  return stepBuilderFactory.get("step1")
    .<Person, Person> chunk(10)
    .reader(reader())
    .processor(processor())
    .writer(writer)
    .build();
}
// end::jobstep[]

The first method defines the job, and the second one defines a single step. Jobs are built from steps, where each step can involve a reader, a processor, and a writer.

In this job definition, you need an incrementer, because jobs use a database to maintain execution state. You then list each step, (though this job has only one step). The job ends, and the Java API produces a perfectly configured job.

In the step definition, you define how much data to write at a time. In this case, it writes up to ten records at a time. Next, you configure the reader, processor, and writer by using the beans injected earlier.

chunk() is prefixed <Person,Person> because it is a generic method. This represents the input and output types of each “chunk” of processing and lines up with ItemReader<Person> and ItemWriter<Person>.

The last bit of batch configuration is a way to get notified when the job completes.

 1
 2
 3
 4
 5
 6
 7
 8
 9
10
11
12
13
14
15
16
17
18
19
20
21
22
23
24
25
26
27
28
29
30
31
32
33
34
35
36
package com.example.batchprocessing;

import org.slf4j.Logger;
import org.slf4j.LoggerFactory;
import org.springframework.batch.core.BatchStatus;
import org.springframework.batch.core.JobExecution;
import org.springframework.batch.core.listener.JobExecutionListenerSupport;
import org.springframework.beans.factory.annotation.Autowired;
import org.springframework.jdbc.core.JdbcTemplate;
import org.springframework.stereotype.Component;

@Component
public class JobCompletionNotificationListener extends JobExecutionListenerSupport {

  private static final Logger log = LoggerFactory.getLogger(JobCompletionNotificationListener.class);

  private final JdbcTemplate jdbcTemplate;

  @Autowired
  public JobCompletionNotificationListener(JdbcTemplate jdbcTemplate) {
    this.jdbcTemplate = jdbcTemplate;
  }

  @Override
  public void afterJob(JobExecution jobExecution) {
    if(jobExecution.getStatus() == BatchStatus.COMPLETED) {
      log.info("!!! JOB FINISHED! Time to verify the results");

      jdbcTemplate.query("SELECT first_name, last_name FROM people",
        (rs, row) -> new Person(
          rs.getString(1),
          rs.getString(2))
      ).forEach(person -> log.info("Found <" + person + "> in the database."));
    }
  }
}

The JobCompletionNotificationListener listens for when a job is BatchStatus.COMPLETED and then uses JdbcTemplate to inspect the results.

Make the Application Executable

Although batch processing can be embedded in web apps and WAR files, the simpler approach demonstrated below creates a standalone application. You package everything in a single, executable JAR file, driven by a good old Java main() method.

The Spring Initializr created an application class for you. For this simple example, it works without further modification.

 1
 2
 3
 4
 5
 6
 7
 8
 9
10
11
12
package com.example.batchprocessing;

import org.springframework.boot.SpringApplication;
import org.springframework.boot.autoconfigure.SpringBootApplication;

@SpringBootApplication
public class BatchProcessingApplication {

  public static void main(String[] args) throws Exception {
    System.exit(SpringApplication.exit(SpringApplication.run(BatchProcessingApplication.class, args)));
  }
}

@SpringBootApplication is a convenience annotation that adds all of the following:

  • @Configuration: Tags the class as a source of bean definitions for the application context.
  • @EnableAutoConfiguration: Tells Spring Boot to start adding beans based on classpath settings, other beans, and various property settings. For example, if spring-webmvc is on the classpath, this annotation flags the application as a web application and activates key behaviors, such as setting up a DispatcherServlet.
  • @ComponentScan: Tells Spring to look for other components, configurations, and services in the com/example package, letting it find the controllers.

The main() method uses Spring Boot’s SpringApplication.run() method to launch an application. Did you notice that there was not a single line of XML? There is no web.xml file, either. This web application is 100% pure Java and you did not have to deal with configuring any plumbing or infrastructure.

Note that SpringApplication.exit() and System.exit() ensure that the JVM exits upon job completion. See the Application Exit section in Spring Boot Reference documentation for more details.

For demonstration purposes, there is code to create a JdbcTemplate, query the database, and print out the names of people the batch job inserts.
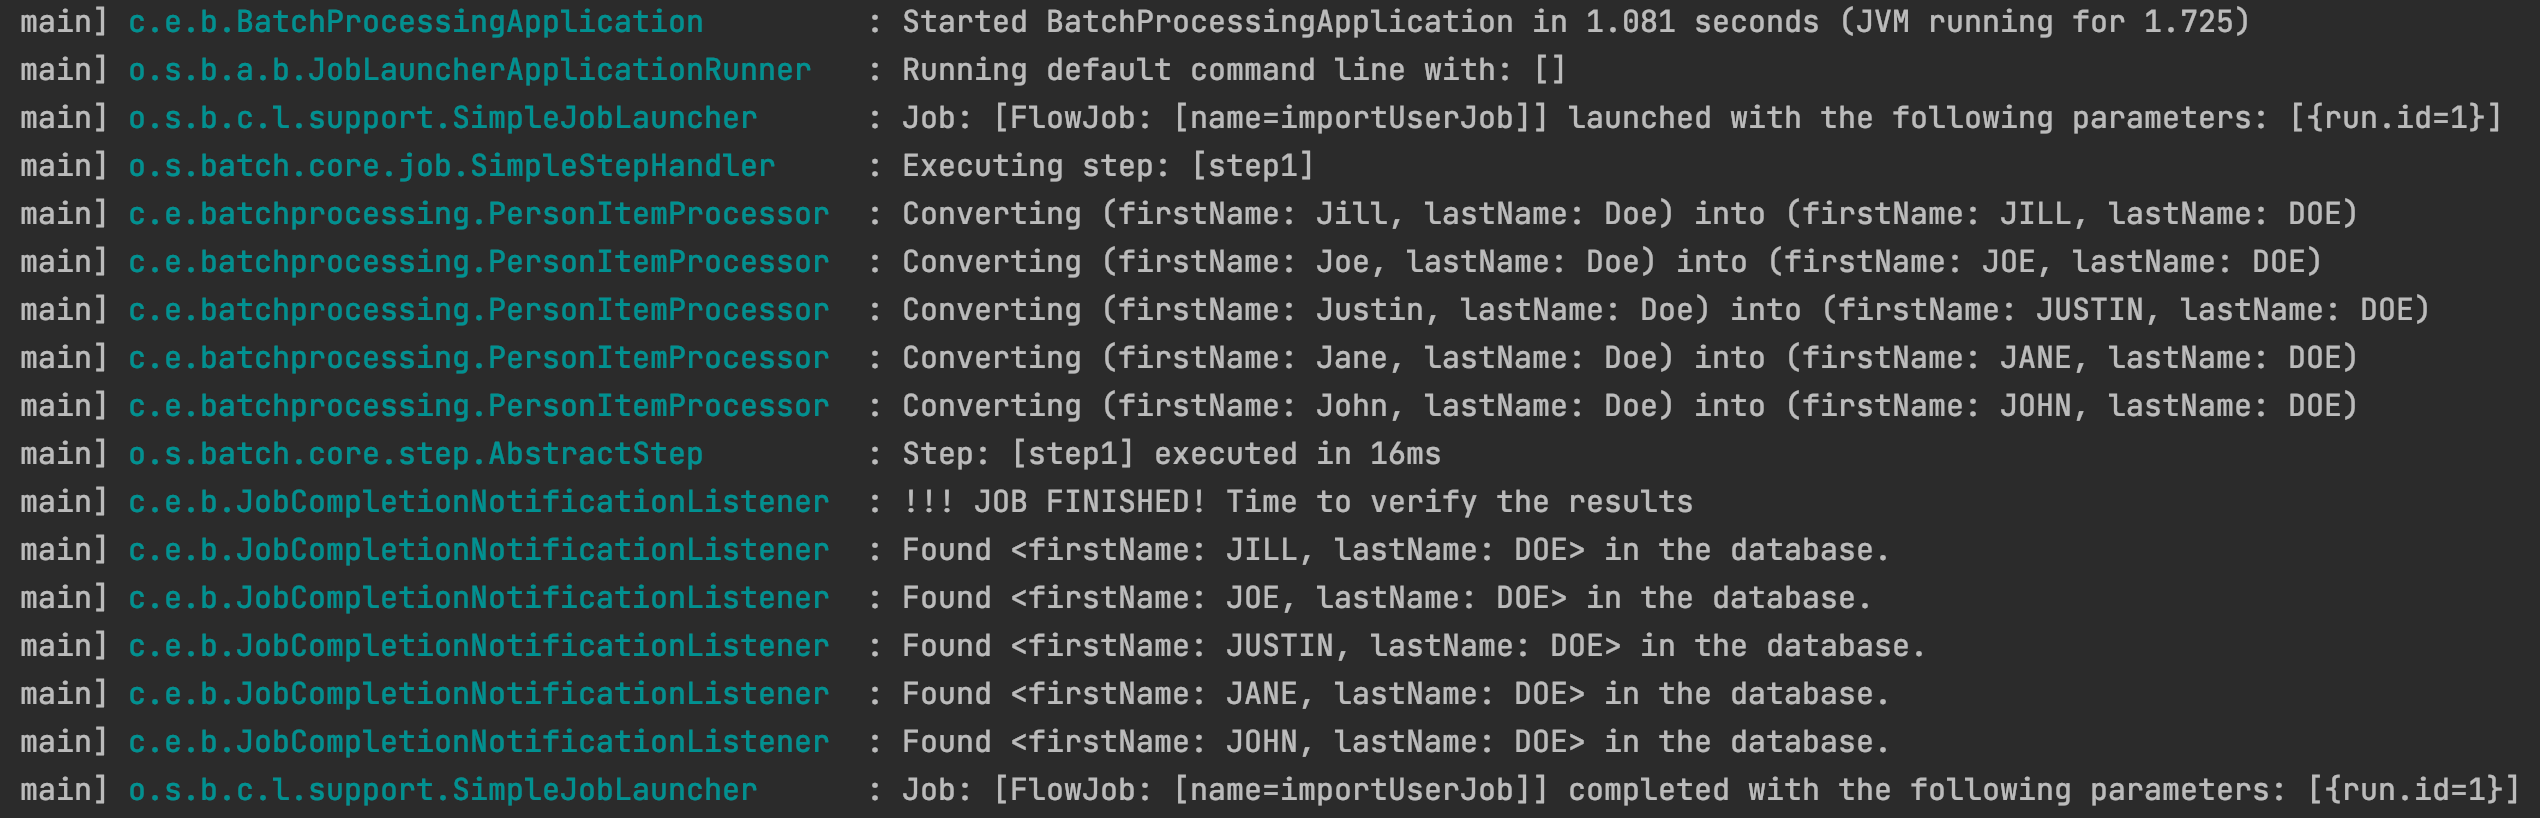
运行结果:

spring-batch

Summary

Congratulations! You built a batch job that ingested data from a spreadsheet, processed it, and wrote it to a database.